4. AutoStub Features
The AutoStub homepage is displayed as shown below. This is the core AutoStub page where you can create mocks. Here you can upload swagger/wsdl files and generate mock data. Swagger files can have JSON or YAML extension.
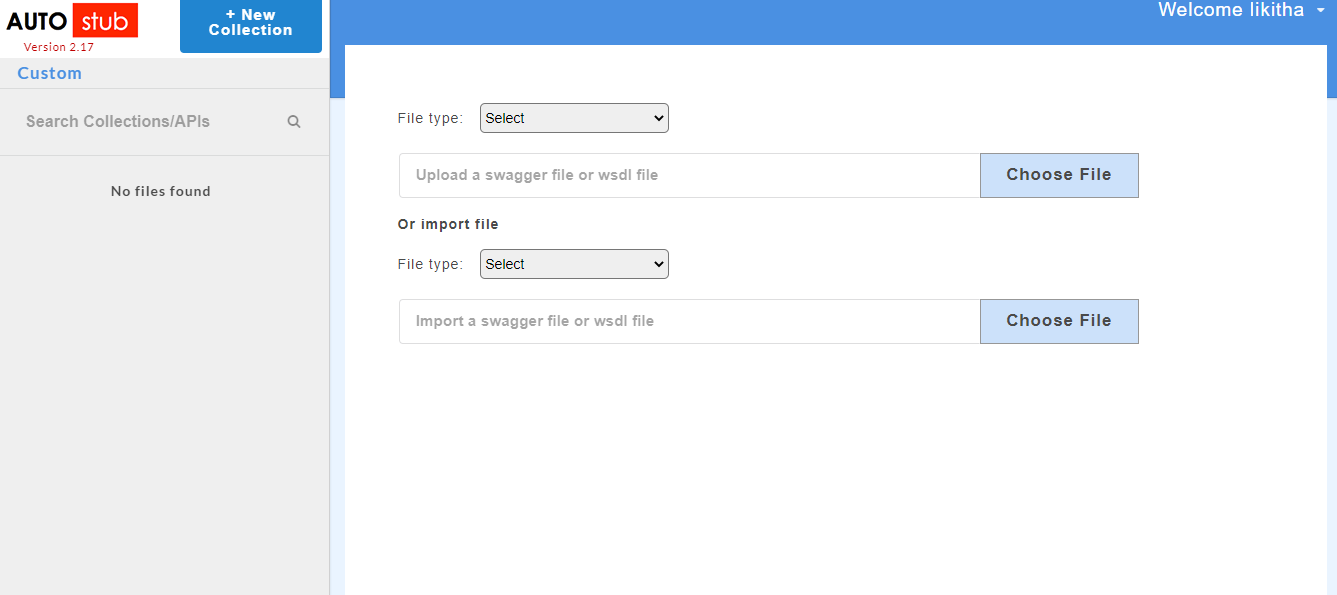
Fig. 4.1 Upload Specs
4.1. Service panel
Once the swagger/wsdl services are added, they will be displayed on the service panel on the left of the page. The service panel displays a list of all services/projects (both swagger and wsdl) that have been uploaded in the application.
Note
Upload Specs page will not be visible to Super Admin as they cannot generate mock data.
4.2. File Upload
AutoStub allows users to upload the files in following formats in order to generate the data:
- Swagger/Zip Files
- WSDL/Zip Files
Note
- AutoStub supports multiple reference json/yaml files with a master swagger file upload. Compress the files to a zip file to perform multi reference upload.
- AutoStub supports multiple reference xsd files with a master wsdl file upload. Compress the files to a zip file to perform multi reference upload.
4.2.1. Swagger Service File Upload
4.2.1.1. About Swagger Specification Files
AutoStub supports both Swagger 2.0 and Swagger 3.0 specification files.
Users can define the minimum length and maximum length parameters in the Swagger 2.0/3.0 specification file. If the minimum and maximum length is defined for parameters, the array of object with min and max length of data will be generated.
If a swagger 2.0/3.0 specification file has parameter formats like float, date, datetime, timestamp and int64, it will be supported in the request/response of the particular schema having those formats. Mock data will be generated based on the parameter format in the specification file.
If a swagger 2.0/3.0 specification file has parameter patterns like A^&*a, those will be supported in the request/response of the particular schema having those patterns. If patterns are defined for particular properties Faker functions cannot be attached. Note that the pattern keyword in the specs allows user to define a regular expression template for the string value. Only the values that match this template will be accepted. Regular expressions are case-sensitive, that is, [a-z] and [A-Z] are different expressions. Example: ‘^d{3}-d{2}-d{4}$’
In swagger 3.0 specification files, users can define entire nesting object with key and value pairs as a request and response payload. An example is given below:
content:

application/xml:

schema:

$ref: '#/components/schemas/xml'

examples:

xml:

summary: A sample XML response

value: '<objects><object><id>1</id><name>new</name></object><object><id>2</id></object></objects>'

text/html:

schema:

type: string

examples:

html:

summary: A list containing two items

value: '<html><body><ul><li>item 1</li><li>item 2</li></ul></body></html>'
Swagger 3.0 specification files support user-specific media types for both JSON and XML content types, for example:
application/vnd.mycompany.myapp.v2+json,application/vnd.openstreetmap.data+xml,application/vnd.github-issue.text+json.requestBody: content: application/thbs+json: schema: $ref: "#/components/schemas/FHIR-JSON-RESOURCE" example: "{\n \"resourceType\": \"Parameters\",\n \"parameter\": [ {\n\ \ \"name\": \"operation\",\n \"part\": [ {\n \"name\": \"\ type\",\n \"valueString\": \"add\"\n }, {\n \"name\": \"\ path\",\n \"valueString\": \"Patient\"\n }, {\n \"name\"\ : \"name\",\n \"valueString\": \"birthDate\"\n }, {\n \"\ name\": \"value\",\n \"valueDate\": \"1930-01-01\"\n } ]\n \ \ } ]\n}" application/thbs+xml: schema: $ref: "#/components/schemas/FHIR-XML-RESOURCE" example: "<Parameters xmlns=\"http://hl7.org/fhir\">\n <parameter>\n\ \ <name value=\"operation\"/>\n <part>\n <name value=\"\ type\"/>\n <valueString value=\"add\"/>\n </part>\n \ \ <part>\n <name value=\"path\"/>\n <valueString value=\"\ Patient\"/>\n </part>\n <part>\n <name value=\"name\"\ />\n <valueString value=\"birthDate\"/>\n </part>\n \ \ <part>\n <name value=\"value\"/>\n <valueDate value=\"\ 1930-01-01\"/>\n </part>\n </parameter>\n</Parameters>"In swagger 3.0 specification files, users can use the
readOnlyandwriteOnlyboolean attributes to mark specific properties as read-only or write-only in the specs file.
A
readOnlyproperty can only be sent as part of a response and CANNOT be sent as part of the request. If the property is marked asreadOnlybeingtrueand is in therequiredlist, therequiredwill take effect on the response only. A read-only field cannot be modified.A
writeOnlyproperty can only be sent as part of a request and CANNOT be sent as part of the response. If the property is marked aswriteOnlybeingtrueand is in therequiredlist, therequiredwill take effect on the request only. A write-only field may be modified.A property MUST NOT be marked as both
readOnlyandwriteOnlybeing true. Default value isfalse.For example, when GET returns more properties than used in POST, you can use the same schema in both GET and POST and mark the extra properties as
readOnly.type: object properties: id: # Returned by GET, not used in POST/PUT/PATCH type: integer readOnly: true username: type: string password: # Used in POST/PUT/PATCH, not returned by GET type: string writeOnly: true
Fig. 4.2 readOnly and writeOnly in response and request respectively
- Swagger 3.0 specifications files provides support for several keywords which you can use to combine schemas. You can use these keywords to create a complex schema, or validate a value against multiple criteria.
oneOf– validates the value against exactly one of the subschemasExample:
paths:

/pets:

patch:

requestBody:

content:

application/json:

schema:

oneOf:

- $ref: '#/components/schemas/Cat'

- $ref: '#/components/schemas/Dog'

responses:

'200':

description: Updated
Fig. 4.3 oneOf
allOf– validates the value against all the subschemasExample :
Dog: # "Dog" is a value for the pet_type property (the discriminator value)

allOf: # Combines the main `Pet` schema with `Dog`-specific properties

- $ref: '#/components/schemas/Pet'

- type: object

# all other properties specific to a `Dog`

properties:

bark:

type: boolean

breed:

type: string

enum: [Dingo, Husky, Retriever, Shepherd]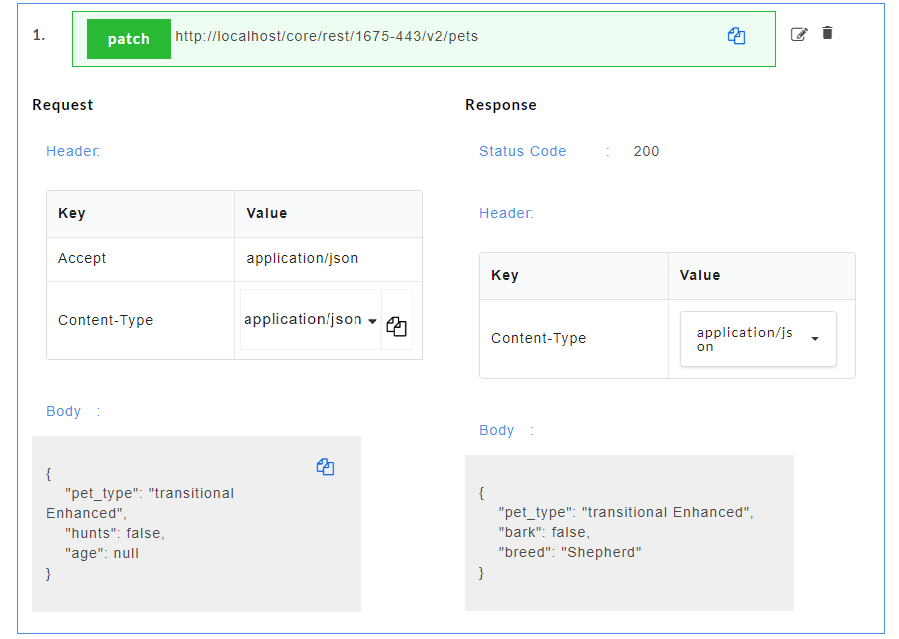
Fig. 4.4 allOf
anyOf– validates the value against any (one or more) of the subschemasExample:
 paths:

/pets:

patch:

requestBody:

 content:

application/json:

schema:

anyOf:

- $ref: '#/components/schemas/PetByAge'

- $ref: '#/components/schemas/PetByType'

responses:

'200':

description: Updated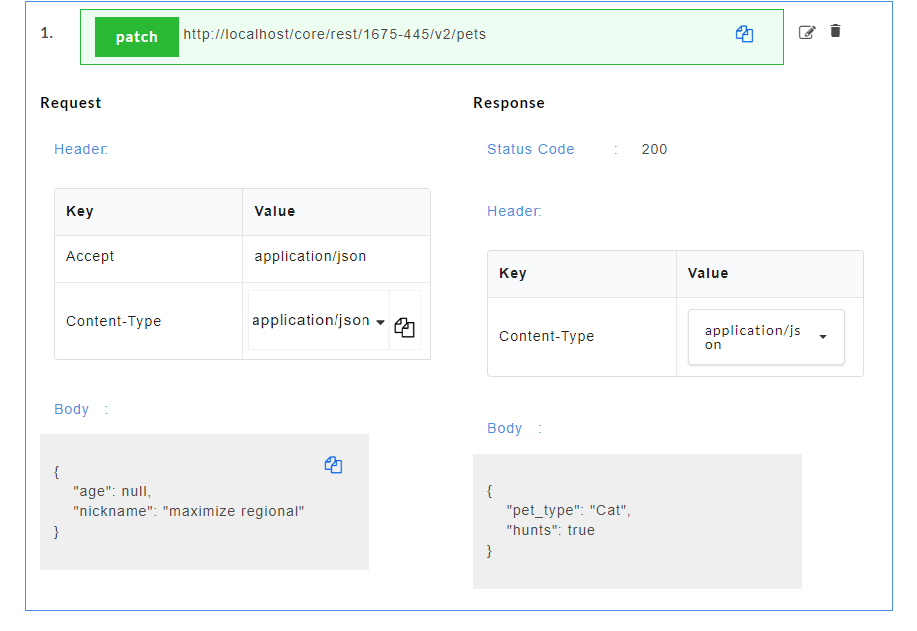
Fig. 4.5 anyOf
not- used to make sure the value is not valid against the specified schema.Example:components: schemas: PetByType: type: object properties: pet_type: not: type: integer required: - pet_type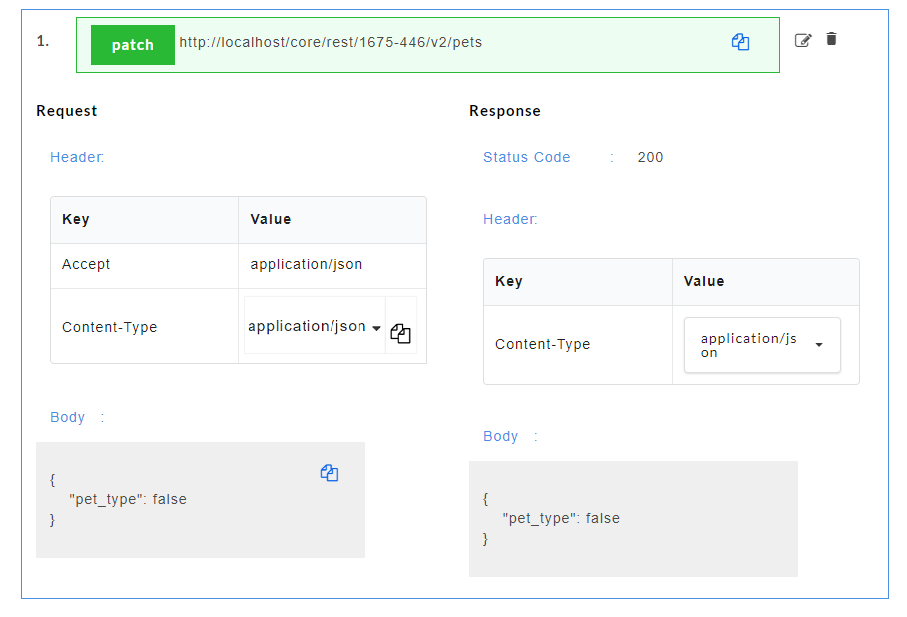
Fig. 4.6 not
- Users can provide support for security headers in Swagger files.
OpenAPI 3.0 lets users describe APIs protected using the following security schemes:
HTTP authentication schemes
- Basic
- Bearer
API Keys in headers, query string or cookies.
- Cookie authentication
oAuth2
- AutoStub provides OAuth 2.0 support in Swagger 3.0 that gives an API client limited access to user data on a web server.
The supported Grant Types are:
Implicit
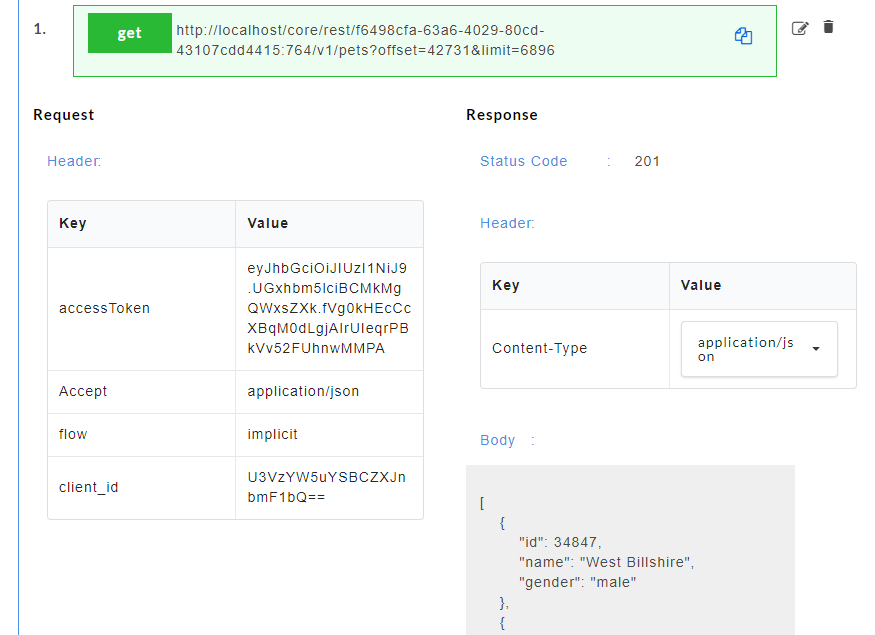
Fig. 4.7 Implicit
Resource owner password credentials (or just password)
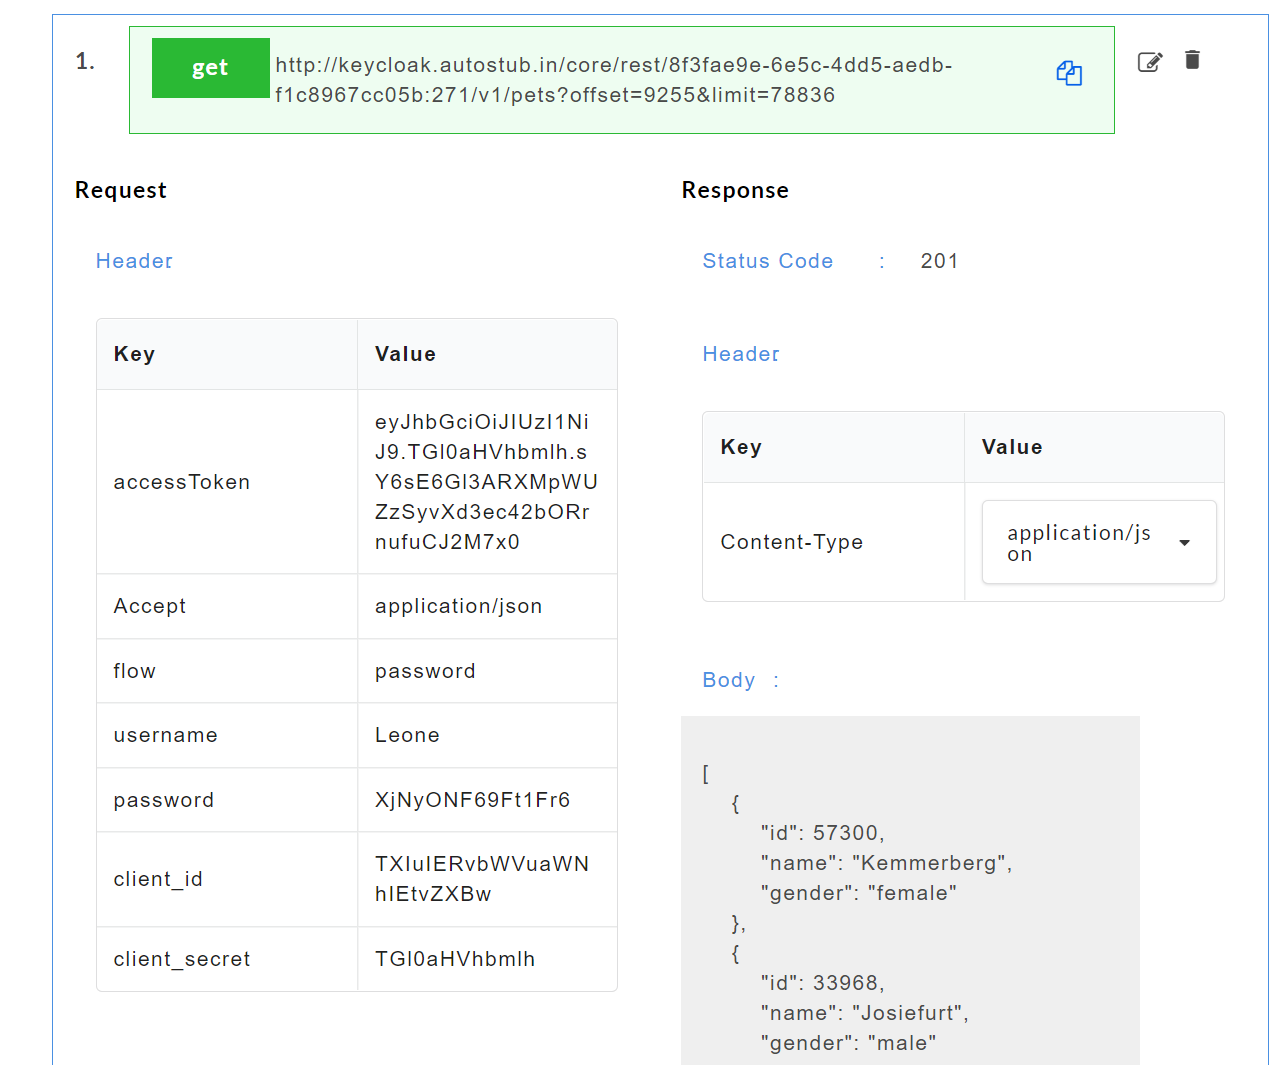
Fig. 4.8 Password
Client Credentials
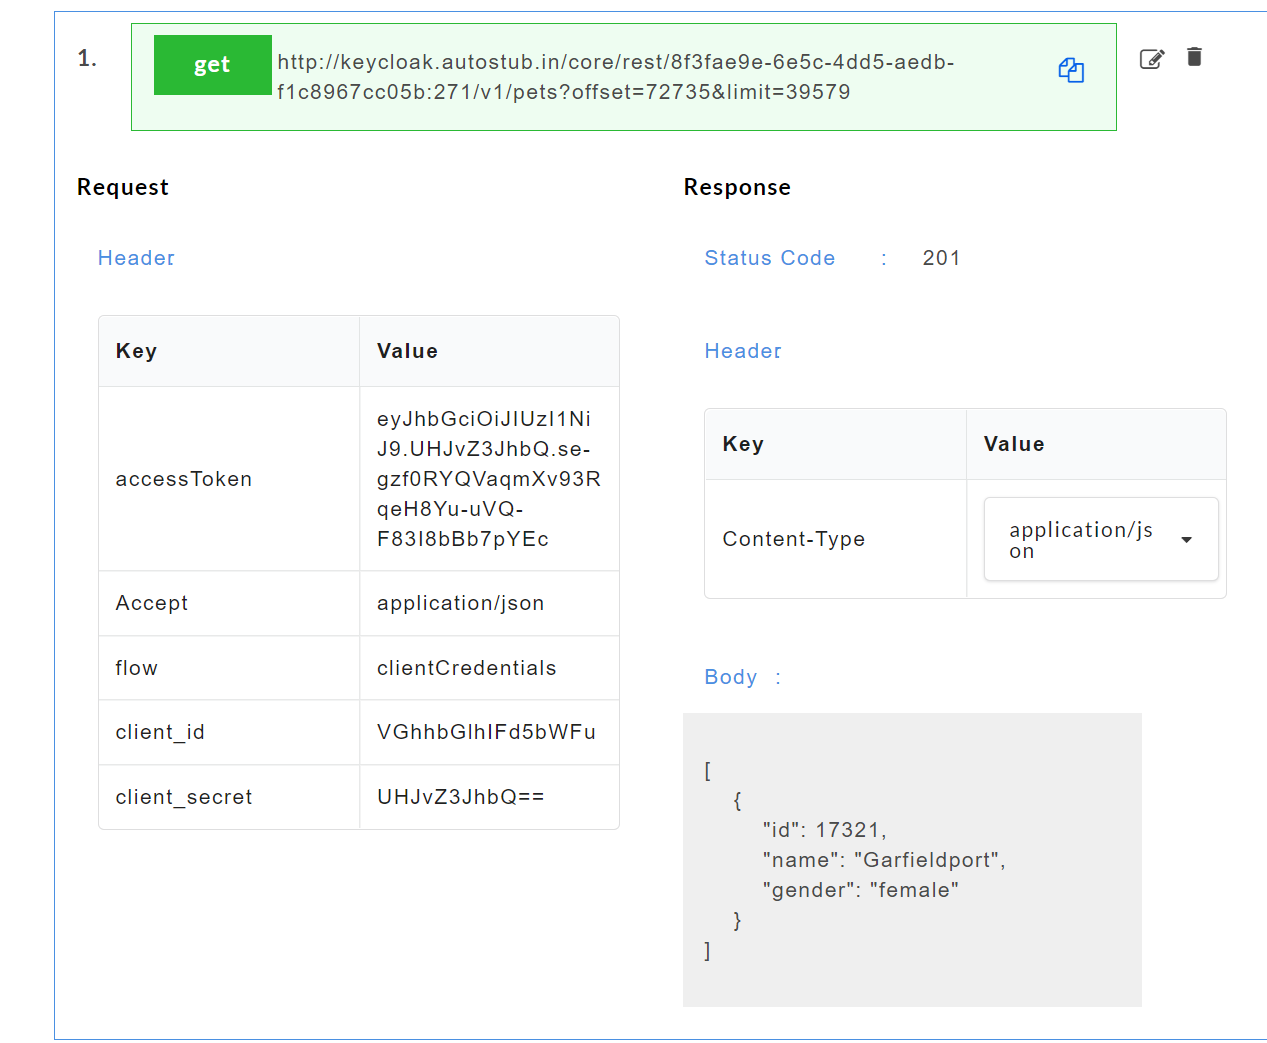
Fig. 4.9 Client Credentials
AutoStub supports Parameter Serialization in Swagger 3.0.
Serialization is the process of translating object states or data structures into a format that can be communicated and later reconstructed. The operation parameters (path, query, header, and cookie) in OpenAPI 3.0 support arrays and objects, and you can specify how these parameters should be serialized.
The
styleandexplodekeywords specify the serialisation mechanism.
styledefines how multiple values are delimited. The location of the parameter (path, query, header, or cookie) determines the potential styles.explode(true or false) determines whether arrays and objects should produce distinct parameters for each array item or object property.The supported parameter types are:
- Query Parameters
Query Parameters support the following
stylevalues:
- form – (default) ampersand-separated values, also known as form-style query expansion. Corresponds to the URI template
{?param_name}- spaceDelimited - space-separated array values. Same as
collectionFormat: ssvin OpenAPI 2.0. Only applies to non-exploded arrays (explode: false)that is, the space separates the array values if the array is a single parameter,as inarr=a b c.- pipeDelimited - pipeline-separated array values. Same as
collectionFormat: pipesin OpenAPI 2.0. Only applies to non-exploded arrays (explode: false),that is, the pipe separates the array values if the array is a single parameter, as inarr=a|b|c.- deepObject - simple non-nested objects are serialised as
paramName[prop1]=value1¶mName[prop2]=value2&...The behavior for nested objects and arrays is not defined.
4.2.1.2. Upload a Single Swagger File
- From the File Type drop-down, select option Swagger/zip file.
- Click Choose File to upload a Swagger 2.0/ 3.0 specification file stored locally on your computer.
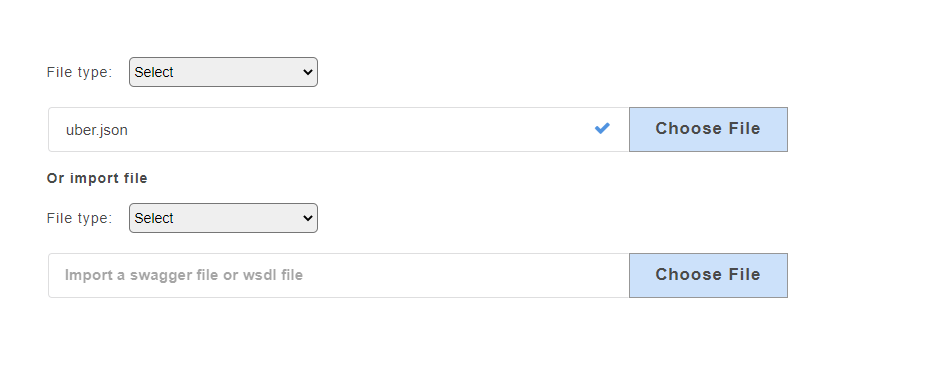
Fig. 4.10 Single Swagger File Upload
- Click Submit. The added swagger service will be displayed on the service panel on the left.

Fig. 4.11 Single Swagger File
4.2.1.3. Upload a Swagger Zip File
Upload a compressed file that contains .json file or .yaml file and its dependencies. When a user uploads a zip file, a drop-down will appear that will display the swagger master file with the extension .json or .yaml.
To demonstrate the swagger zip file upload, we have considered a zip file named external_ref.zip which contains the master swagger.json.
- From the File Type drop-down, select option Swagger/zip file.
- Click Choose File to upload a zip file.
- On uploading the zip file, a drop-down appears. Select the master file
swagger.json.
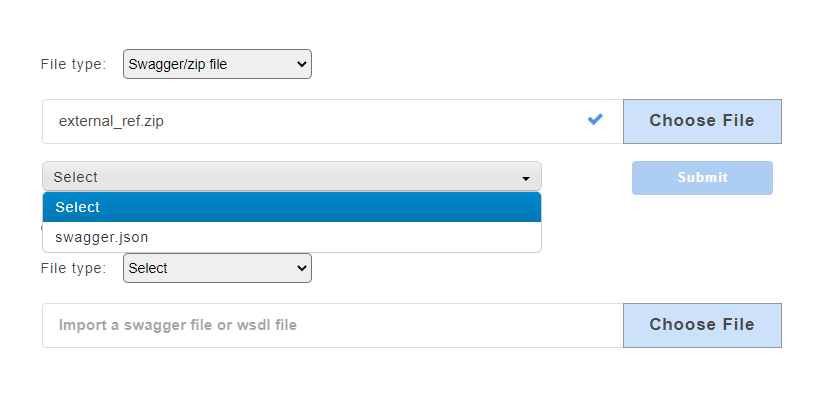
Fig. 4.12 Zip Swagger File Upload
Note
You can upload multiple reference swagger files.
- Click Submit. The added service will be displayed on the service panel on the left.
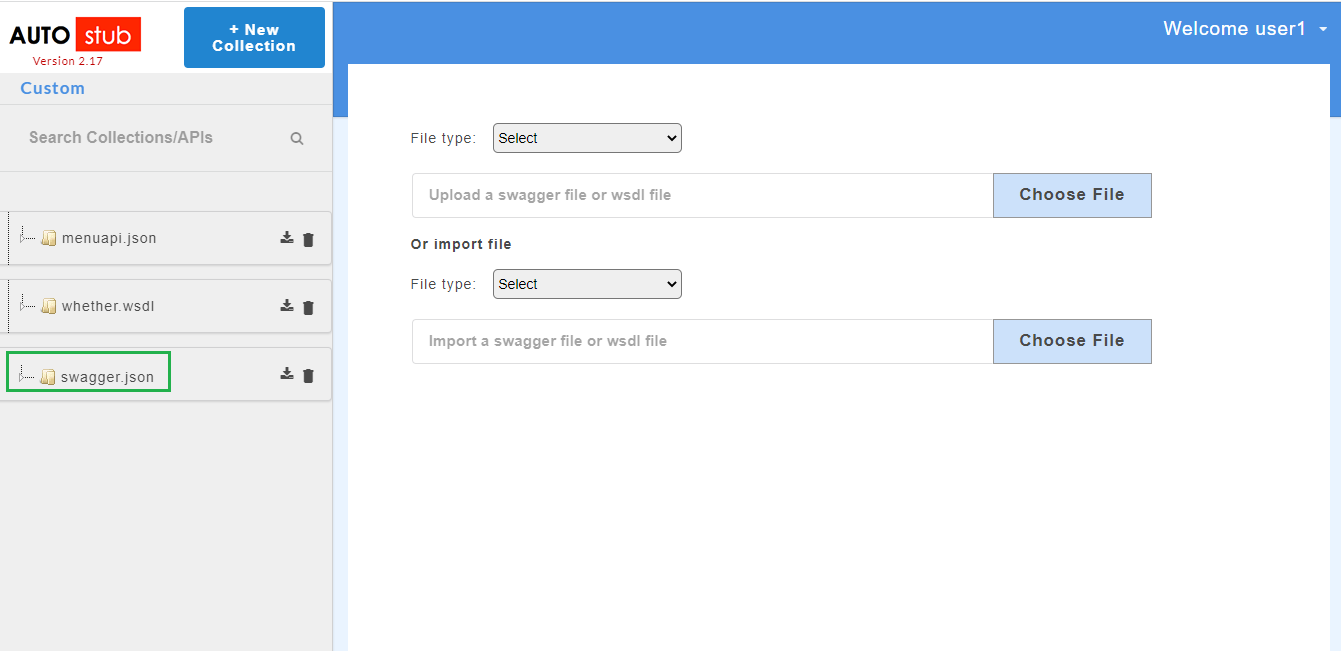
Fig. 4.13 Zip Swagger Service
Click on a service/project name.
Click the drop-down
 to display the list of resources under that service. You can further drop-down to display the http methods such as POST, GET etc. In the below image,
 swagger.jsonis the service name,/petsis the resource name andgetandpostare the http methods.
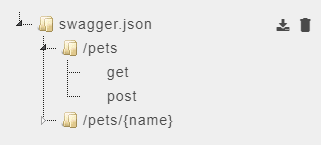
Fig. 4.14 Resource Name and Methods
- Click the delete icon
corresponding to the service name, to delete the service.
- Click the export icon
corresponding to the service name, to export the swagger service. The exported file will be downloaded in a zip format. The zip will include the swagger specification file and the swagger config data file.
Note
If the swagger service is exported after mock data generation, the exported zip file will inlcude swagger specification file and another file having both swagger config data and mock data.
- On successful upload of swagger files, click the service name to display request and response parameters on the Config Data page.
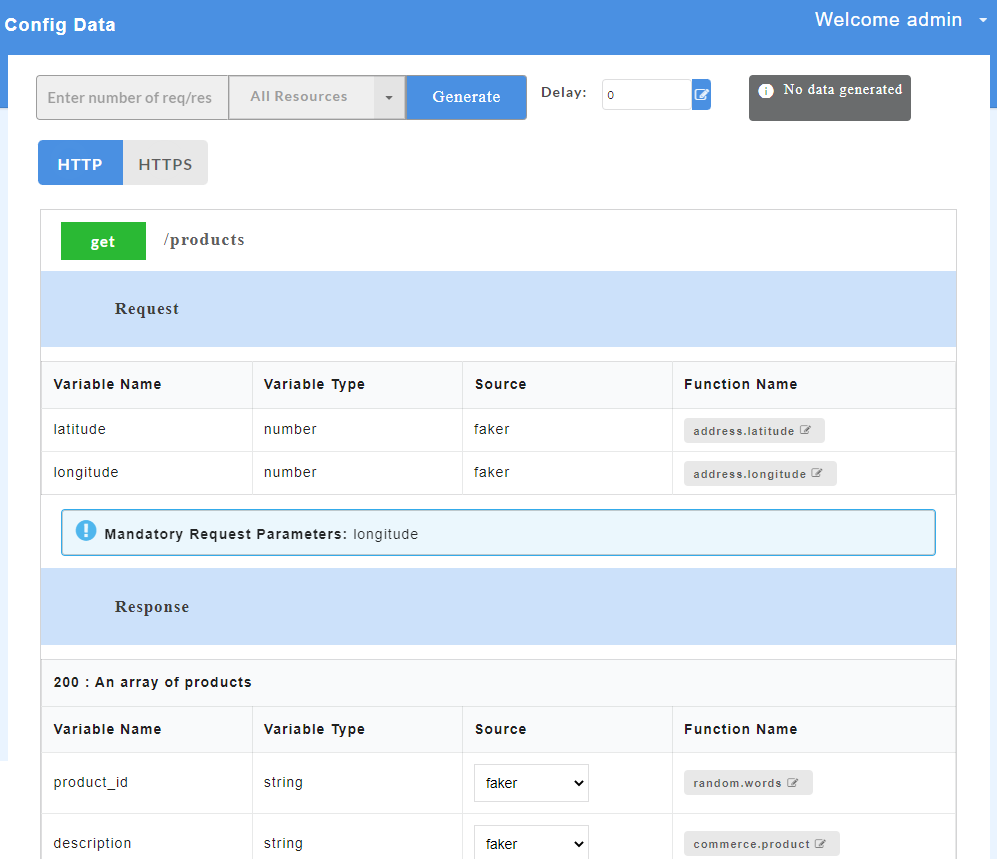
Fig. 4.15 Request and Response Parameters for Swagger
- To view all the request and response parameters, scroll to the end of the Config Data page. The request and response parameters consists of Variable Name, Variable Type, Source and Function Name.
The table below describes each field in detail.
| Request/Response fields | Description |
|---|---|
| Variable Name | Refers to the attribute name contained in the uploaded service file |
| Variable Type | Type of the variable |
| Source | Refers to the source of generating the mock data |
| Function Name | Refers to the function associated with the attribute name. |
Note
Mandatory request parameters for swagger are mentioned on the Config Data page. During API consumption in third-party tool, user needs to pass the mandatory paramters in order to generate the data.
On the Config Data page, for each method, the response code that will be returned by the server is also displayed. The user has to define a default status code (wherever applicable) before data generation.
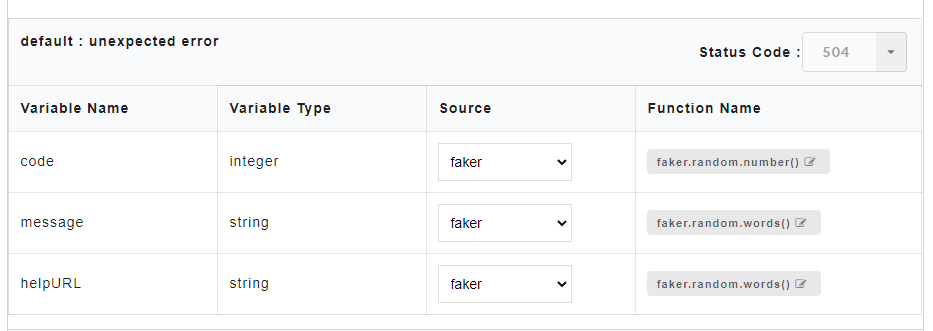
Fig. 4.16 Sample Default Status Code Before Data Generation
Default status code allows the user to define a common structure for a status code. Status code can either be a success code or an error code. Once the default status code is defined, irrespective of any action performed by the user, the system will throw this default status code after data generation. The default status code (wherever applicable) will be displayed along with other response codes.
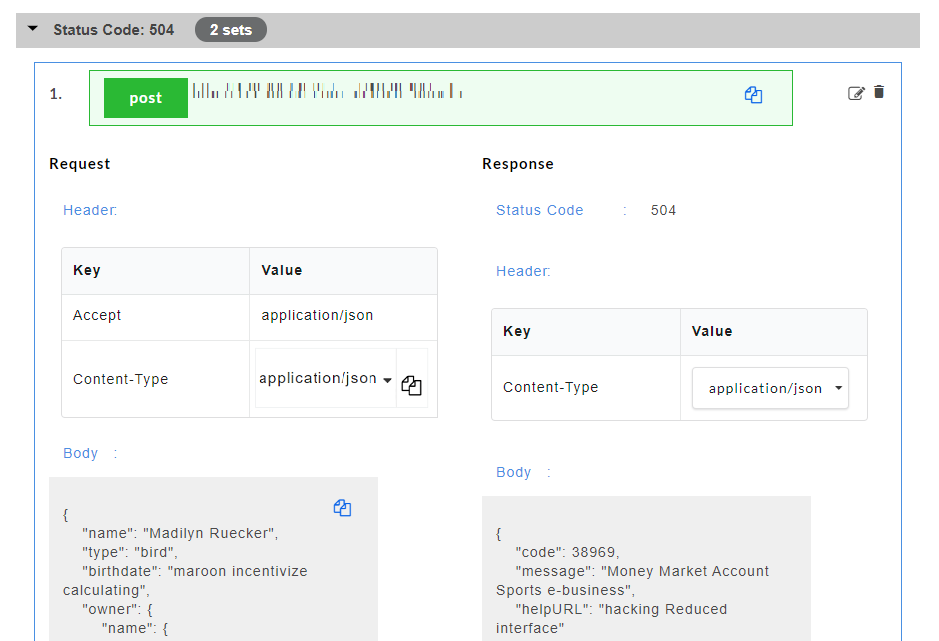
Fig. 4.17 Sample Default Status Code After Data Generation
Note
Default status codes are not http status codes.
4.2.1.4. Import a Single Swagger File
- From the Import File drop-down, select option Swagger file.
- Click Choose File to upload a Swagger 2.0/ 3.0 specification file stored locally on your computer. This file will include both swagger mock data and config data.
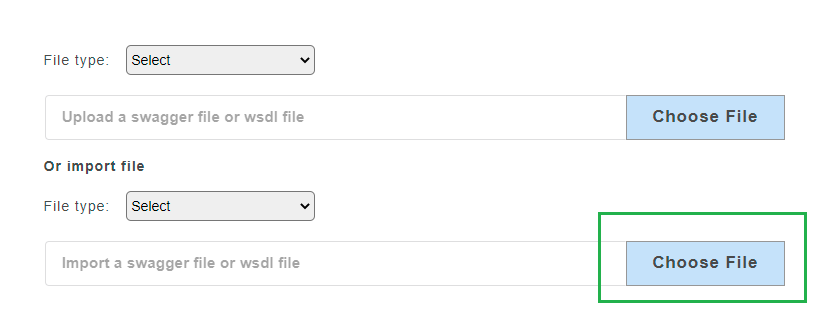
Fig. 4.18 Single Swagger File Import
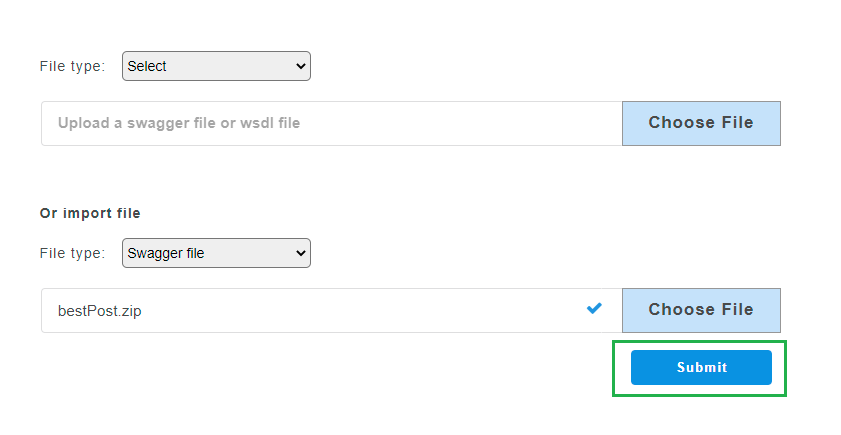
Fig. 4.19 Submit
- Click Submit. After confirmation, an Import Files dialog box displays.
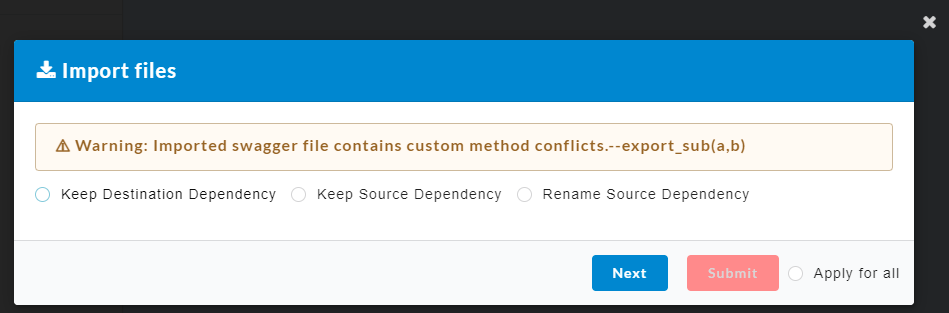
Fig. 4.20 Import dialog box
A conflict will arise if same custom methods are present in both the imported file (source) as well as the application (destination).
- Keep Destination Dependency: The custom methods present in the destination will be retained and the ones present in the source will be deleted.
- Keep Source Dependency: The custom methods present in the source will be retained and the ones present in the destination will be deleted.
- Rename Source Dependency: The custom methods present in the source can be renamed and retained.
- Click the radio button to select any of the above options.
- For Rename Source Dependency, enter a tag for the custom method.
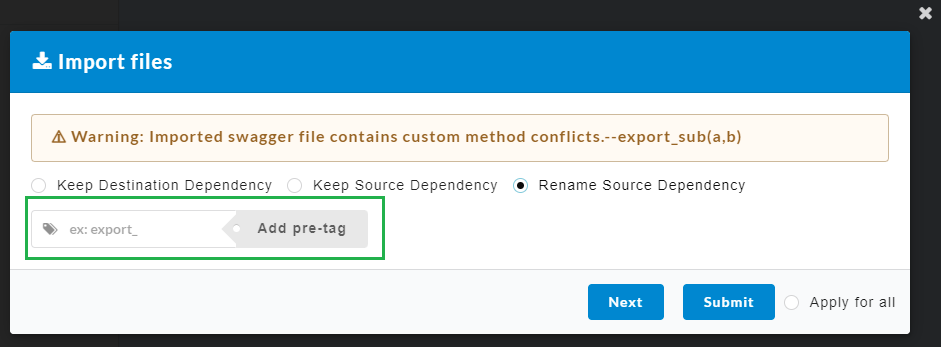
Fig. 4.21 Rename Source Dependency
- Click Next to navigate to the next custom method and repeat the process or click Apply for all to apply the same selection to all custom methods.
- Finally click Submit. The imported file will be displayed as shown below.
Fig. 4.22 Submit
- Click Submit. The added swagger service will be displayed on the service panel on the left.

Fig. 4.23 Imported swagger file
4.2.2. WSDL Service File Upload
4.2.2.1. Upload a Single WSDL File
- From the File Type drop-down, select option WSDL/zip file.
- Click Choose File to upload WSDL file stored locally on your computer.
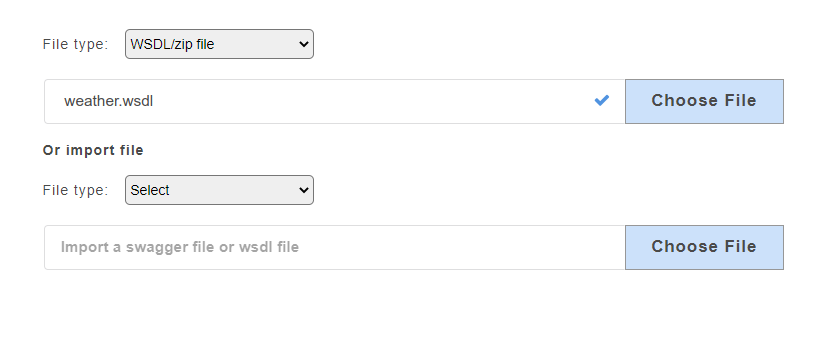
Fig. 4.24 Single WSDL File Upload
- Click Submit. The added wsdl service will be displayed on the service panel on the left.
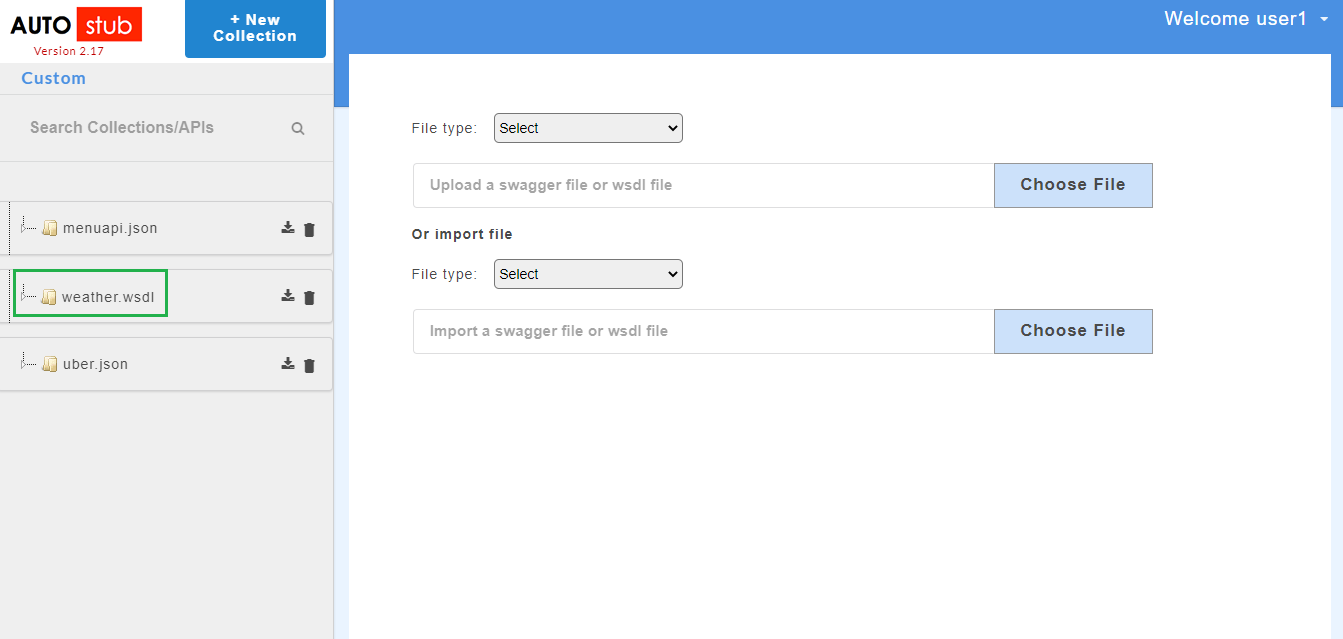
Fig. 4.25 Single WSDL File
4.2.2.2. Upload a WSDL Zip File
Upload a compressed file that contains .wsdl file and its dependencies. When a user uploads a zip file, a drop-down will appear that will display the wsdl master file with the extension .wsdl.
To demonstrate the wsdl zip file upload, we have considered a zip file named manageAccount.zip which contains the master manageaccount_1_0.wsdl file.
- From the File Type drop-down, select option WSDL/zip file.
- Click Choose File to upload a zip file.
- On uploading the zip file, a drop-down appears. Select the master file
manageaccount_1_0.wsdl.
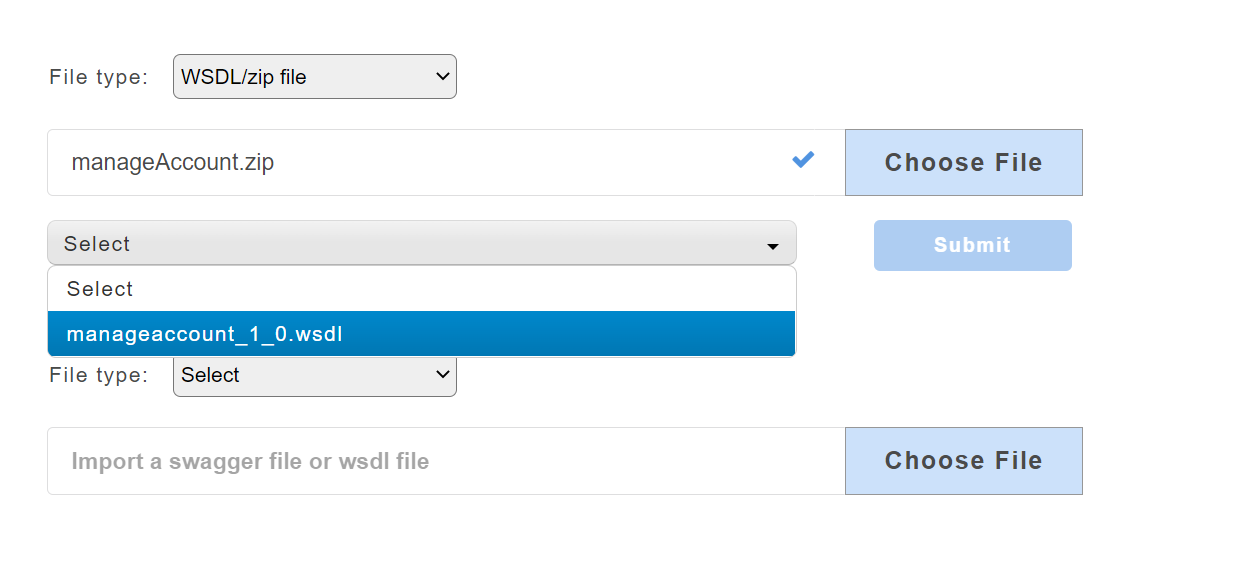
Fig. 4.26 Zip Wsdl File Upload
- Click Submit. The added service will be displayed on the service panel on the left.
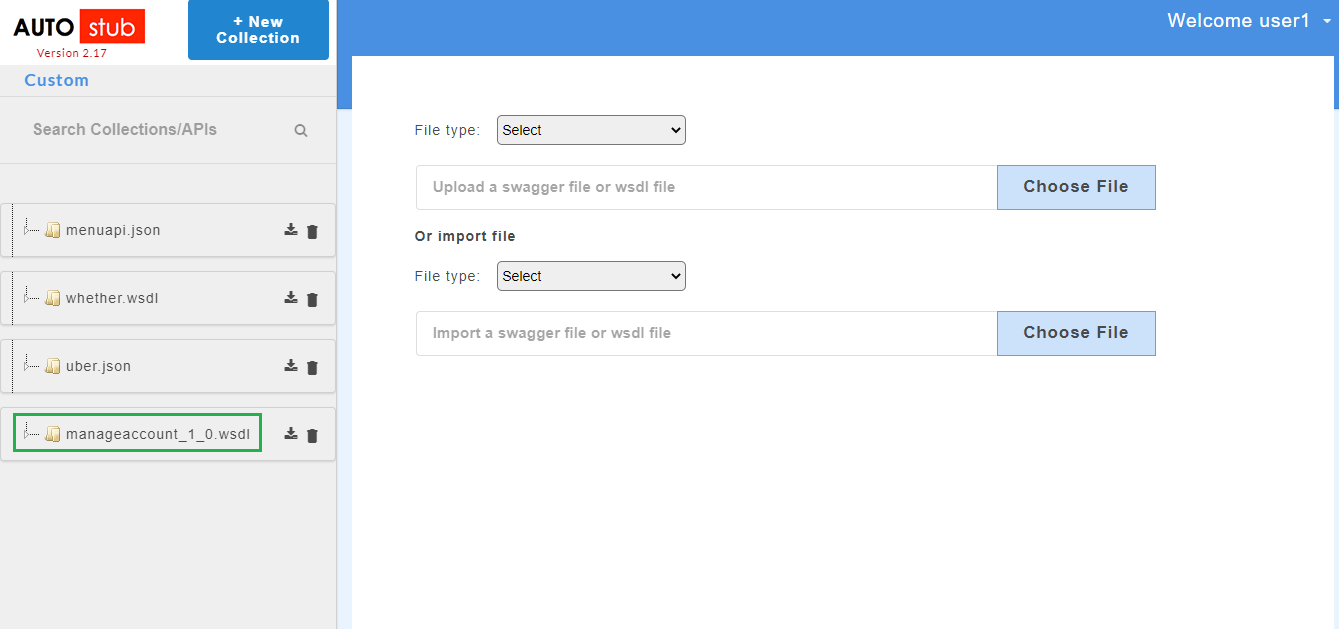
Fig. 4.27 Zip Wsdl Service
- Click on a service/project name.
- Click the drop-down to display the list of resources under that service. In the below image,
manageaccount_1_0.wsdlis the service name,createAccountis the resource name.
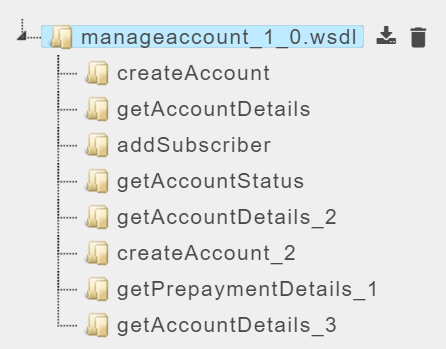
Fig. 4.28 Resource Name
- Click the delete icon
- Click the export icon
Note
If the wsdl service is exported after mock data generation, the exported zip file will inlcude wsdl specification file and another file having both wsdl config data and mock data.
- On successful upload of wsdl files, click the service name to display the request and response parameters on the Config Data page.
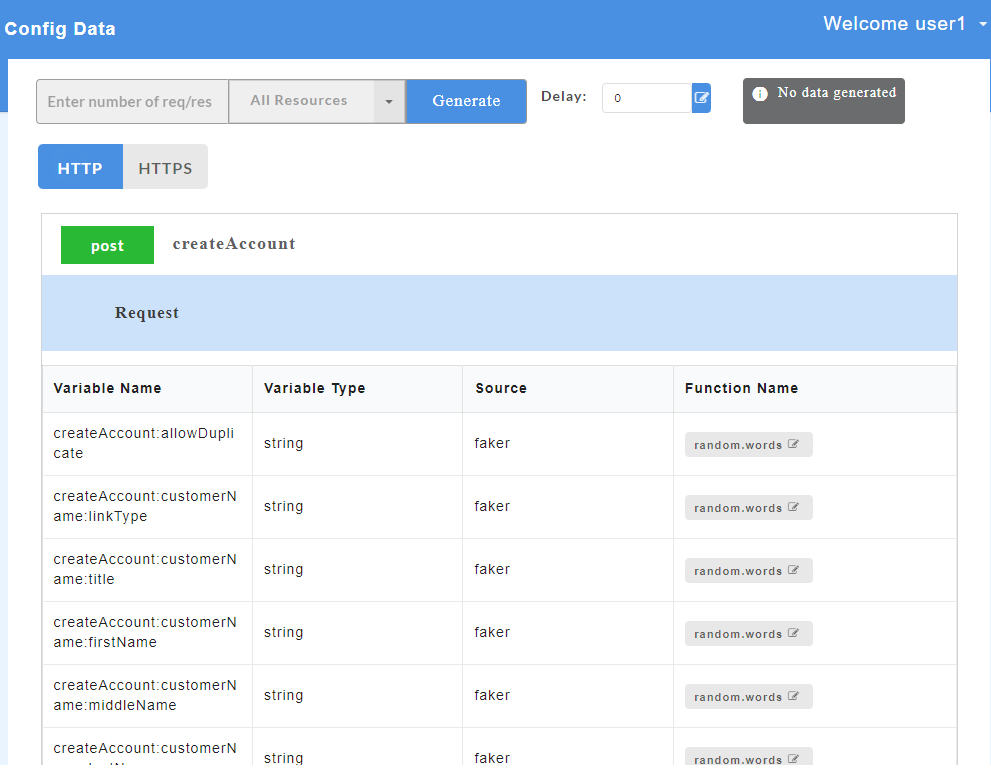
Fig. 4.29 Request and Response Parameters for WSDL
- To view all the request and response parameters, scroll to the end of the Config Data page. The request and response parameters consists of Variable Name, Variable Type, Source and Function Name.
Below table describes each field in detail.
| Request/Response fields | Description |
|---|---|
| Variable Name | Refers to the attribute name contained in the uploaded service file |
| Variable Type | Type of the variable |
| Source | Refers to the source of generating the mock data |
| Function Name | Refers to the function associated with the attribute name |
Note
Mandatory request parameters for wsdl are mentioned on the Config Data page. During API consumption in third-party tool, user needs to pass the mandatory paramters in order to generate the data.
On the Config Data page, for each method, the response code that will be returned by the server is also displayed. The user has to compulsorily define a fault code (wherever applicable) before data generation, otherwise data will not get generated.

Fig. 4.30 Sample Fault Code Before Data Generation
Fault code allows the user to define a common structure for an error code. Once the fault code is defined, irrespective of any action performed by the user, the system will throw this fault code after data generation. The fault code (wherever applicable) will be displayed along with other response codes.
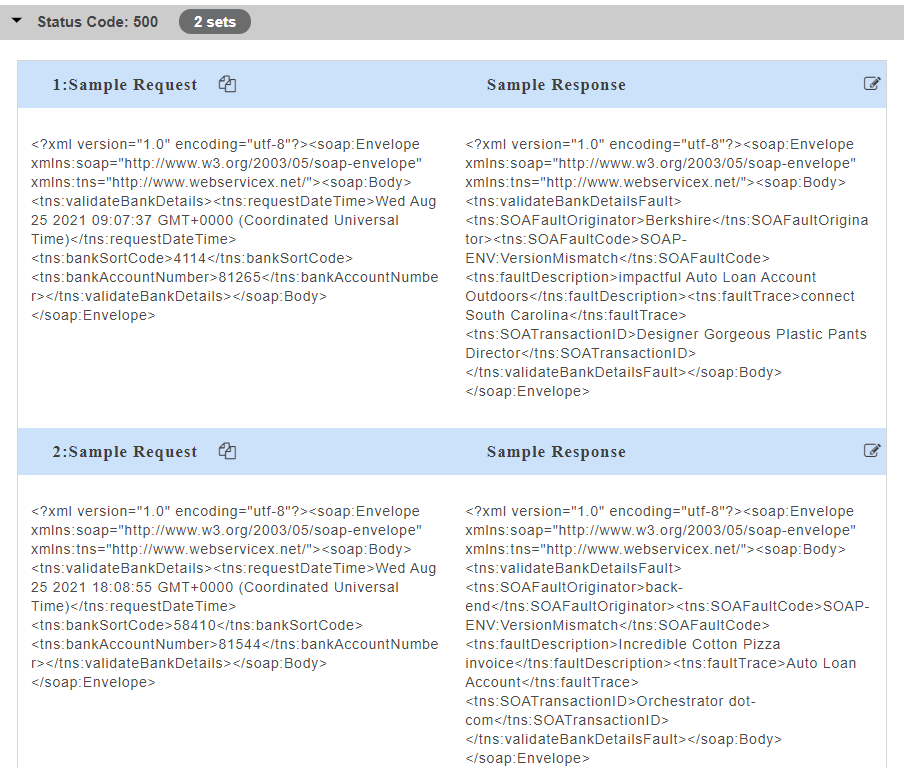
Fig. 4.31 Sample Fault Code Code After Data Generation
4.2.2.3. Import a Single WSDL File
- From the Import File drop-down, select option WSDL file.
- Click Choose File to upload a WSDL file stored locally on your computer. This file will include both wsdl mock data and config data.
Fig. 4.32 Single Wsdl File Import
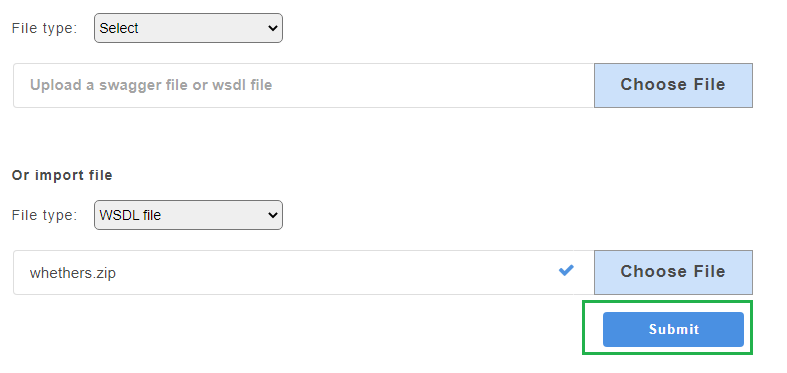
Fig. 4.33 Submit
- Click Submit. After confirmation, an Import Files dialog box displays.
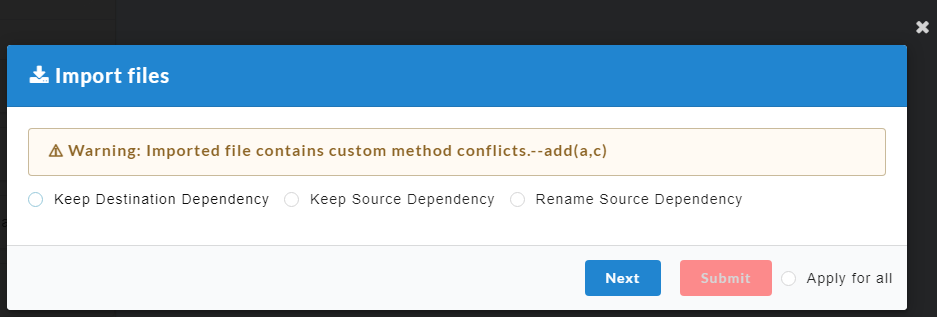
Fig. 4.34 Import dialog box
A conflict will arise if same custom methods are present in both the imported file (source) as well as the application (destination).
- Keep Destination Dependency: The custom methods present in the destination will be retained and the ones present in the source will be deleted.
- Keep Source Dependency: The custom methods present in the source will be retained and the ones present in the destination will be deleted.
- Rename Source Dependency: The custom methods present in the source can be renamed and retained.
- Click the radio button to select any of the above options.
- For Rename Source Dependency, enter a tag for the custom method.
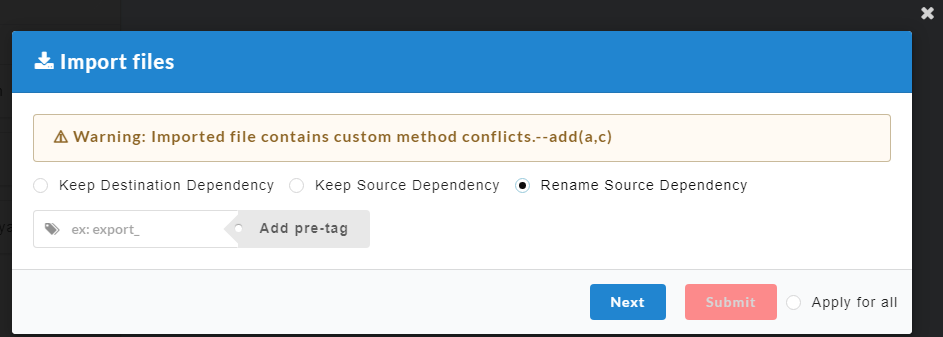
Fig. 4.35 Rename Source Dependency
- Click Next to navigate to the next custom method and repeat the process or click Apply for all to apply the same selection to all custom methods.
- Finally click Submit. The imported file will be displayed as shown below.
Fig. 4.36 Submit
- Click Submit. The added swagger service will be displayed on the service panel on the left.

Fig. 4.37 Imported wsdl file
4.3. Generating Sample Records
4.3.1. Swagger
Mock data (sample request and response) can be generated at service, resource and method level. Users can generate mock data either for all resources or selective resources, and all methods or a selective methods.
Generating Mock Data at Service Level
At service level, mock data is generated for the entire service, i.e for all resources.
- To generate mock data at service level, click the required service name on the service panel.
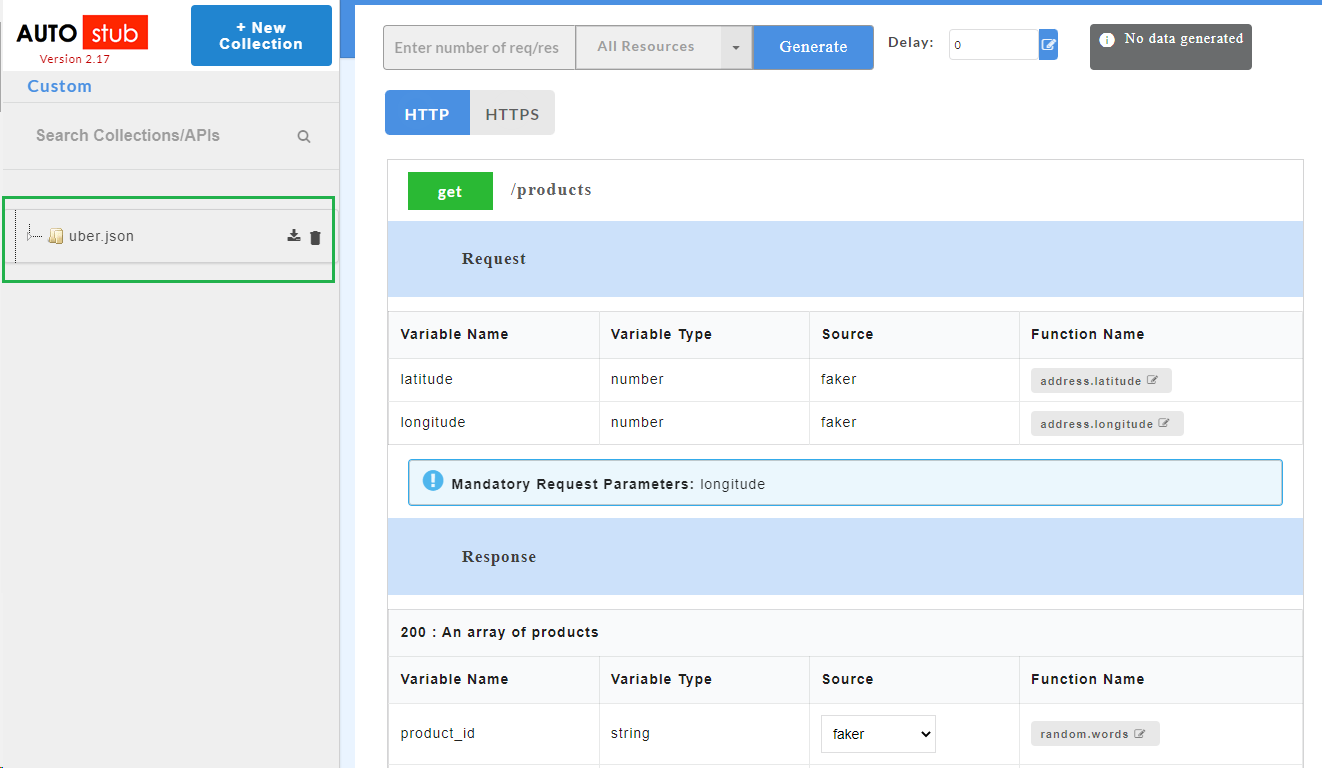
Fig. 4.38 Service Panel
- Click to select HTTP or HTTPS protocol. If you select HTTP the data will be generated with http protocol during data generation. If you select HTTPS, a message displays asking you to setup SSL certificate on the proxy server.
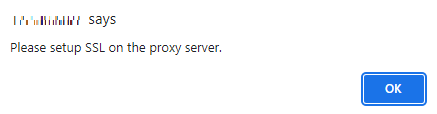
Fig. 4.39 SSL alert
Note
Data with HTTPS protocol can only be generated with SSL certificate. SSL certificate needs to be setup from the backend. If the system does not have an SSL certificate, data will be generated with HTTP protocol by default.
- In the Enter number of request/response need to generate box, enter the number of sample records of swagger mock data that you wish to generate.
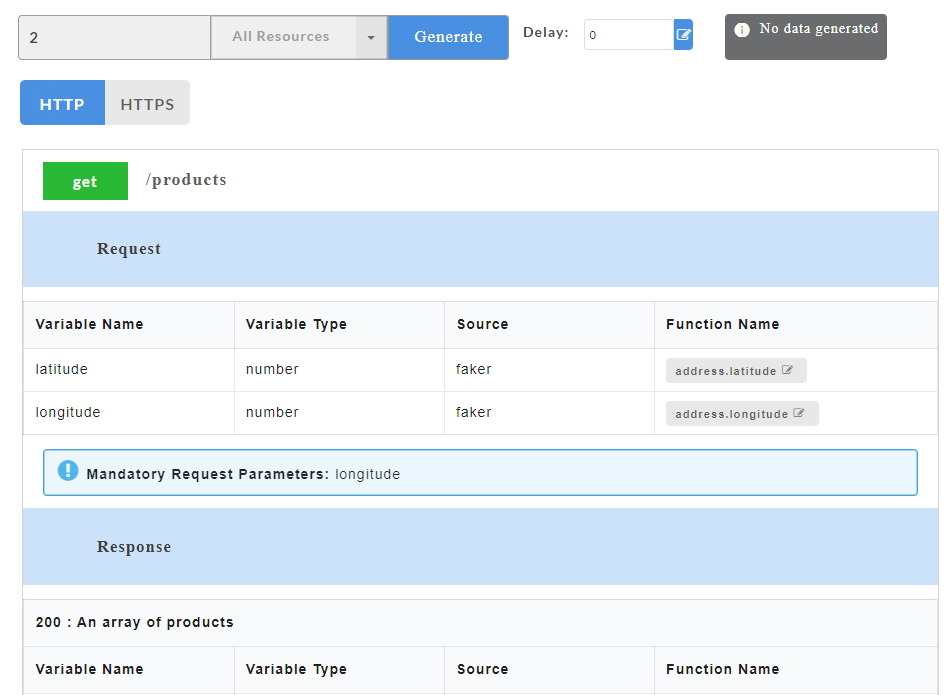
Fig. 4.40 Service Level Data Generation
- If swagger file contains default response, data will not be generated unless default status codes (wherever applicable) is defined.
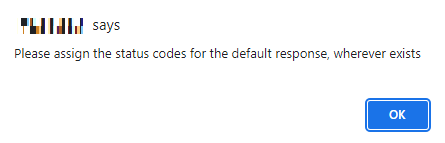
Fig. 4.41 Default code alert
- To define a default status code, from the Status Code drop-down, select the required status code. You can select multiple status codes by clicking the check box corresponding to the required status code. Use the Search box to search for a status code.
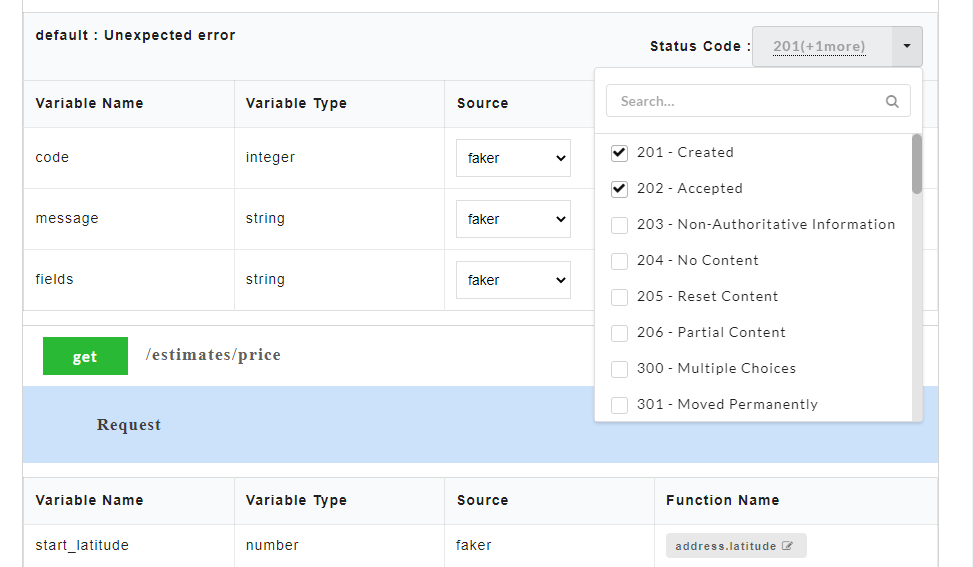
Fig. 4.42 Default Status Code
- In case you are replacing the existing data, the below message will be displayed. Click OK to proceed.
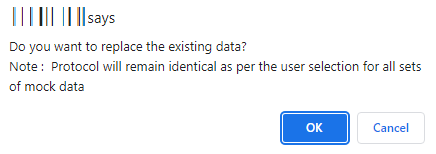
Fig. 4.43 Replace existing data
- Click Generate. The sample mock data is generated.
- Click on a resource name under a service in the service panel to view the sample mock data. Sample Data page displays the sample request, response, headers and the URL information. The endpoint URL can be used on a third party client to consume the API. Further, click on each method to view the sets of mock data under that method.
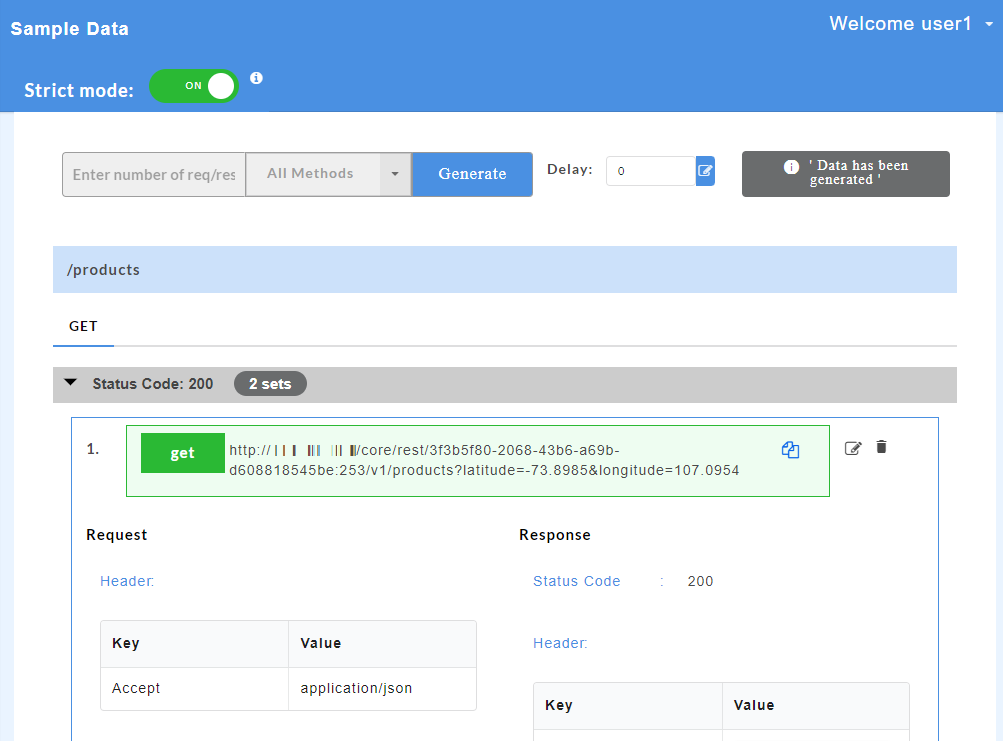
Fig. 4.44 Swagger Mock Data
The generated mock data is grouped and numbered based on the status code. The number of sets of mock data generated under each status code is also displayed. Click the accordion tab of any status code to hide/show the mock data sets under that status code.
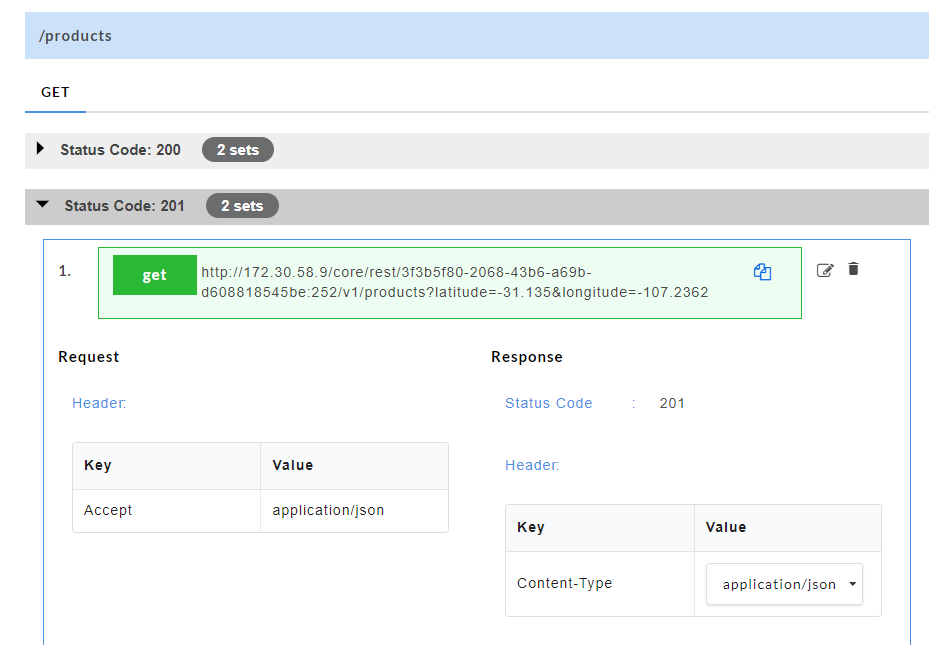
Fig. 4.45 Status Code tab
Note
- If data is generated for all resources, Config Data page will display “Data is generated for all resources” message.
- If data is generated for selective resources, Config Data page will display “Data is generated partially” message.
- If no data is generated, Config Data page will display “No data is generated” message.
Generating Mock Data at Resource Level
At resource level, mock data is generated for selective resources.
- To generate mock data at resource level, click on a service name on the service panel.
Fig. 4.46 Service Panel
- Click to select HTTP or HTTPS protocol. If you select HTTP the data will be generated with http protocol during data generation. If you select HTTPS, a message displays asking you to setup SSL certificate on the proxy server.
Fig. 4.47 SSL alert
Note
Data with HTTPS protocol can only be generated with SSL certificate. SSL certificate needs to be setup from the backend. If the system does not have an SSL certificate, data will be generated with HTTP protocol by default.
- In the Enter number of request/response need to generate box, enter the number of sample records of swagger mock data that you wish to generate.
- From the All Resources drop-down, select the check boxes corresponding to the resources for which you want to generate mock data. Use the Search box to search for a resource.

Fig. 4.48 Select Resources
- If swagger file contains default response, data will not be generated unless default status codes (wherever applicable) is defined.
Fig. 4.49 Default code alert
- To define a default status code, from the Status Code drop-down, select the required status code. You can select multiple status codes by clicking the check box corresponding to the required status code. Use the Search box to search for a status code.
Fig. 4.50 Default Status Code
- In case you are replacing the existing data, the below message will be displayed. Click OK to proceed.
Fig. 4.51 Replace existing data
- Click Generate. The sample mock data is generated based on the resources selected.
- Click on a resource name under a service in the service panel to view the sample mock data. Sample Data page displays the sample request, response, headers and the URL information. The endpoint URL can be used on a third party client to consume the API. Further, click on each method to view the sets of mock data under that method.
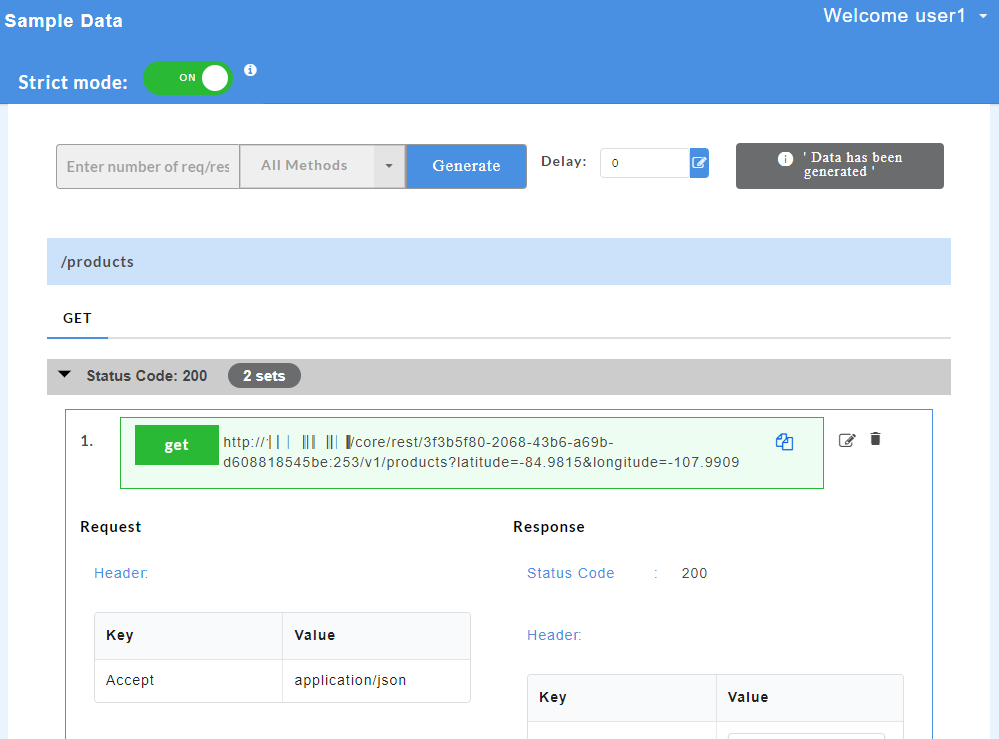
Fig. 4.52 Swagger Mock Data
The generated mock data is grouped and numbered based on the status code. The number of sets of mock data generated under each status code is also displayed. Click the accordion tab of any status code to hide/show the mock data sets under that status code.
Fig. 4.53 Status Code tab
Generating Mock Data at Method Level
At method level, mock data is generated for selective methods under a particular resource.
- To generate the mock data at method level, click on a service name and then click the required resource name.
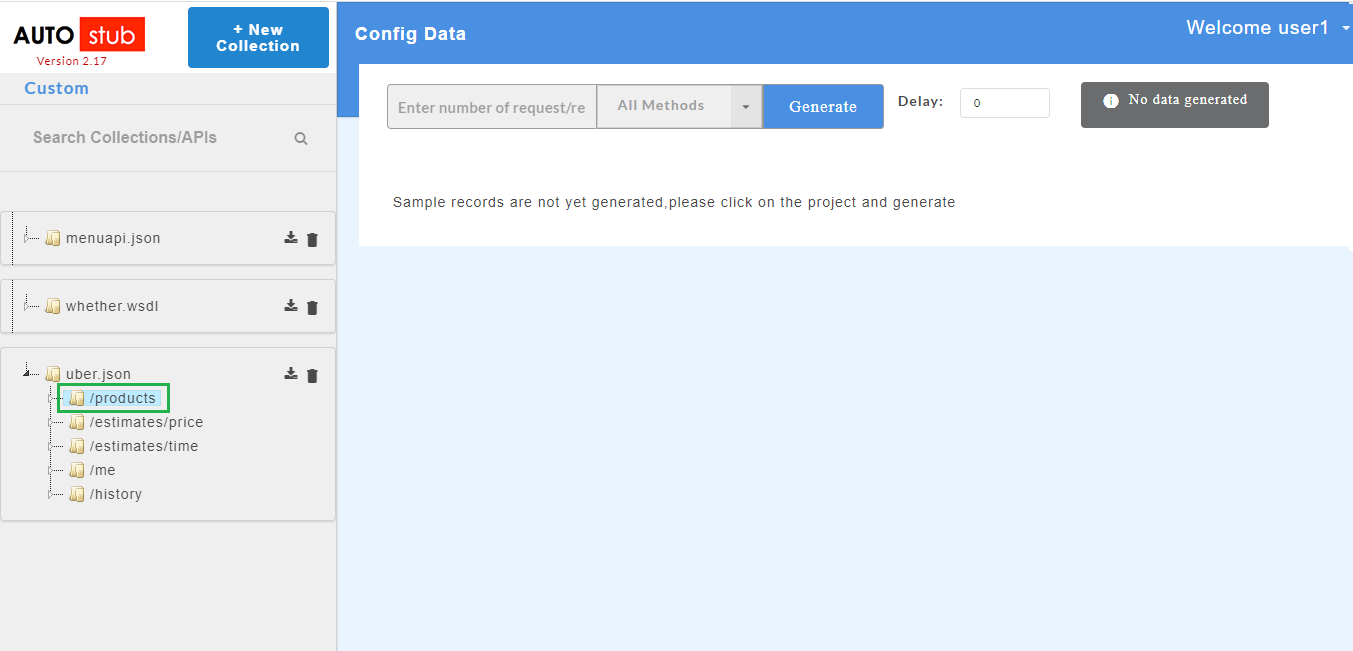
Fig. 4.54 Service Panel
- Click to select HTTP or HTTPS protocol. If you select HTTP the data will be generated with http protocol during data generation. If you select HTTPS, a message displays asking you to setup SSL certificate on the proxy server.
Fig. 4.55 SSL alert
Note
Data with HTTPS protocol can only be generated with SSL certificate. SSL certificate needs to be setup from the backend. If the system does not have an SSL certificate, data will be generated with HTTP protocol by default.
- In the Enter number of request/response need to generate box, enter the number of sample records of swagger mock data that you wish to generate.
- From the All Methods drop-down, select the check boxes corresponding to the methods for which you want to generate mock data. Use the Search box to search for a method.
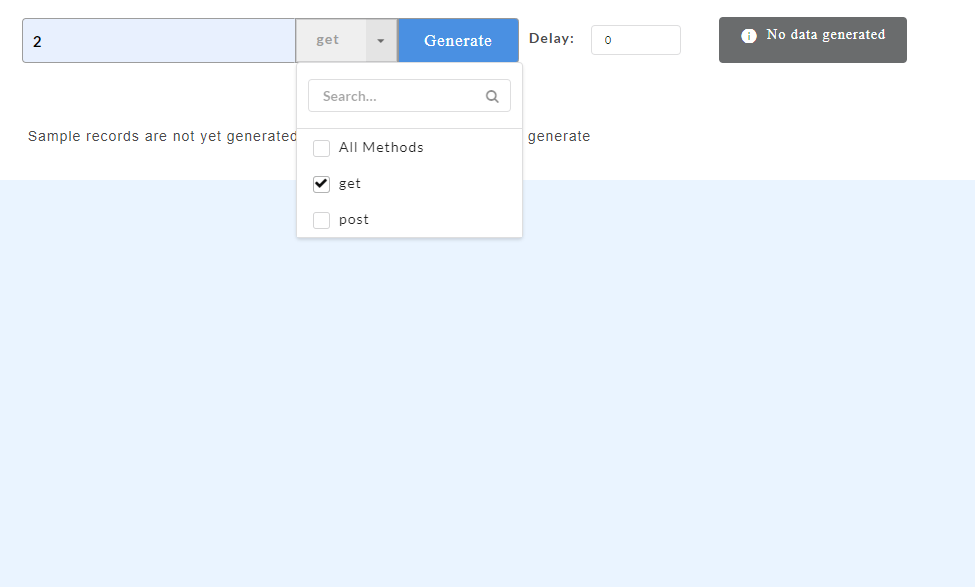
Fig. 4.56 Select Method
- If swagger file contains default response, data will not be generated unless default status codes (wherever applicable) is defined.
Fig. 4.57 Default code alert
- To define a default status code, on the Config Data page, from the Status Code drop-down, select the required status code. You can select multiple status codes by clicking the check box corresponding to the required status code. Use the Search box to search for a status code.
Fig. 4.58 Default Status Code
- In case you are replacing the existing data, the below message will be displayed. Click OK to proceed.
Fig. 4.59 Replace existing data
- Click Generate. The sample mock data is generated.
- Click on a method name under a resource to view the sample mock data. Sample Data page displays the sample request, response, headers and the URL information. The endpoint URL can be used on a third party client to consume the API.
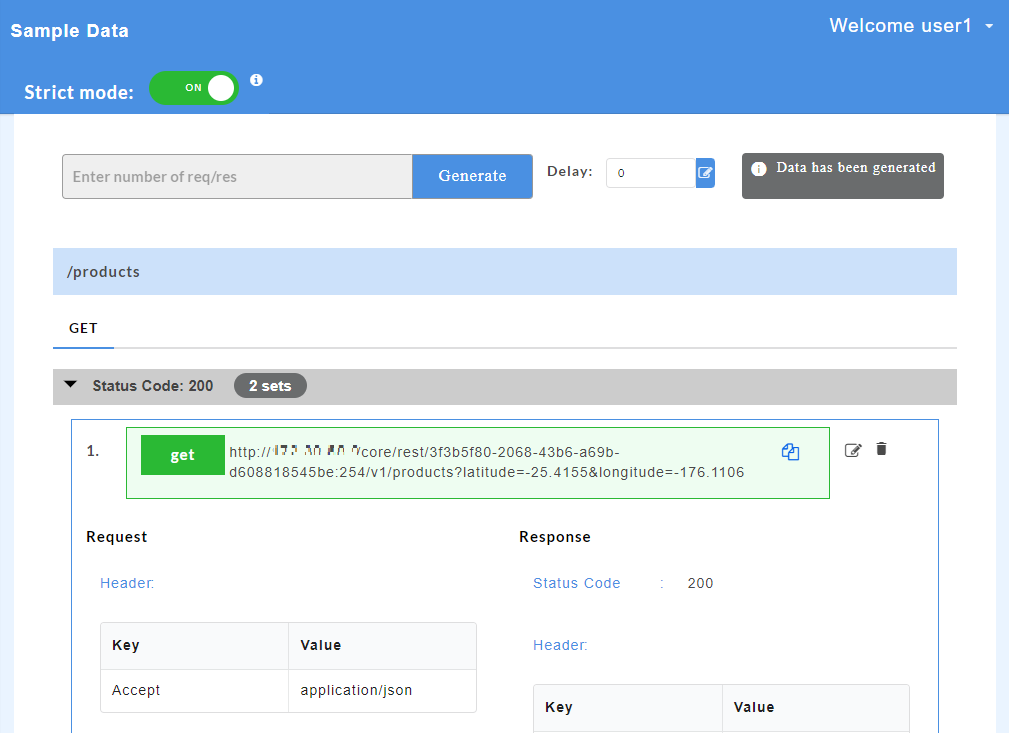
Fig. 4.60 Swagger Mock Data
The generated mock data is grouped and numbered based on the status code. The number of sets of mock data generated under each status code is also displayed. Click the accordion tab of any status code to hide/show the mock data sets under that status code.
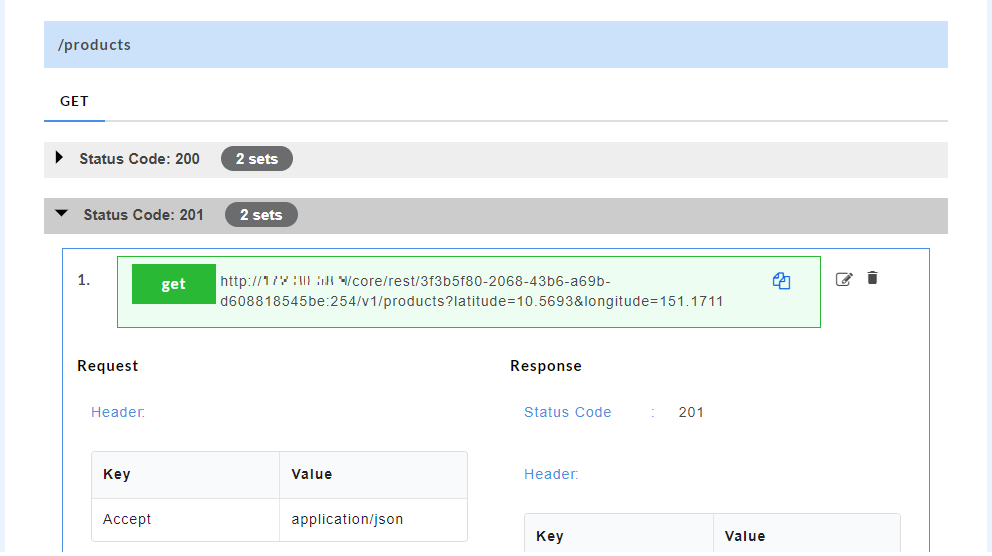
Fig. 4.61 Status Code Tabs
Editing a Swagger Mock Data:
Edit option  allows you to edit swagger mock data at stub level. Edit option is available for each set of mock data generated.
- For a particular set of swagger mock data, click the edit icon to edit the mock data. You can edit the path parameter values of the URL, request headers, response headers, request body and response body.

Fig. 4.62 Swagger Edit
- Click the save
 icon to save the changes.
Note
- Edit feature for Swagger mock data is applicable for both JSON and XML requests and responses.
- You can only modify the value and not the key of a request/response.
- You can add aditional array items (for array elements), if min and max length properties are defined in the schema of the swagger specifications file.
- For a key-value pair, if the variable type is a number, you must enter a number as a value. If a string is entered as a value instead of a number, then the system will throw an error.
- You cannot make changes to any other data in the URL, except the path parameter values.
Deleting a Swagger Mock Data:
Delete option ![]() allows you to delete swagger mock data at stub level. Delete option is available for each set of mock data generated.
allows you to delete swagger mock data at stub level. Delete option is available for each set of mock data generated.
- For a particular set of swagger mock data, click the delete
 icon to delete the mock data.

Fig. 4.63 Swagger Delete
- A message is displayed asking you to confirm the deletion.
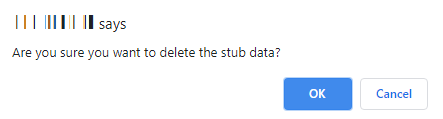
Fig. 4.64 Swagger Delete
- Click OK to delete the data set or click Cancel to not delete the data set.
4.3.2. WSDL
Mock data (sample request and response) can be generated at service and resource level. Users can generate mock data either for all resources or selective resources.
Generating Mock Data at Service Level
At service level, mock data is generated for the entire service, i.e for all resources.
- To generate the mock data, at service level, click the required service name on the service panel.
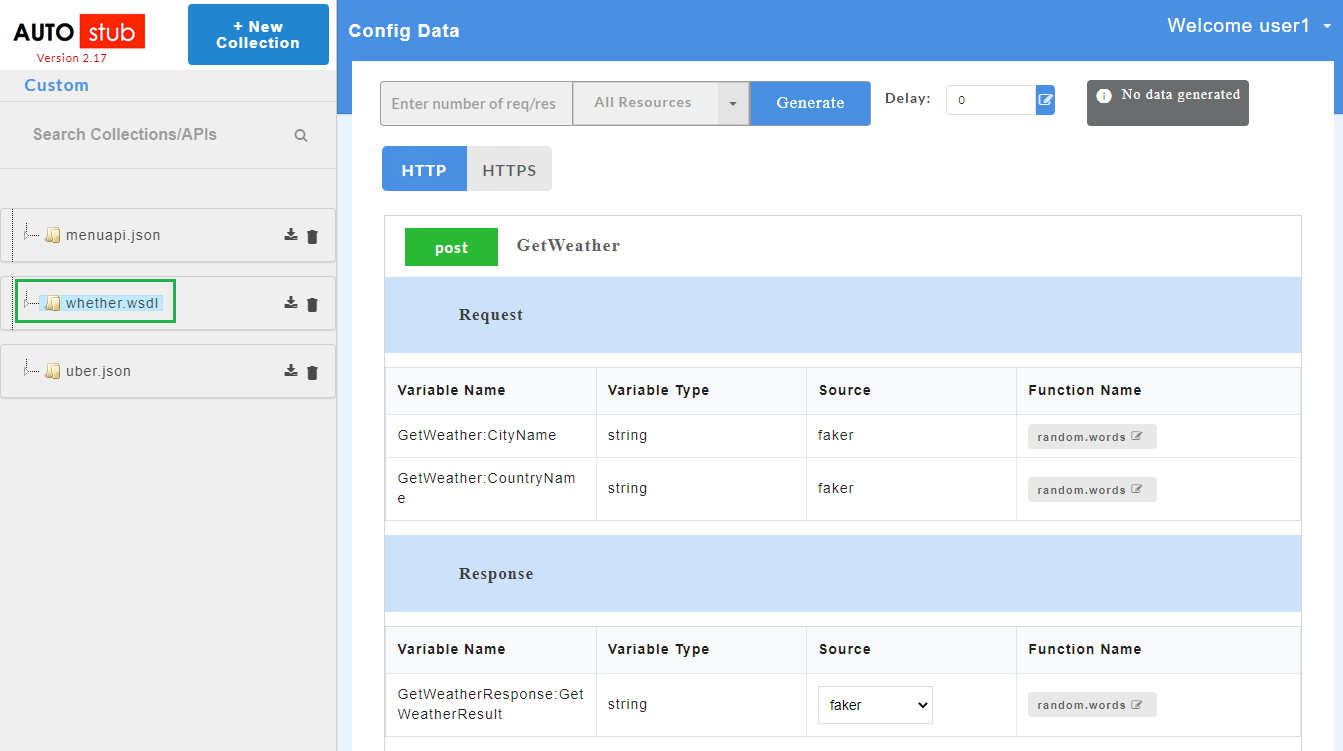
Fig. 4.65 Service Panel
- Click to select HTTP or HTTPS protocol. If you select HTTP the data will be generated with http protocol during data generation. If you select HTTPS, a message displays asking you to setup SSL certificate on the proxy server.
Fig. 4.66 SSL alert
Note
Data with HTTPS protocol can only be generated with SSL certificate. SSL certificate needs to be setup from the backend. If the system does not have an SSL certificate, data will be generated with HTTP protocol by default.
- In the Enter number of request/response need to generate box, enter the number of sample records of wsdl mock data that you wish to generate.
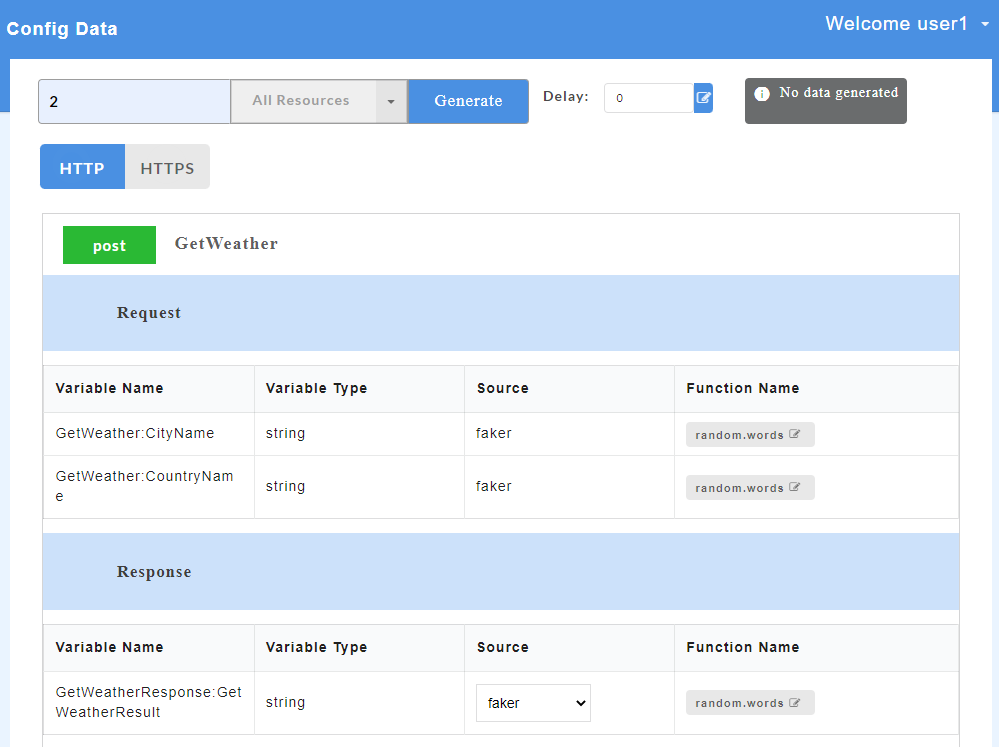
Fig. 4.67 Service Level Data Generation
- If wsdl file contains error codes, data will not be generated unless fault codes (wherever applicable) is defined.
Fig. 4.68 Default code alert
- To define a fault code, from the Fault Code drop-down, select the required fault code. You can select multiple fault codes by clicking the check box corresponding to the required fault code. Use the Search box to search for a fault code.
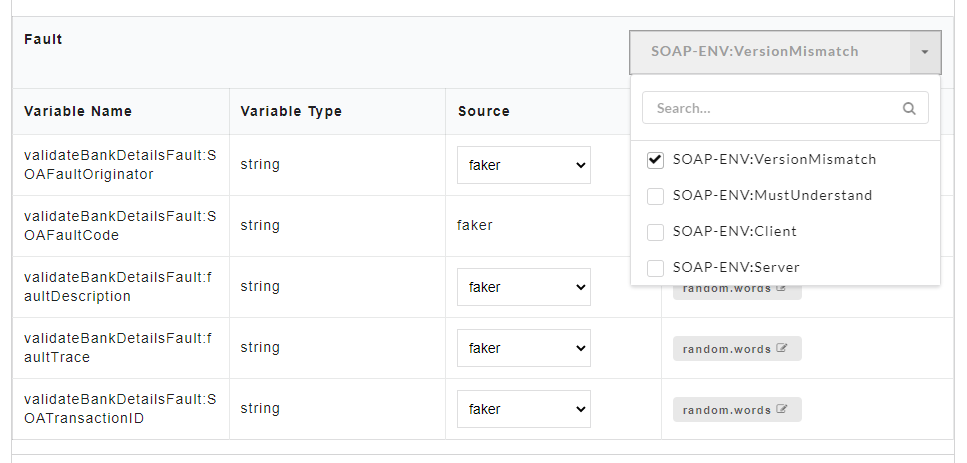
Fig. 4.69 Fault Code
- In case you are replacing the existing data, the below message will be displayed. Click OK to proceed.
Fig. 4.70 Replace existing data
- Click Generate. The sample mock data is generated based on the resources selected.
- Click on a resource name under a service in the service panel to view the sample mock data. Sample Data page displays the sample request, response, headers and the URL information. The endpoint URL can be used on a third party client to consume the API.

Fig. 4.71 Wsdl Mock Data
The generated mock data is grouped and numbered based on the status code. The number of sets of mock data generated under each status code is also displayed. Click the accordion tab of any status code to hide/show the mock data sets under that status code. Fault code is also displayed for error codes wherever applicable.
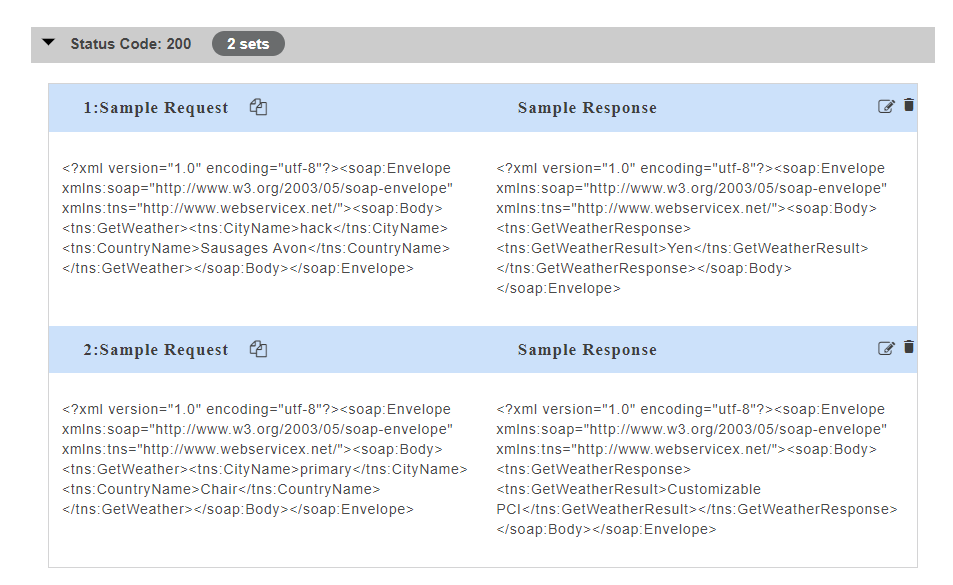
Fig. 4.72 Fault Code
Note
- If data is generated for all resources, Config Data page will display “Data is generated for all resources” message.
- If data is generated for selective resources, Config Data page will display “Data is generated partially” message.
- If no data is generated, Config Data page will display “No data is generated” message.
Generating Mock Data at Resource Level
At resource level, mock data is generated for selective resources.
- To generate the mock data at resource level, click on a service name on the service panel.
Fig. 4.73 Service Panel
- Click to select HTTP or HTTPS protocol. If you select HTTP the data will be generated with http protocol during data generation. If you select HTTPS, a message displays asking you to setup SSL certificate on the proxy server.
Fig. 4.74 SSL alert
Note
Data with HTTPS protocol can only be generated with SSL certificate. SSL certificate needs to be setup from the backend. If the system does not have an SSL certificate, data will be generated with HTTP protocol by default.
- In the Enter number of request/response need to generate box, enter the number of sample records of wsdl mock data that you wish to generate.
- From the All Resources drop-down, select the check boxes corresponding to the resources for which you want to generate mock data. Use the Search box to search for a resource.
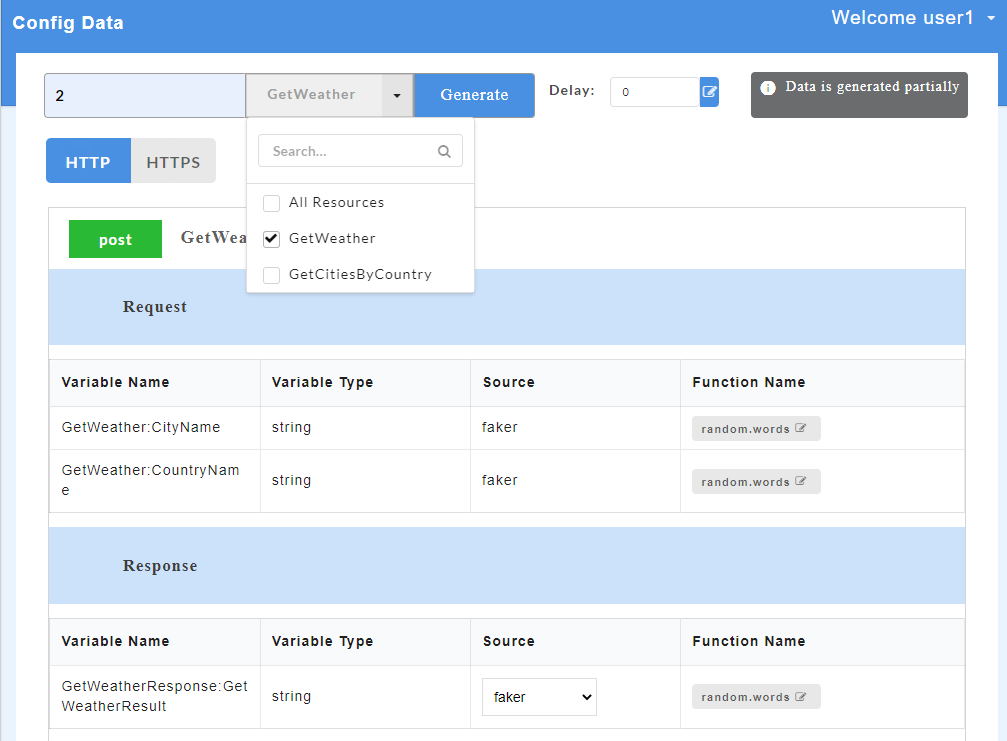
Fig. 4.75 Select Resources
- If wsdl file contains fault response, data will not be generated unless fault codes (wherever applicable) is defined.
Fig. 4.76 Default code alert
- To define a fault code, from the Fault Code drop-down, select the required fault code. You can select multiple fault codes by clicking the check box corresponding to the required fault code. Use the Search box to search for a fault code.
Fig. 4.77 Fault Code
- In case you are replacing the existing data, the below message will be displayed. Click OK to proceed.
Fig. 4.78 Replace existing data
- Click Generate. The sample mock data is generated based on the resources selected.
- Click on a resource name under a service in the service panel to view the sample mock data. Sample Data page displays the sample request, response, headers and the URL information. The endpoint URL can be used on a third party client to consume the API.
Fig. 4.79 Wsdl Mock Data
The generated mock data is grouped and numbered based on the status code. The number of sets of mock data generated under each status code is also displayed. Click the accordion tab of any status code to hide/show the mock data sets under that status code.
Fig. 4.80 Fault Code
Note
WSDL method is always POST, hence the data generation occurs only at service level and resource level.
Editing a WSDL Mock Data
Edit option allows you to edit wsdl mock data at stub level. Edit option is available for each set of mock data generated.
- For a particular set of wsdl mock data, click the edit icon to edit the mock data. You can edit the path parameter values of the URL, request headers, response headers, request body and response body.
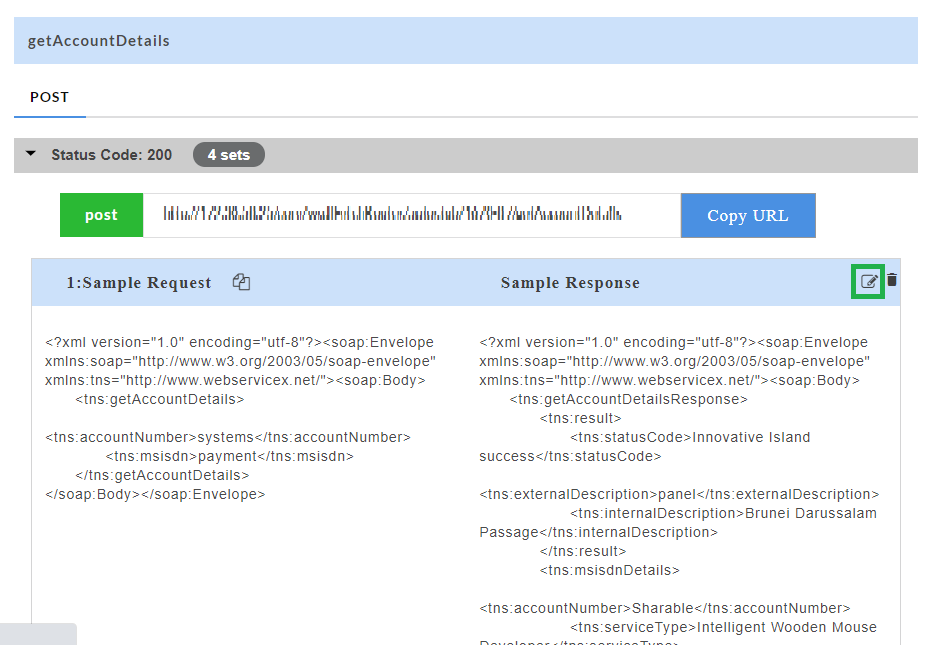
Fig. 4.81 Wsdl Edit
- Click the save icon to save the changes.
Note
- You cannot make changes to any other data in the URL, except the query and path parameter value.
- You will not be able to edit fault codes unless they match any of the fault codes defined in the Fault Code dropdown.
Deleting a WSDL Mock Data:
Delete option ![]() allows you to delete wsdl mock data at stub level. Delete option is available for each set of mock data generated.
allows you to delete wsdl mock data at stub level. Delete option is available for each set of mock data generated.
- For a particular set of wsdl mock data, click the delete icon to delete the mock data.
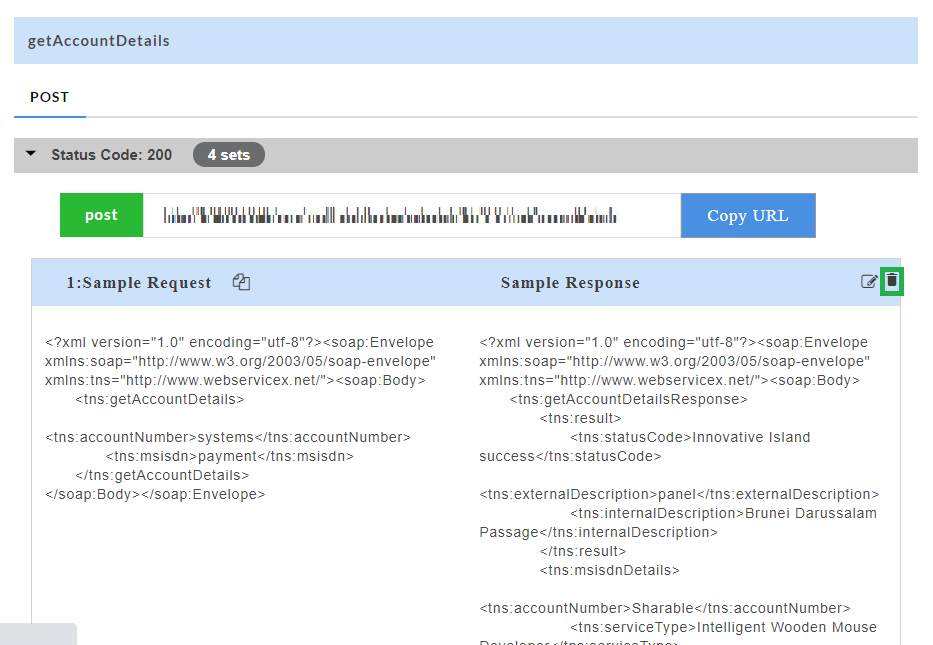
Fig. 4.82 Wsdl Delete
- A message is displayed asking you to confirm the deletion.
Fig. 4.83 Wsdl Delete
- Click OK to delete the data set or click Cancel to not delete the data set.
4.4. Testing the API endpoints
Users can now execute and test the APIs in the AutoStub. Instead of copying and pasting all the data into a third-party program to test the APIs, users can save time by using AutoStub’s testing capability.
The test feature is a simple and interactive interface that allows users to compose and send requests and view responses to those requests. In essence, it enables customers to evaluate their APIs’ operation without writing a single line of code. With the help of this capability, users may quickly verify the outcomes of their API requests.
The API testing capability is accessible via HTTP and REST clients as well. It is possible to test both the Swagger and WSDL files.
Users can test their APIs by invoking the following methods:
- GET: Allows users to obtain information
- POST: Allows users to add new information
- PUT: Allows users to replace existing information
- PATCH: Allows users to update certain exiting information
- DELETE: Allows users to delete existing information
Note
Only the POST method is supported for WSDL files.
4.4.1. Swagger
If you have a Swagger file available, you can test it on the AutoStub.
To test a Swagger file:
On the Service panel, click on the Swagger service to test. Alternatively, you can Upload a Single Swagger File/zip file containing the .json file(s) and its dependencies, or you can Import a Single Swagger File that includes both Swagger mock data and configuration data.
Generate the Swagger mock data.
On the service panel, click on the API to view the parsed mock data.
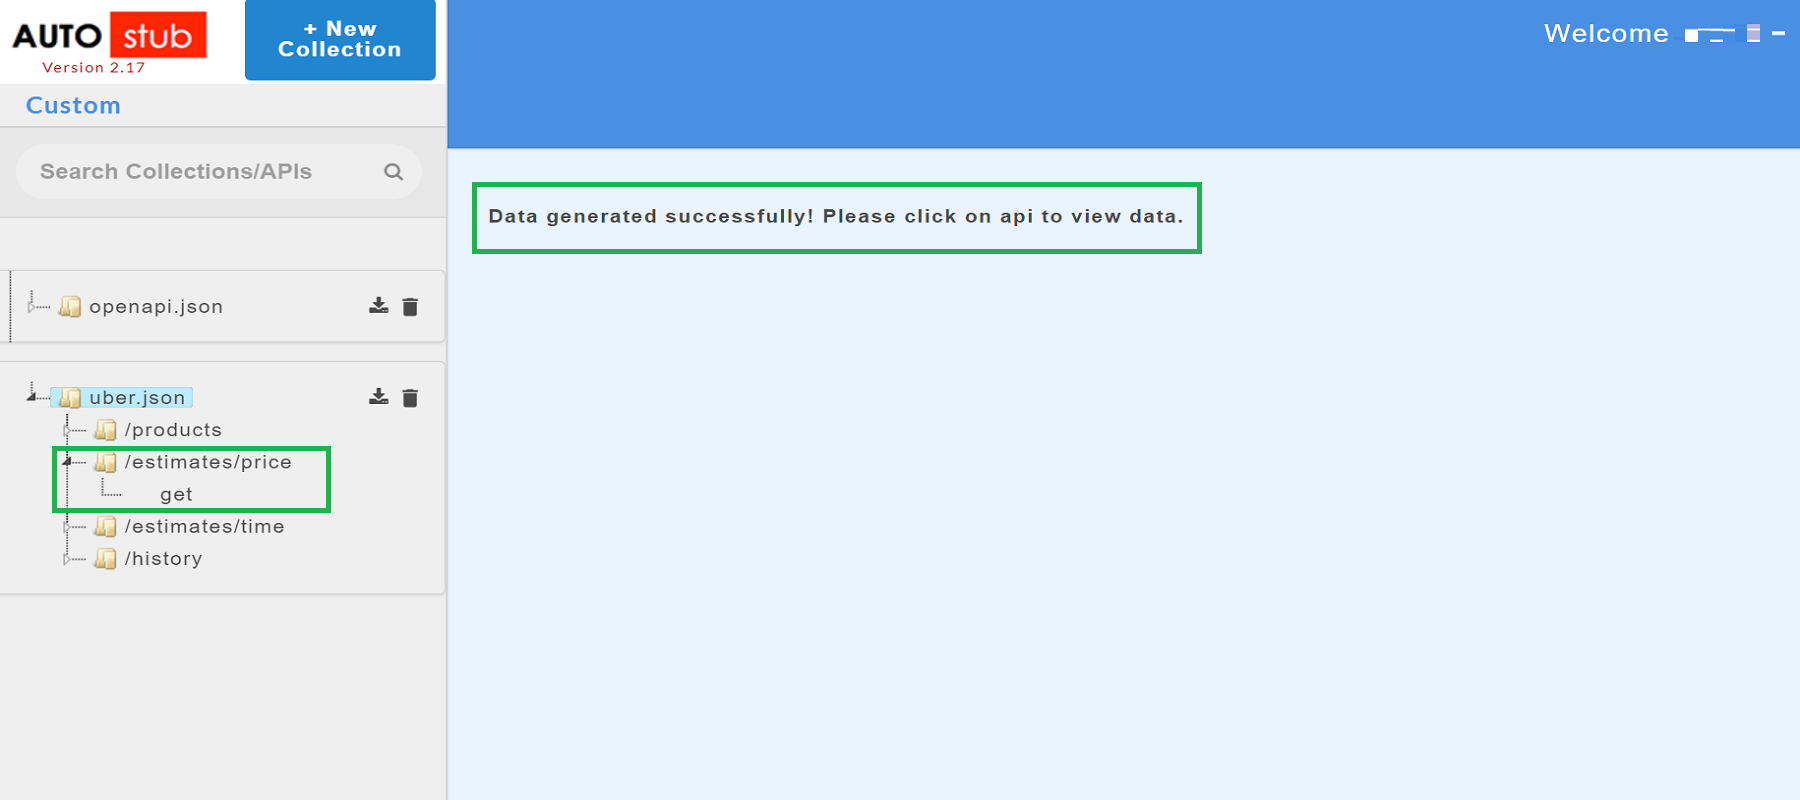
Fig. 4.84 Data Generated
Click on the Execute
 icon to execute the API.
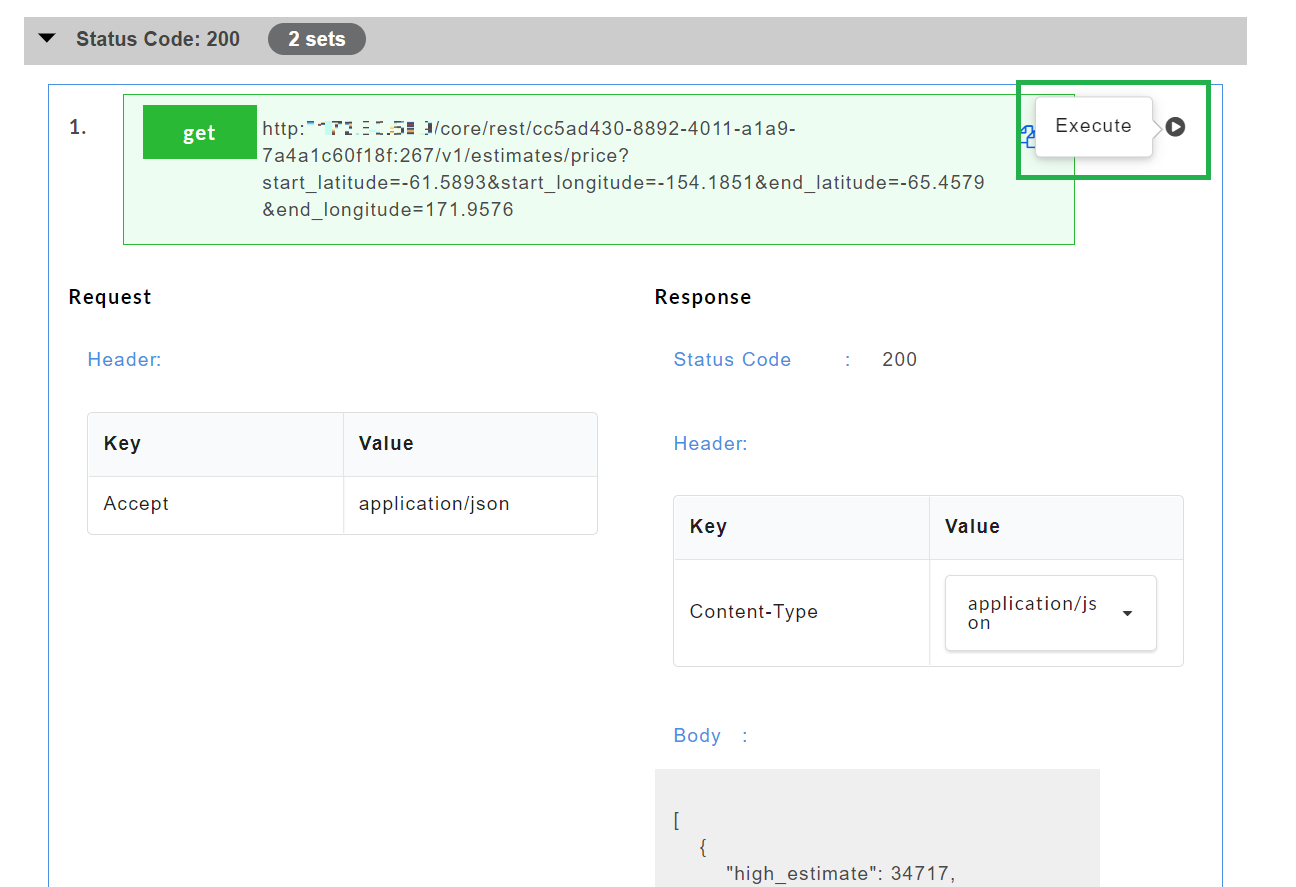
Fig. 4.85 Executing the API
After executing, the AutoStub Test API modal window pops up.
Under the Request Body, enter the request body, if required.
Click Send. The response from the gateway will be displayed under the response headers and response body.
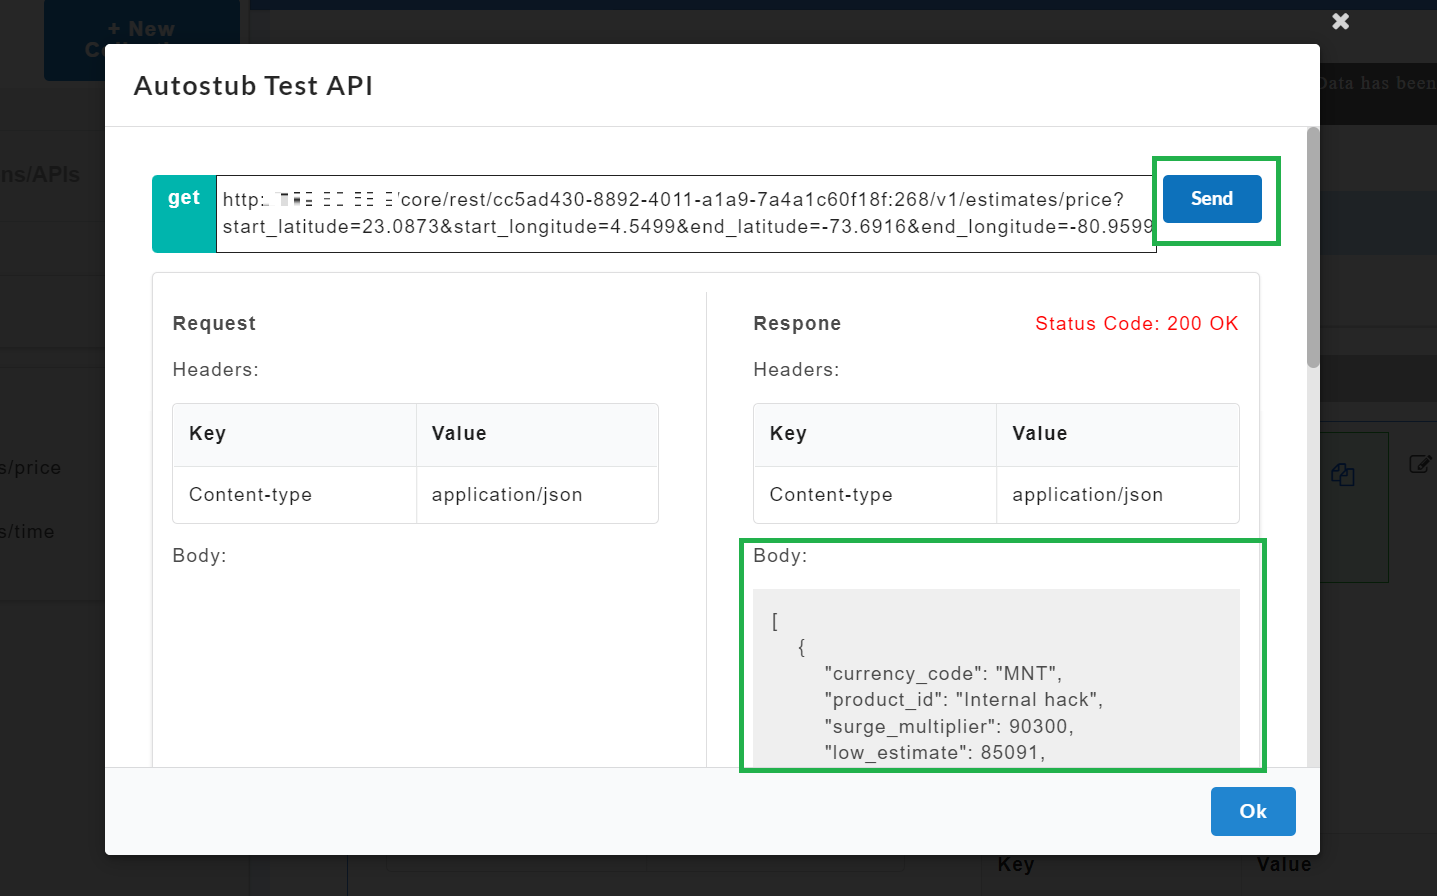
Fig. 4.86 AutoStub Test API modal window
4.4.2. WSDL
If you have a WSDL file available, you can test it on the AutoStub.
To test a WSDL file:
On the Service panel, click on the WSDL service to test. Alternatively, you can Upload a Single WSDL File/zip file containing the .WSDL file(s) and its dependencies, or you can Import a Single WSDL File that includes both WSDL mock data and configuration data.
Generate the WSDL mock data.
On the service panel, click on the API to view the parsed mock data.
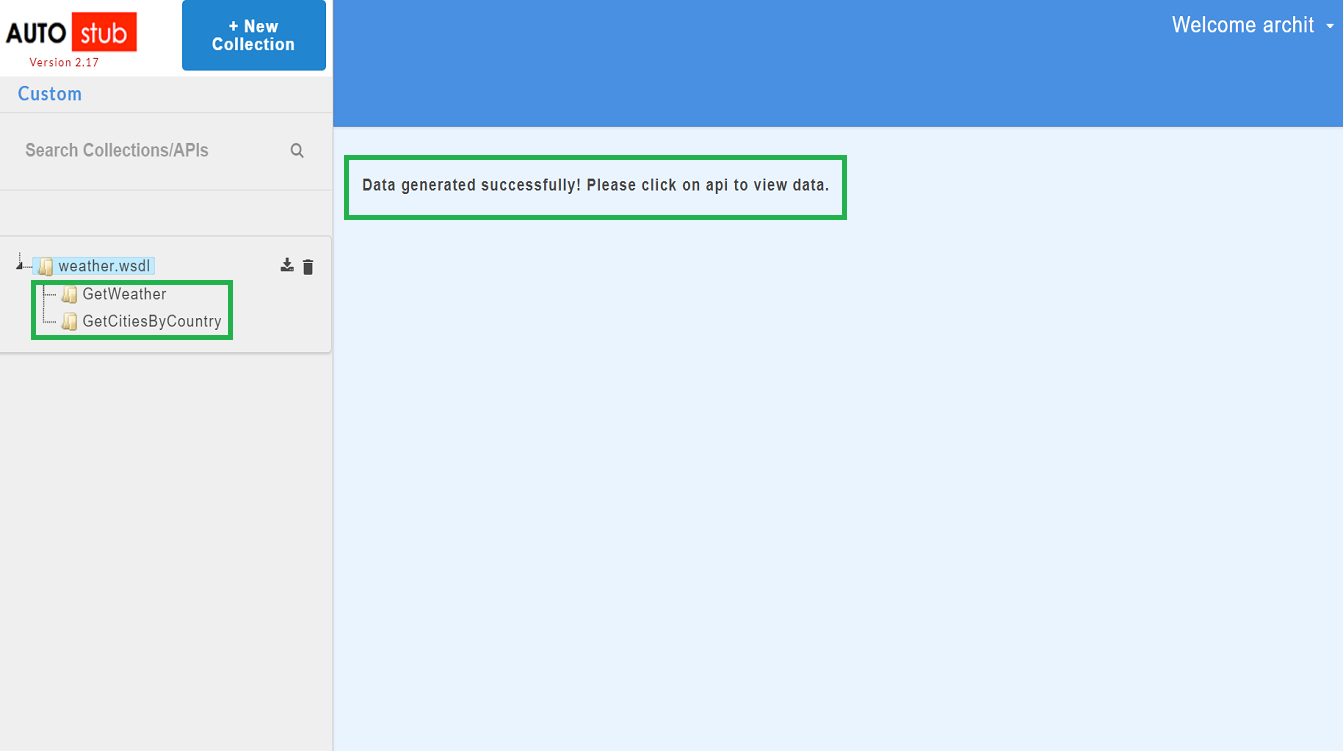
Fig. 4.87 Data Generated
Click on the Execute
icon to execute the API.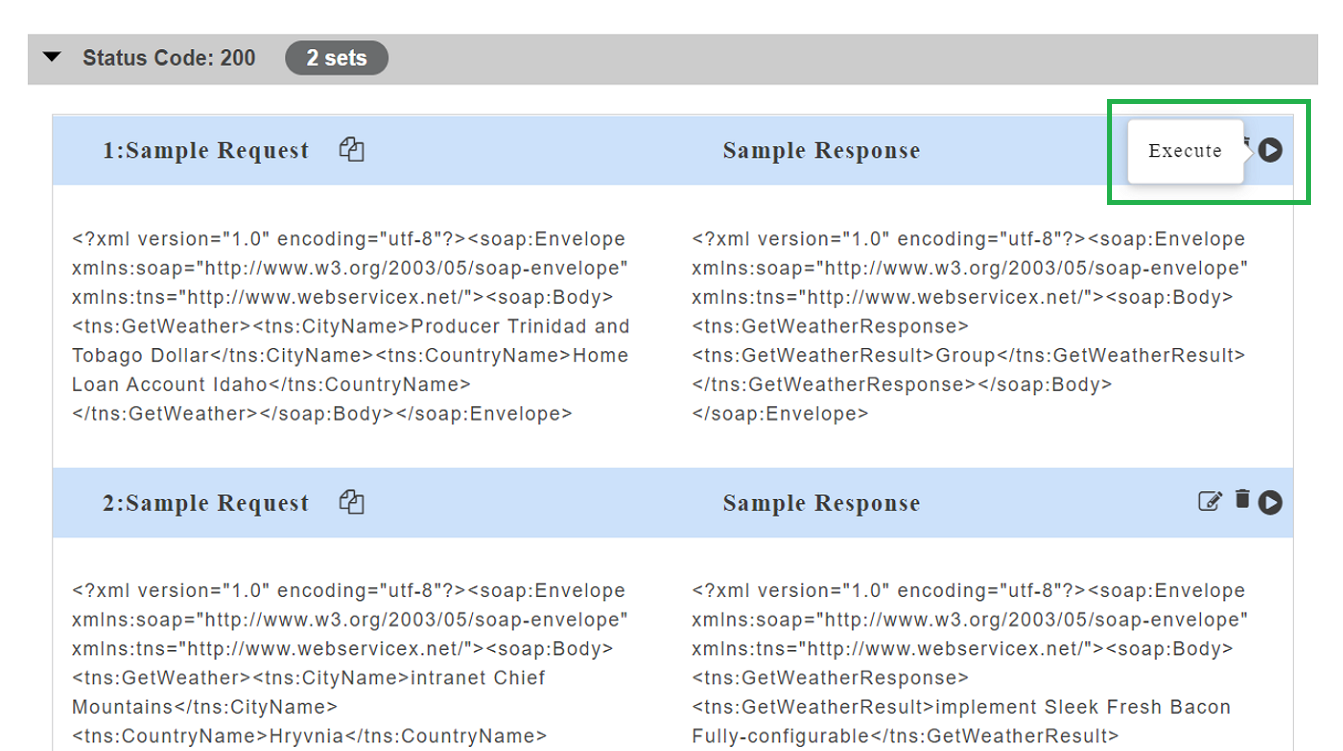
Fig. 4.88 Executing the API
After executing, the AutoStub Test API modal window pops up.
Under the Request Body, enter the request body.
Click Send. The response from the gateway will be displayed under the response headers and response body.

Fig. 4.89 AutoStub Test API modal window
4.5. Delay Functionality
Before mock data is generated, you can set the delay functionality for the response. The delay functionality allows you to set a custom time delay for the response that will be generated. If you set a time delay, the response will only be generated after the time delay specified by user. Delays are set with respect to the service, resource and method level for swagger files, and service and resource for wsdl files.
4.5.1. Swagger
To set the time delay at service level:
Time delay set at service level is applicable to all the resources and methods under it.
To set time delay at service level, click the required service name on the service panel.
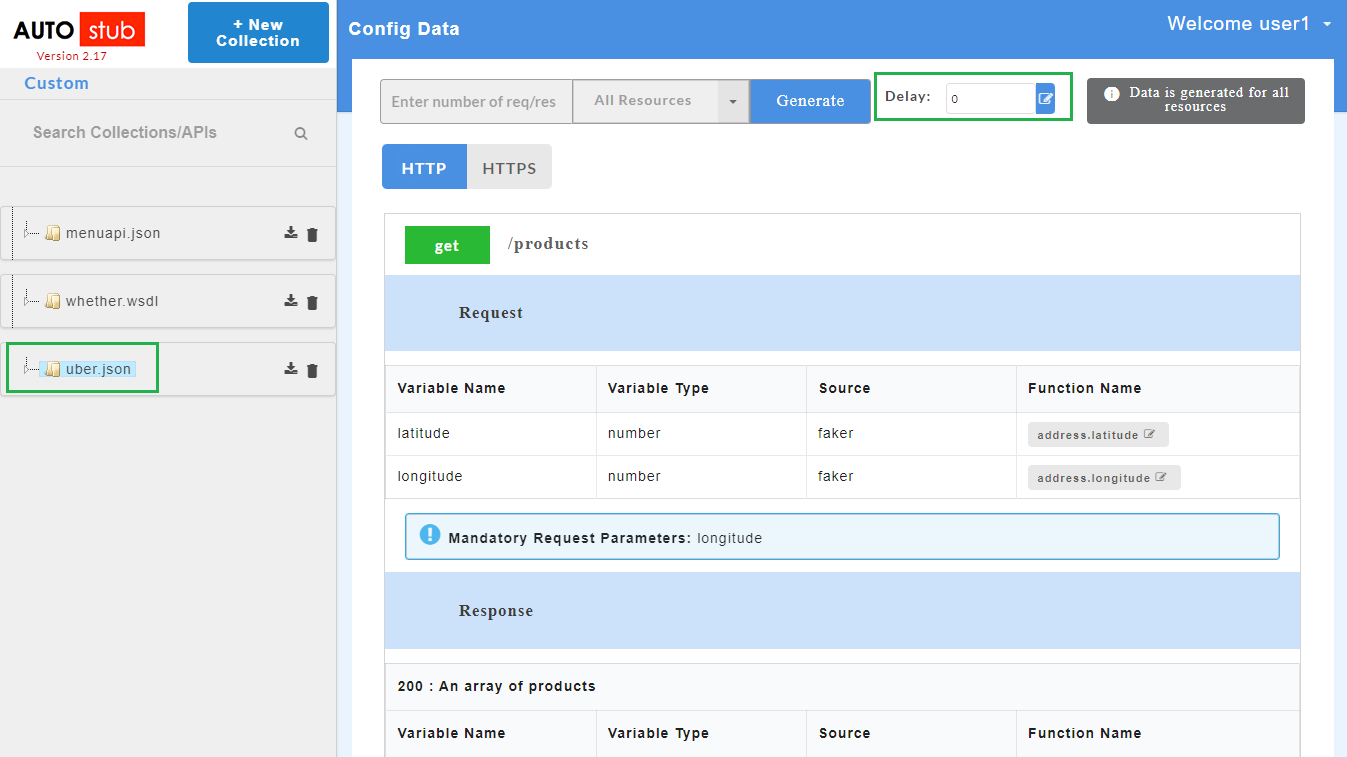
Fig. 4.90 Delay Functionality
Click the edit icon
 next to Delay box and enter the time delay in ms.
Note
The time delay can be set only in milliseconds.
- Click save icon
 .
. - Generate the Swagger / WSDL mock data. Once the sample mock data is generated, the endpoint URL can be used on a third party client to get the response. The response will be generated only after the specified time delay.
Note
The time delay must be set before generating the sample records. The default time delay is 0 ms.
To set the time delay at resource level:
Time delay set at service level can be overridden at resource level for a particular resource and all the methods under it. Time delay set at resource level is applicable to all the methods under that resource.
To set time delay at resource level, click the required resource name under a service.
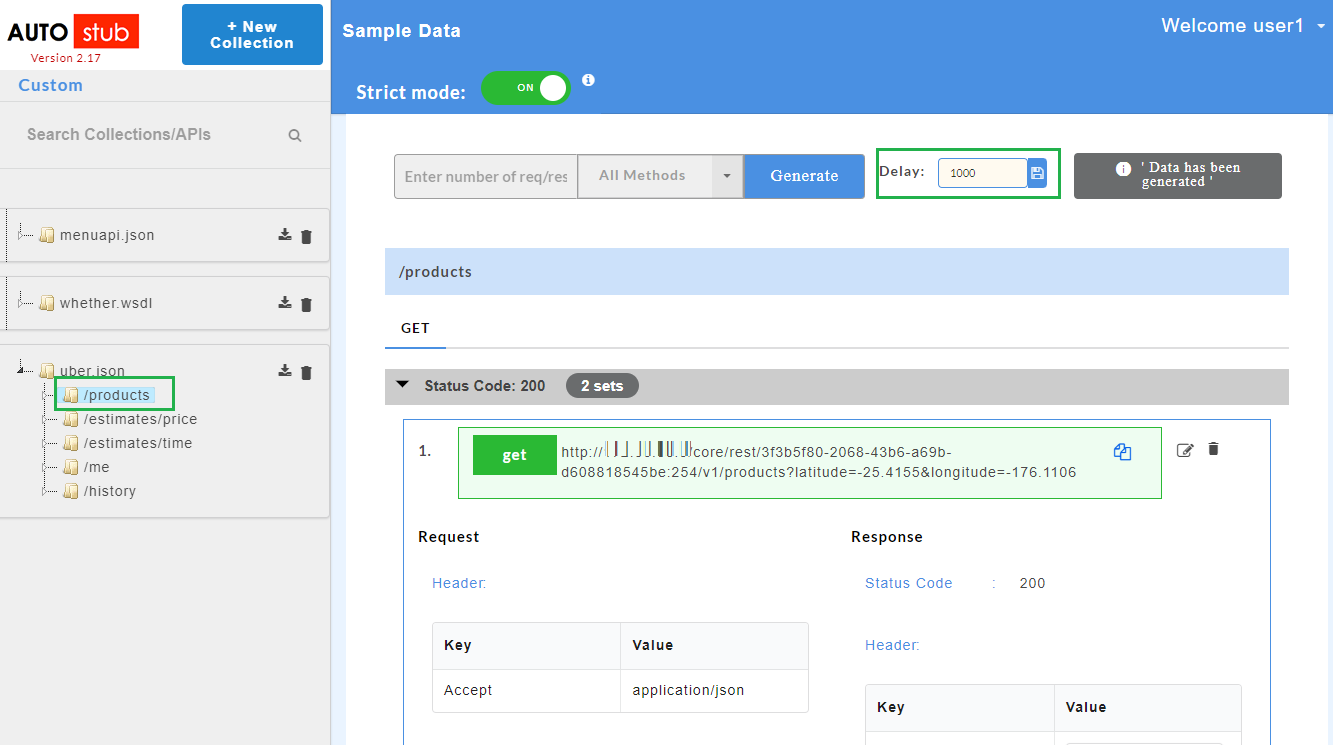
Fig. 4.91 Delay Functionality
Click the edit icon
next to Delay box and enter the time delay in ms.
Note
The time delay can be set only in milliseconds.
- Click save icon .
- Generate the Swagger mock data. Once the sample mock data is generated, the endpoint URL can be used on a third party client to get the response. The response will be generated only after the specified time delay.
Note
The time delay must be set before generating the sample records. The default time delay is 0 ms.
To set the time delay at method level:
Time delay set at service/resource level can be overridden at method level for a particular method. Time delay set at method level is applicable to that method only.
To set time delay at method level, click the required method name under a resource belonging to a service.
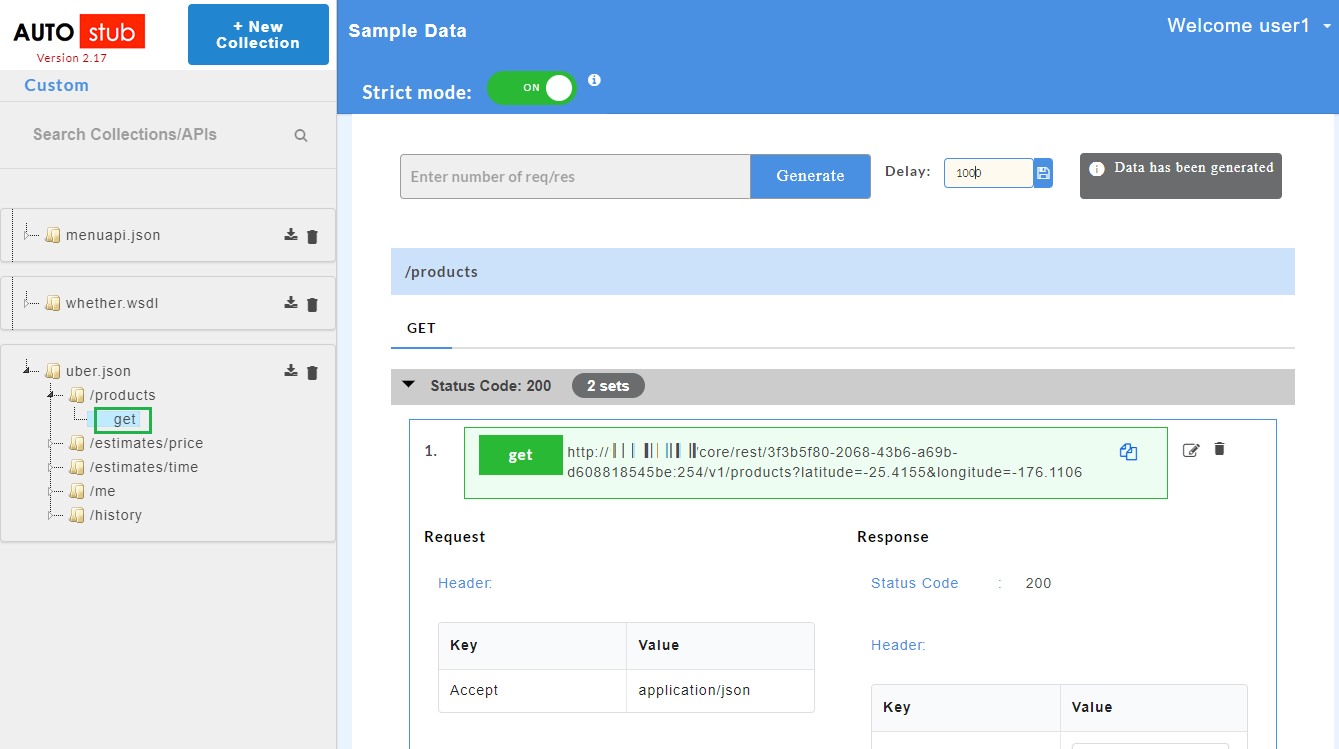
Fig. 4.92 Delay Functionality
Click the edit icon
next to Delay box and enter the time delay in ms.
Note
The time delay can be set only in milliseconds.
- Click save icon .
- Generate the Swagger mock data. Once the sample mock data is generated, the endpoint URL can be used on a third party client to get the response. The response will be generated only after the specified time delay.
Note
The time delay must be set before generating the sample records. The default time delay is 0 ms.
4.5.2. WSDL
To set the time delay at service level:
Time delay set at service level is applicable to all the resources under it.
To set time delay for at service level, click the required service name on the service panel.
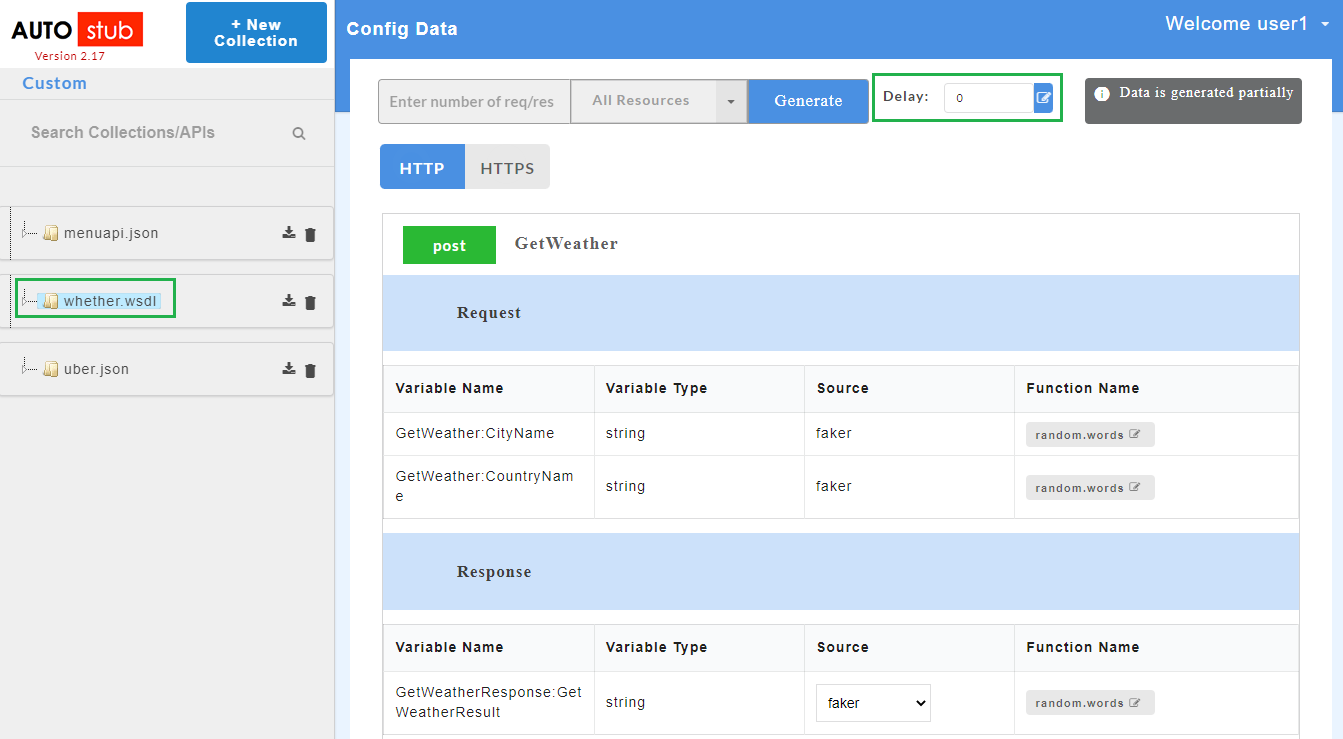
Fig. 4.93 Service level Delay Functionality
Click the edit icon
next to Delay box and enter the time delay in ms.
Note
The time delay can be set only in milliseconds.
- Click save icon .
- Generate the WSDL mock data. Once the sample mock data is generated, the endpoint URL can be used on a third party client to get the response. The response will be generated only after the specified time delay.
Note
The time delay must be set before generating the sample records. The default time delay is 0 ms.
To set the time delay at resource level:
Time delay set at service level can be overridden at resource level for a particular resource.
To set time delay at resource level, click the required resource name under a service.
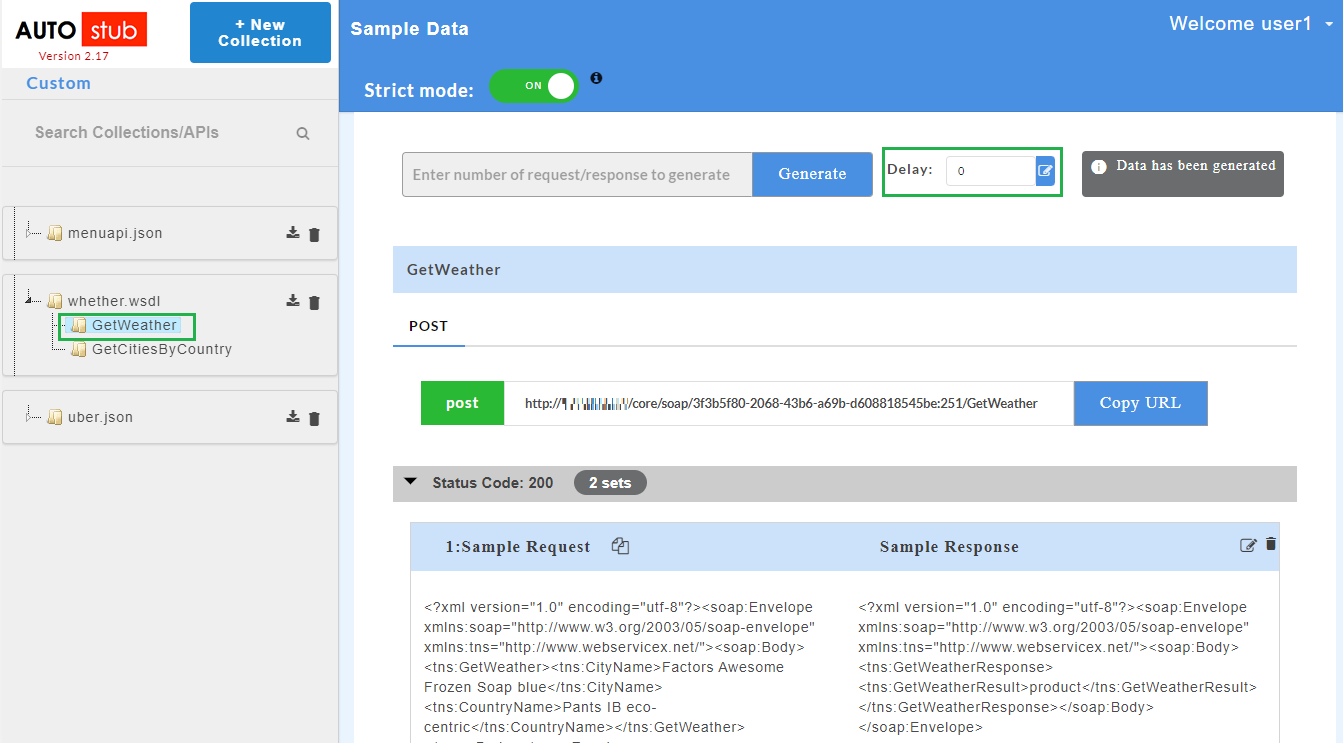
Fig. 4.94 Resource level Delay Functionality
Click the edit icon
next to Delay box and enter the time delay in ms.
Note
The time delay can be set only in milliseconds.
- Click save icon .
- Generate the WSDL mock data. Once the sample mock data is generated, the endpoint URL can be used on a third party client to get the response. The response will be generated only after the specified time delay.
Note
The time delay must be set before generating the sample records. The default time delay is 0 ms.
4.6. Source
AutoStub allows you to choose the source for generating the mock data for both Swagger and WSDL files using any of the below options.
- Faker
- Mapped Key
- Custom Method
4.6.1. Faker
Faker is a Python package that generates mock data. The library used here is called JSON Schema Faker. When swagger/wsdl files are passed through this library, it will read the swagger/wsdl file and generate mock data.
- Upload a swagger/zip file or wsdl/zip file.
- Click on a service name on the service panel.
- Under the Source column, by default, Faker will be selected in the drop-down.
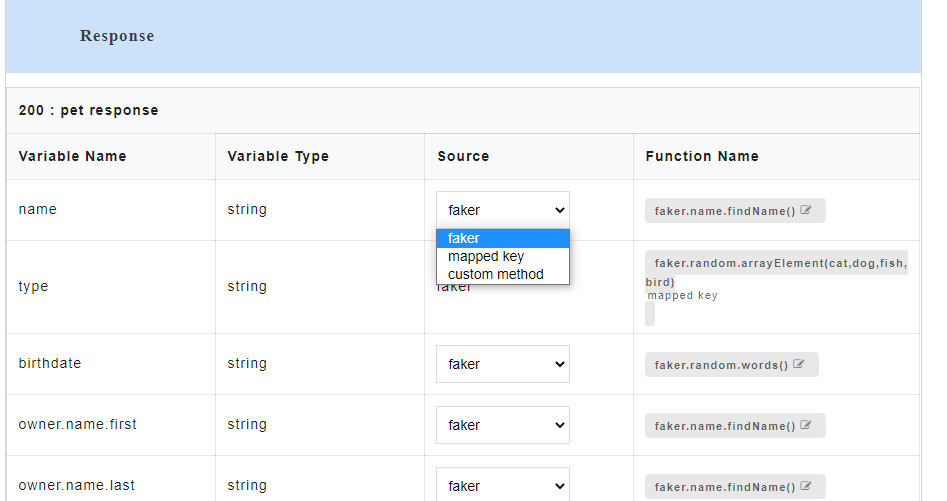
Fig. 4.95 Faker
- Under the Function Name column, click the edit icon
 corresponding to the required faker function.

Fig. 4.96 Faker Edit
A Search Faker Function dialog appears where where the required faker function name can be searched and changed based on the requirements.
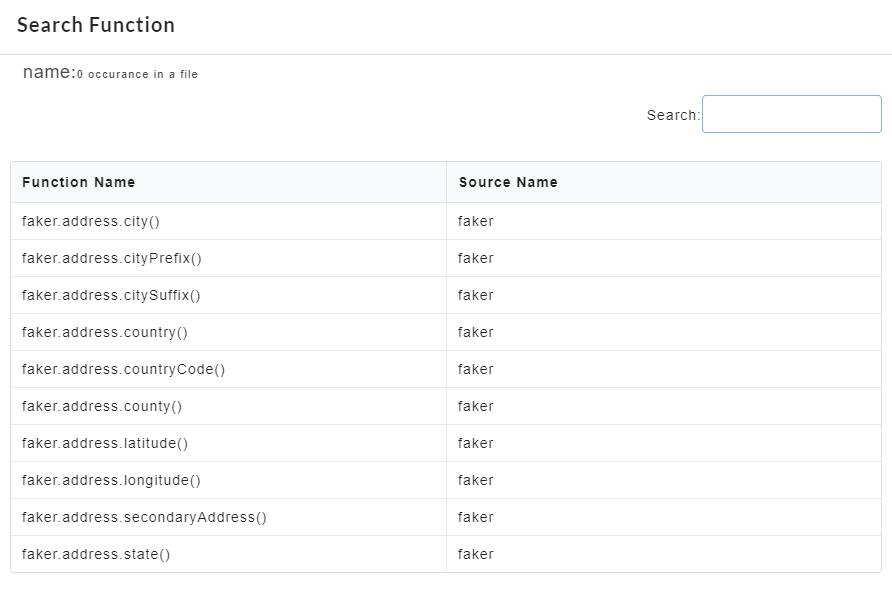
Fig. 4.97 Faker Function
- Use the Search text box to search for the required faker function.
- Click the required faker function and click Change Current to change the current faker function.
4.6.2. Mapped Key
Mapped key is used for mapping response parameter with the request parameter that has the same data type. After the mapping is done, the value which the user assigns to the mapped request parameter should be reflected in the response body when the API is being consumed. Any change made to the value of the mapped key will be reflected in the response body.
4.6.2.1. Swagger
- Upload a swagger/zip file.
- Click on a swagger service name on the service panel.
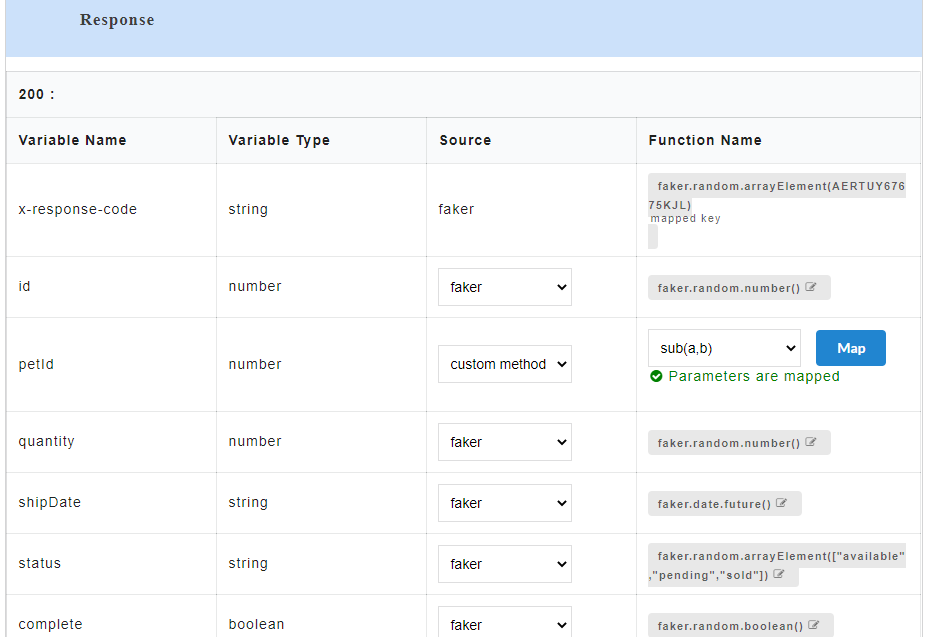
Fig. 4.98 Parsed Data Swagger
- To use mapped key as source, for the required Variable Name, select mapped key from the Source drop-down. From Select a Parameter drop-down, select the required parameter to be mapped.
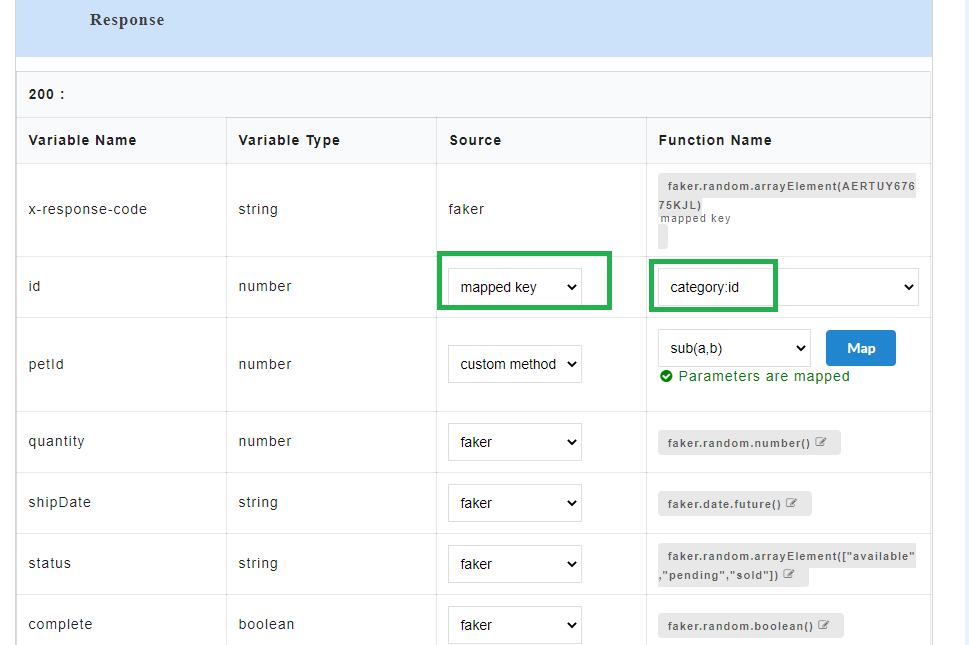
Fig. 4.99 Mapped Key
A “Mapped key successfully updated” message is displayed. Response parameters can only be mapped with the request parameter having same data type. If the same data type is not present, then “No request parameters found of the same type” message is displayed.
- Generate the Swagger mock data for Swagger files. The mapped request key will be visible in the response body.
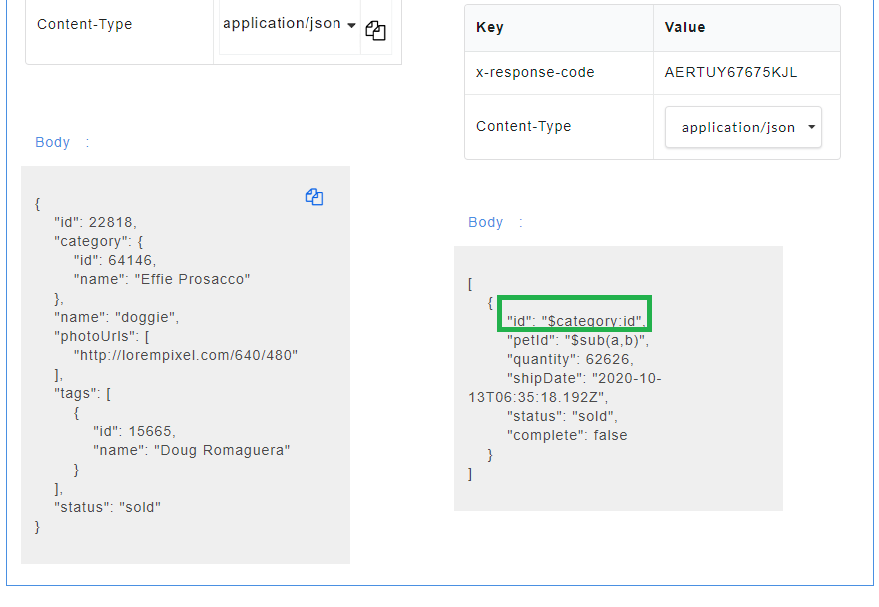
Fig. 4.100 Request Parameter Mapped Swagger
The endpoint URL can be used on a third party client to get the response. When the API is being consumed, the value of the mapped request key will be generated in the response.
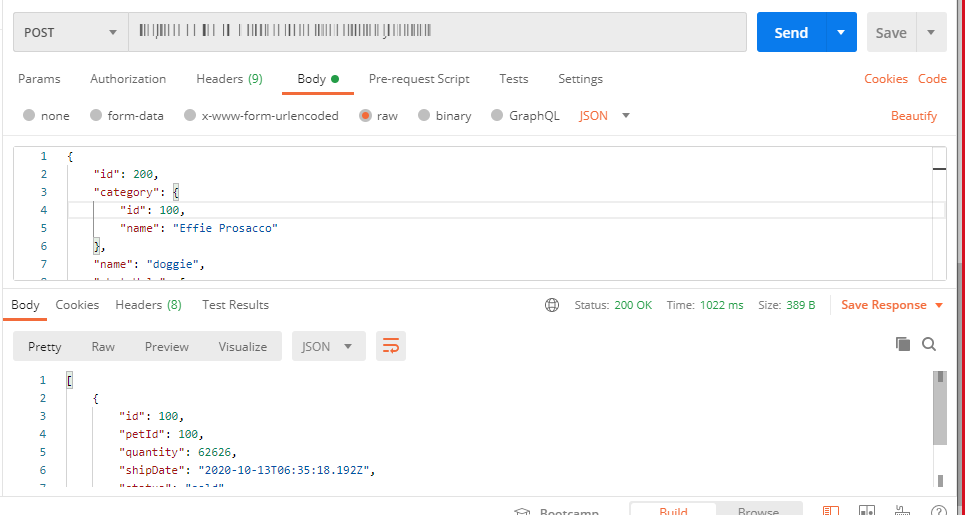
Fig. 4.101 Request Parameter Mapped Swagger
Note
The mapped request key value will be dynamic.
4.6.2.2. WSDL
- Upload a wsdl/zip file.
- Click on a wsdl service name on the service panel.
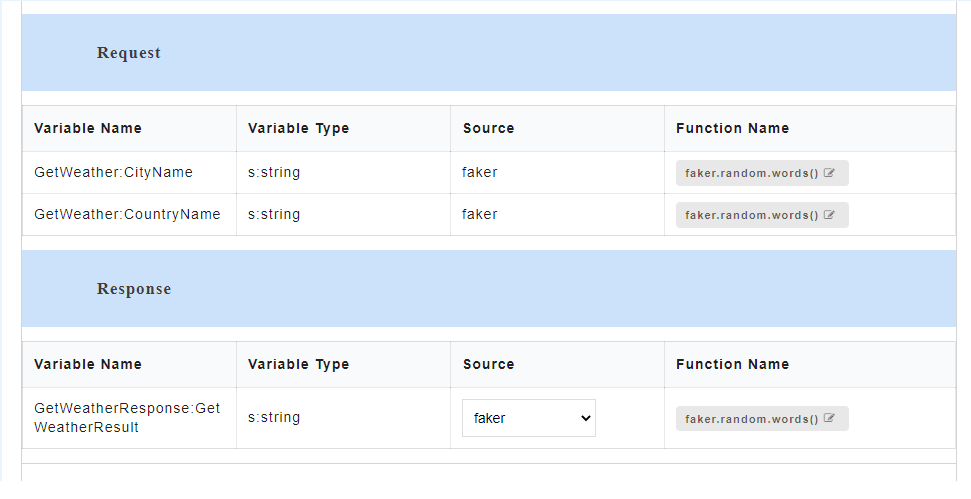
Fig. 4.102 Parsed Data WSDL
- To use mapped key as source, for the required Variable Name, select mapped key from the Source drop-down. From Select a Parameter drop-down, select the required parameter to be mapped.
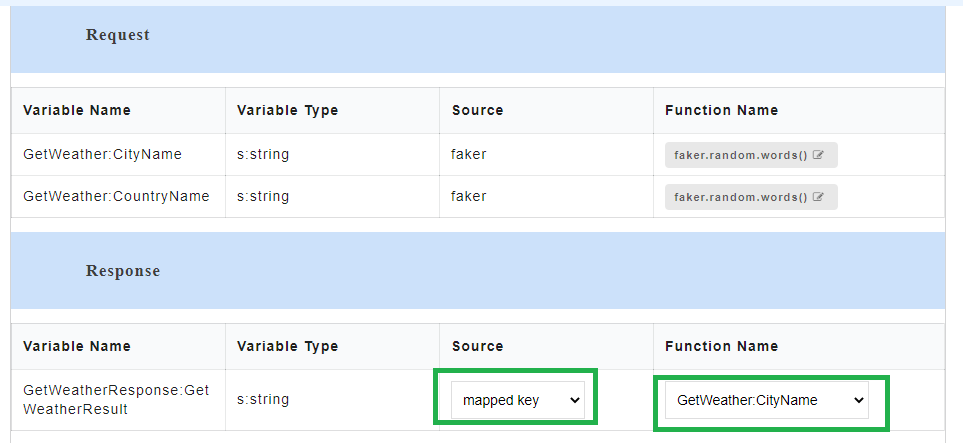
Fig. 4.103 Mapped Key
A “Mapped key successfully updated” message is displayed. Response parameters can only be mapped with the request parameter having same data type. If the same data type is not present, then “No request parameters found of the same type” message is displayed.
- Generate the WSDL mock data for WSDL files. The mapped key will be visible in the response body.
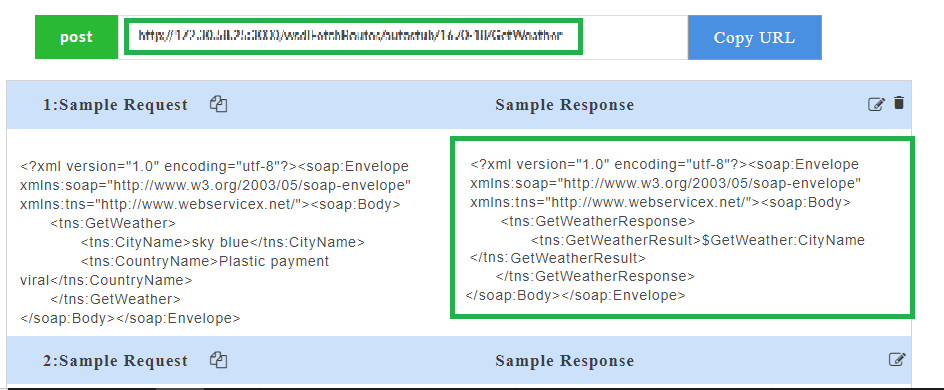
Fig. 4.104 Request Parameter Mapped
The endpoint URL can be used on a third party client to get the response. When the API is being consumed, the value of the mapped request key will be generated in the response.
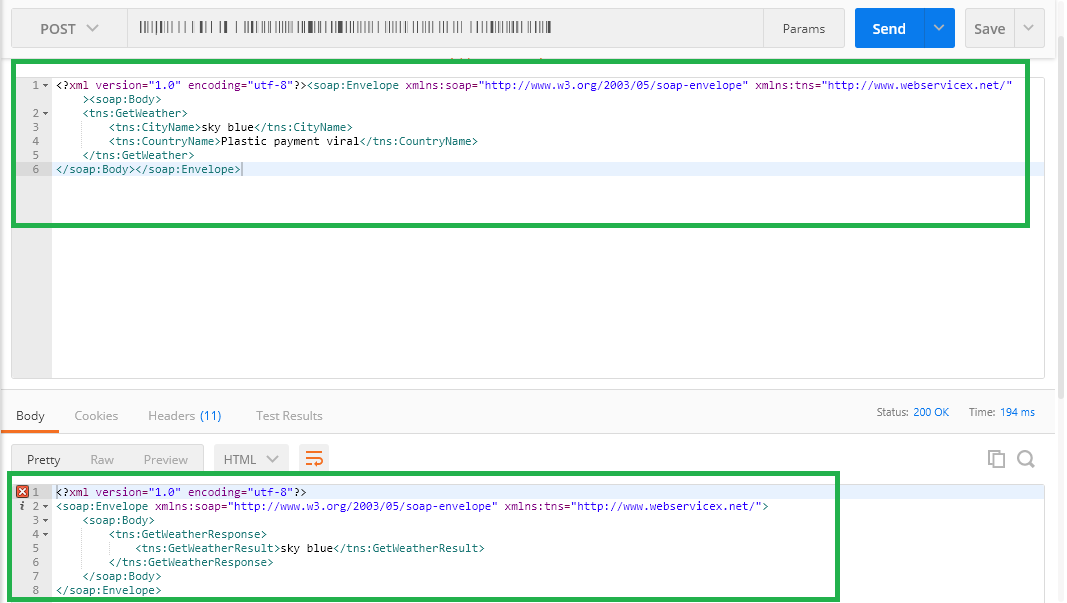
Fig. 4.105 Request Parameter Mapped WSDL
Note
The mapped request key value will be dynamic.
4.6.3. Custom Method
Custom Method is used to create custom functions in order to generate dynamic data in the response of a given request. Custom functions created by the user can be assigned to the response parameters. Assigned custom function arguments can be mapped to the request parameters and it will be executed during the API consumption. The user can either create new custom functions or can use the default functions that are predefined in an application.
4.6.3.1. Swagger
- Upload a swagger/zip file.
- Click on a swagger service name on the service panel.
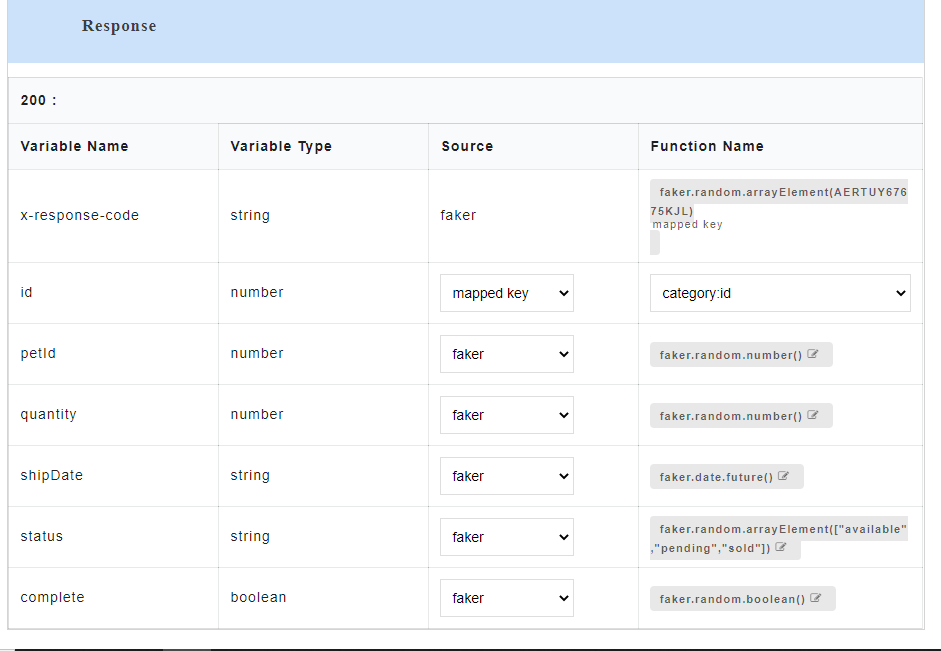
Fig. 4.106 Parsed Data Swagger
- To use custom method as source, for the required Variable Name, select custom method from the Source drop-down.
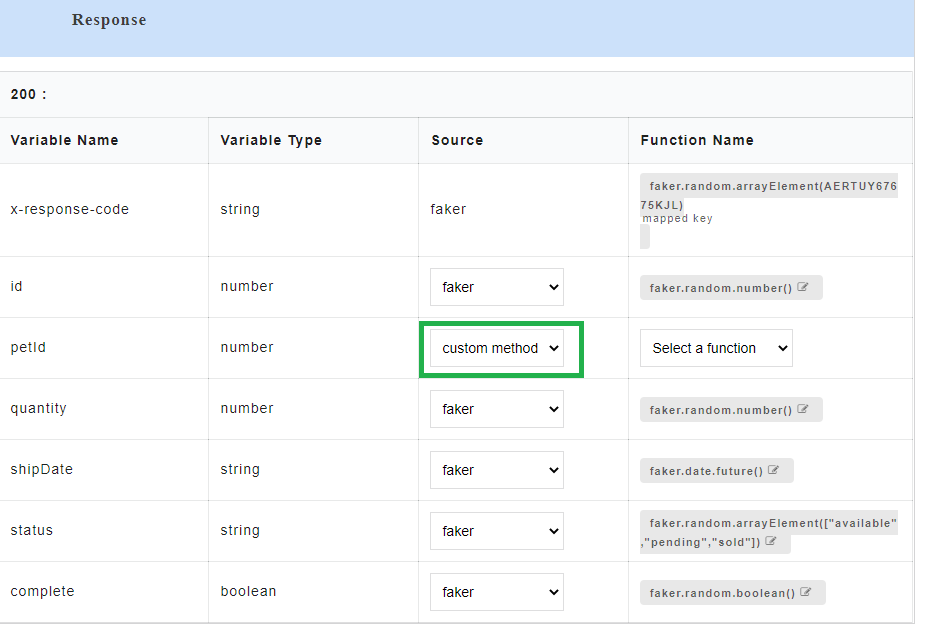
Fig. 4.107 Custom Method Source
- From Select a Function drop-down, select the required custom function. The default functions that are displayed in the custom function list are pre-defined in the application and those functions do not contain any arguments. From this drop-down, you can either select from a list of already created custom functions or select Create to create a new custom function.
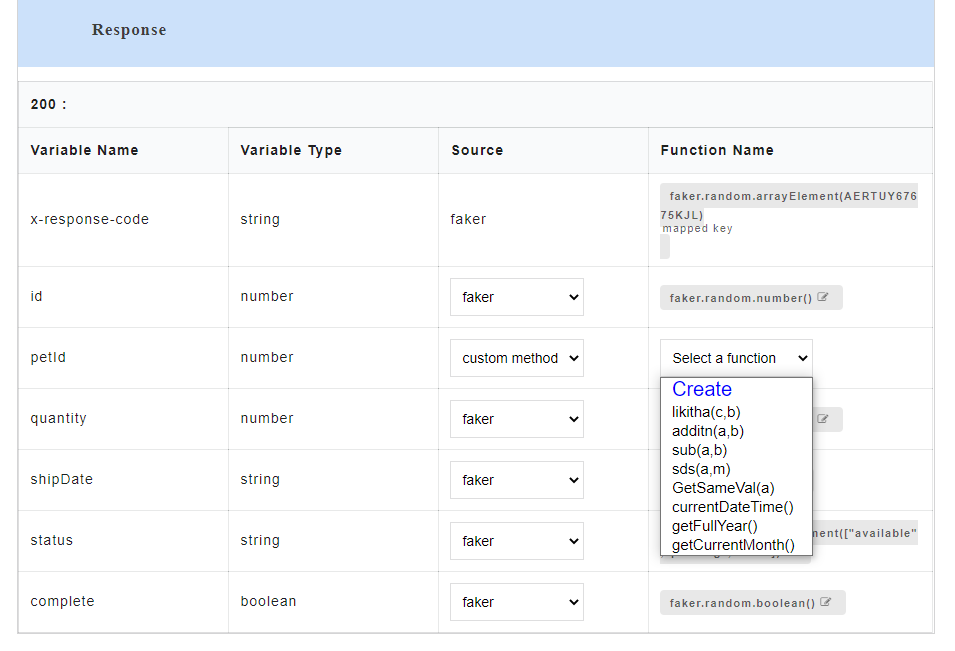
Fig. 4.108 Custom Function
- If you select Create, a Create new custom functions dialog box appears for you to create a new function. You can also access the Create new custom functions dialog box by clicking the Custom button at top-left corner of the AutoStub home page.
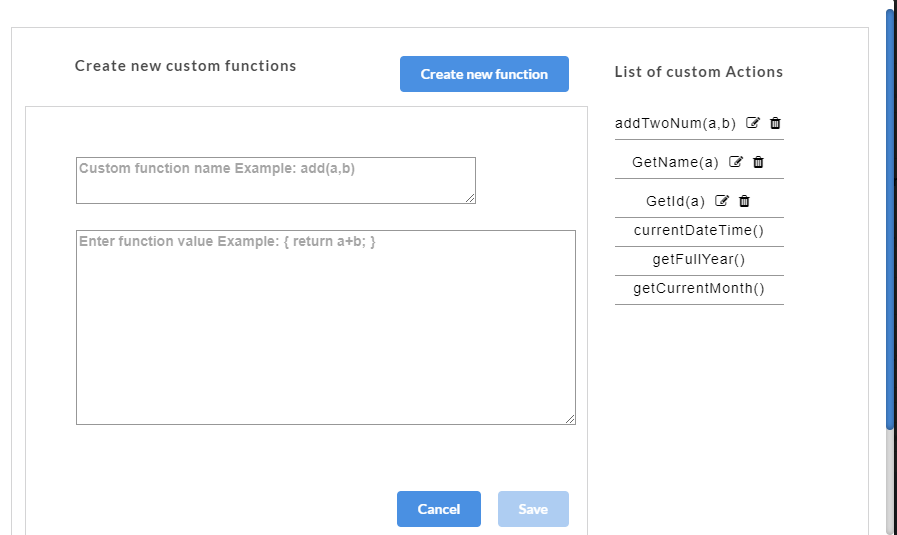
Fig. 4.109 Custom Function Dialog
- In the Create new custom functions dialog box, enter the name of the user defined custom function in the Custom function name box.
- Enter the value to be assigned to the custom function in the Enter function value box.
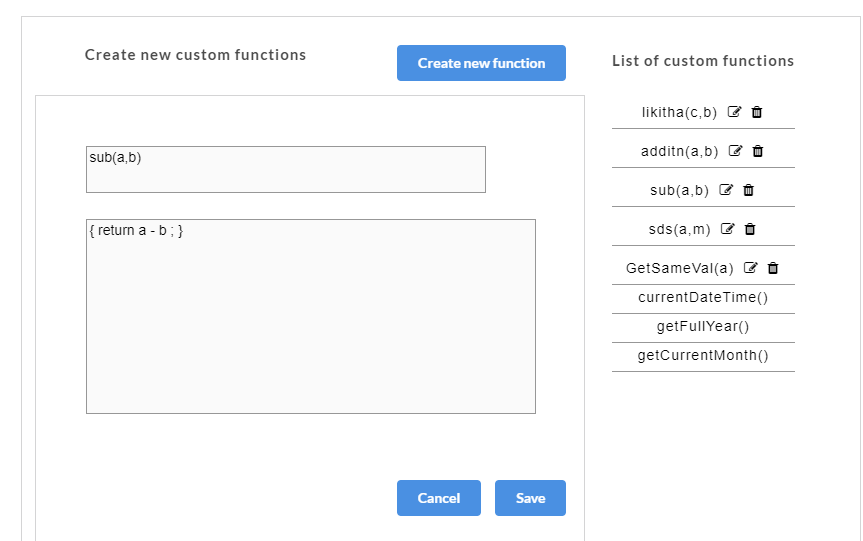
Fig. 4.110 Custom Function Value
- Click Save. A “Custom functions created successfully” message is displayed. Click OK to exit. The custom function will be saved and displayed under the List of Custom Actions.
Once the custom functions are created and values have been assigned to them, they need to be mapped to the request parameters. On the Custom Action page, corresponding to the newly created custom function, “Parameters are not mapped. Click on Map.” message is displayed.
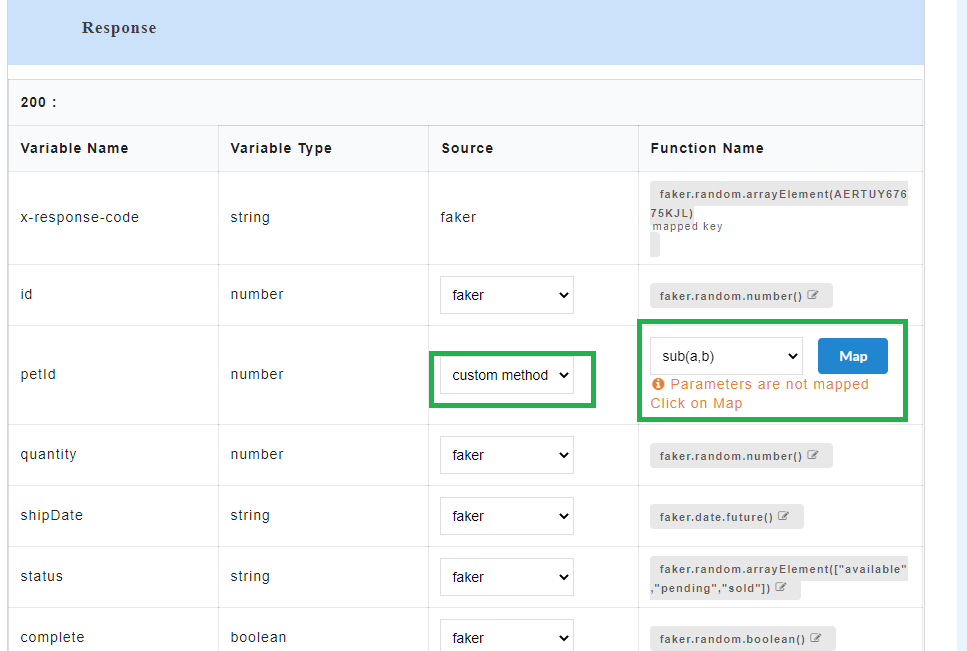
Fig. 4.111 Custom Function Mapping
- On the Custom Action page, for the newly created custom function, click Map to map the custom function arguments to the request parameters. A Map Parameters Custom Action modal opens.
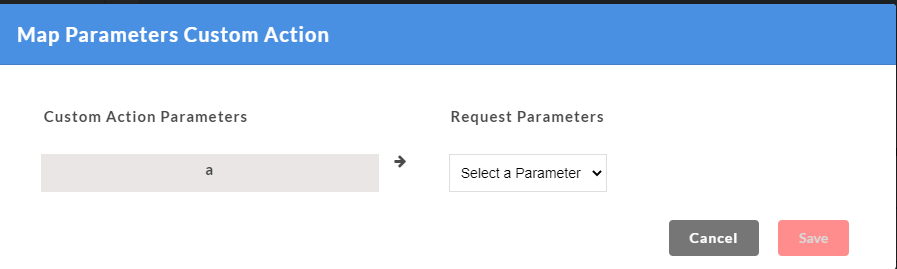
Fig. 4.112 Map Parameters Custom Action
- The Custom function arguments that are to be mapped are displayed on the left. From Select a Function drop-down, select the required parameter to be mapped for each of the custom function arguments from the drop-down. Only the mandatory request parameters that are present within a request can be mapped to custom function arguments.
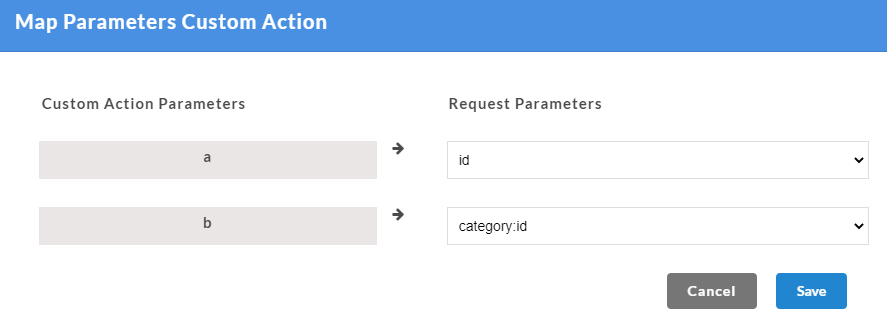
Fig. 4.113 Map Parameters Custom Action
- Click Save. A “Custom functions created successfully” message is displayed. Click OK to exit. On the Custom Action page, you can hover over the newly created custom function to view their mapped parameters. Parameters are mapped message will also be displayed under the custom function.
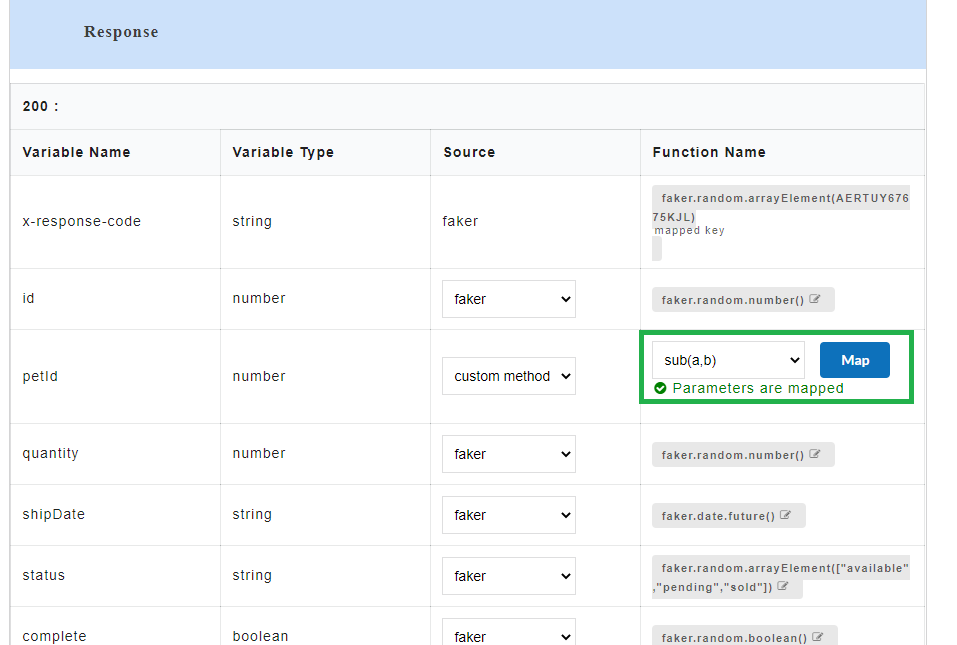
Fig. 4.114 Custom Function Mapped
- Generate the Swagger mock data for Swagger files. The custom function will be visible in the response body.
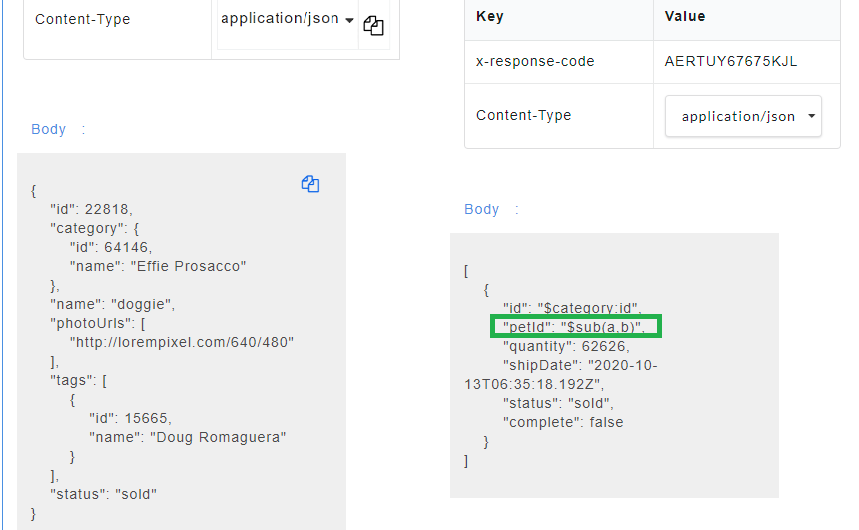
Fig. 4.115 Request Parameter Mapped
The endpoint URL can be used on a third party client to get the response. When the API is being consumed, the value of the custom function will be generated in the response.
Fig. 4.116 Request Parameter Mapped Swagger
For a Swagger File:
If the same parameter is present in the Swagger request and response, then by default, the response parameter will have the same value as the request parameter.
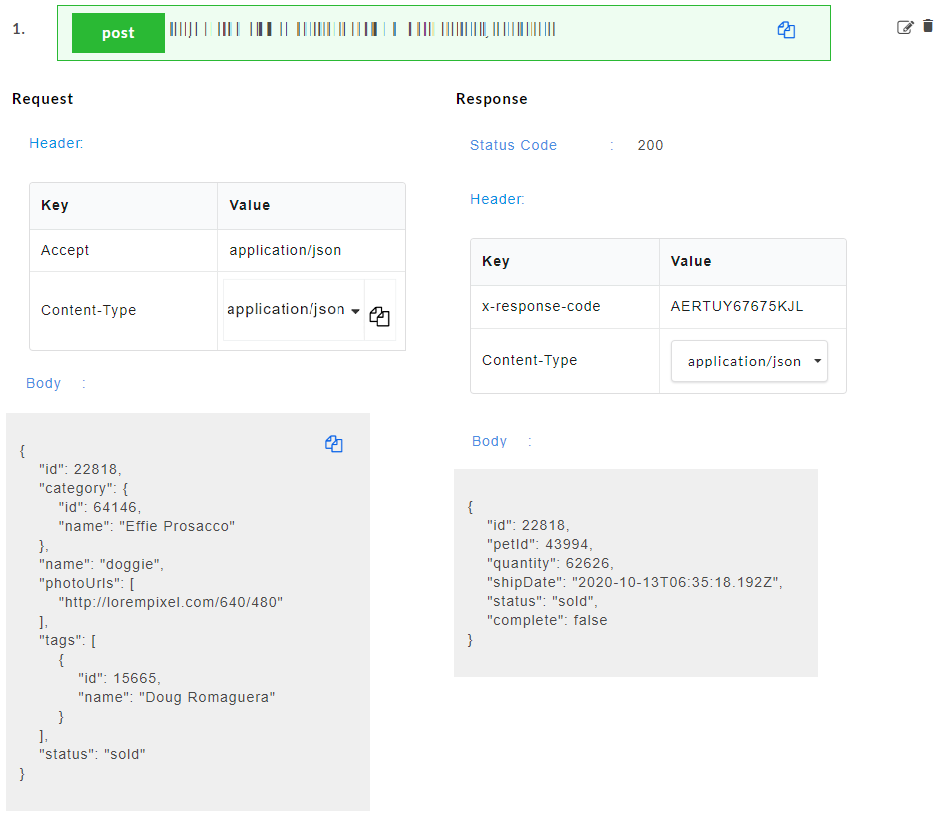
Fig. 4.117 Same Value in Response
If the same parameter is present in the Swagger request and response and if the user changes the function source (eg. from Faker to Mapped Key/Custom Method) and maps request parameters, then upon generating the mock data, the response parameter can have a dynamic value.
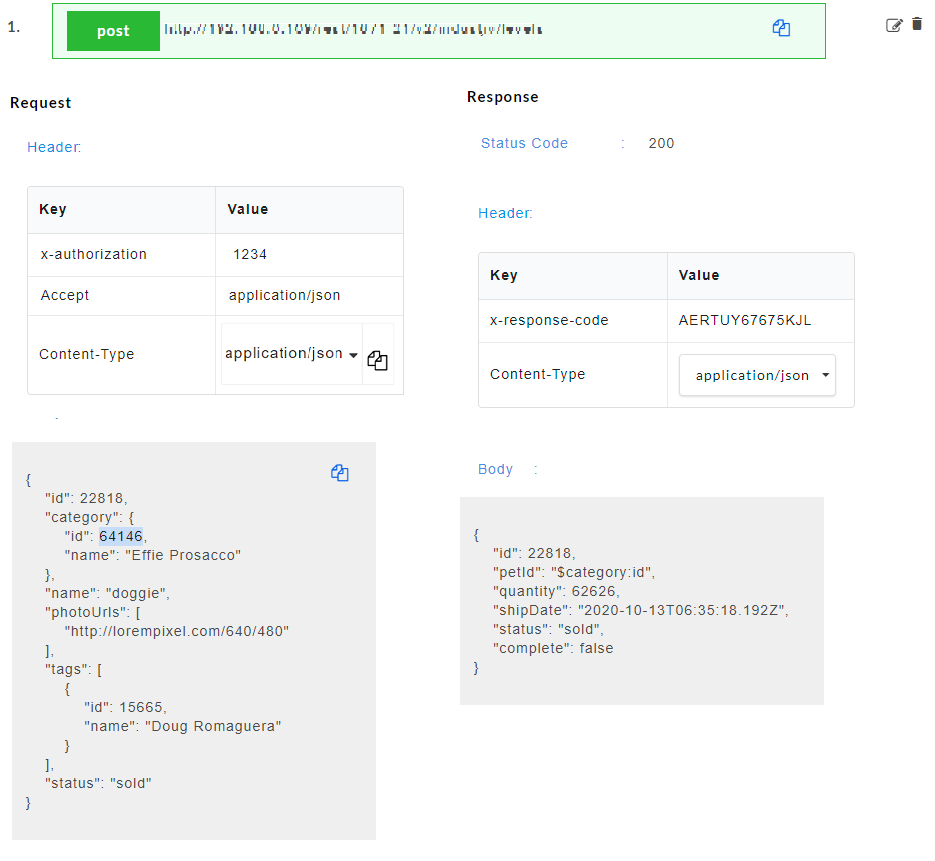
Fig. 4.118 Dynamic Value in Response
If the user changes the function source after mock data generation, then a message is displayed asking the user if they want to rewrite the existing mock data.
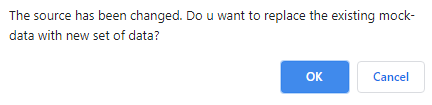
Fig. 4.119 Warning
If the user selects OK then mock data will be generated with the values from the changed function source. If the user selects Cancel then the existing mock data will not be re-written.
Note
This message will only be displayed if the user changes the function source after mock data has been generated. If the user changes the function source before mock data generation, no such message is displayed.
4.6.3.2. WSDL
- Upload a wsdl or zip file that contains .wsdl file and its dependencies.
- Click on a wsdl service name on left navigation panel to display the request and response parameters on the Config Data page.
Fig. 4.120 Parsed Data WSDL
- To use custom method as source, for the required Variable Name, select custom method from the Source drop-down.
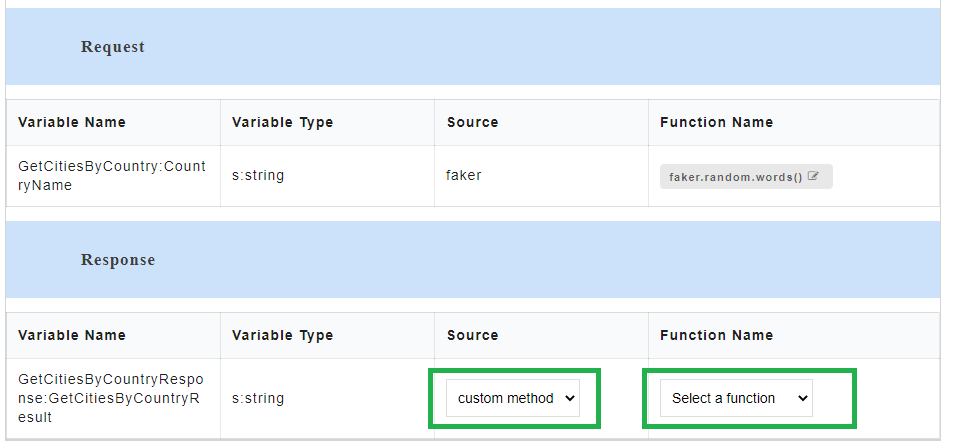
Fig. 4.121 Custom Method Source
- From Select a Function drop-down, select the required custom function. The default functions that are displayed in the custom function list are pre-defined in the application and those functions do not contain any arguments. From this drop-down, you can either select from a list of already created custom functions or select Create to create a new custom function.
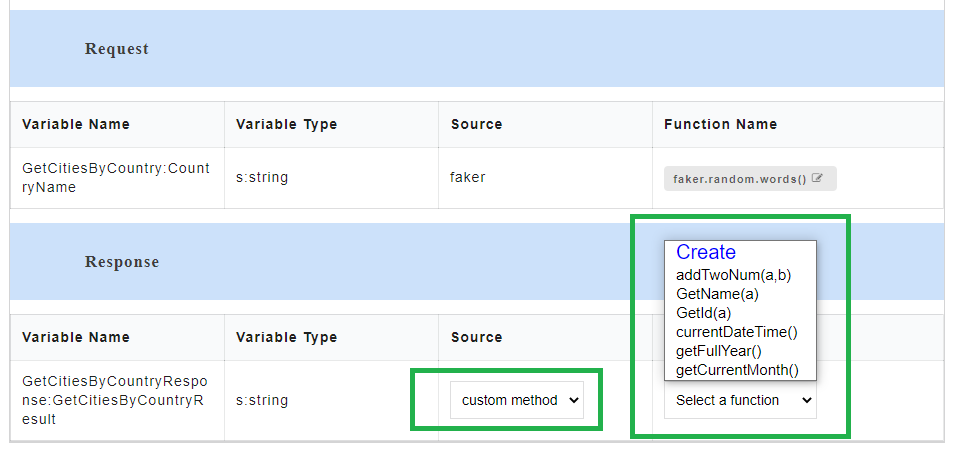
Fig. 4.122 Custom Function
- If you select Create a Create new custom functions dialog box appears for you to create a new function. You can also access the Create new custom functions dialog box by clicking the Custom button at top-left corner of the AutoStub home page.
Fig. 4.123 Custom Function Dialog
- In the Create new custom functions dialog box, enter the name of the user defined custom function in the Custom function name box.
- Enter the value to be assigned to the custom function in the Enter function value box.
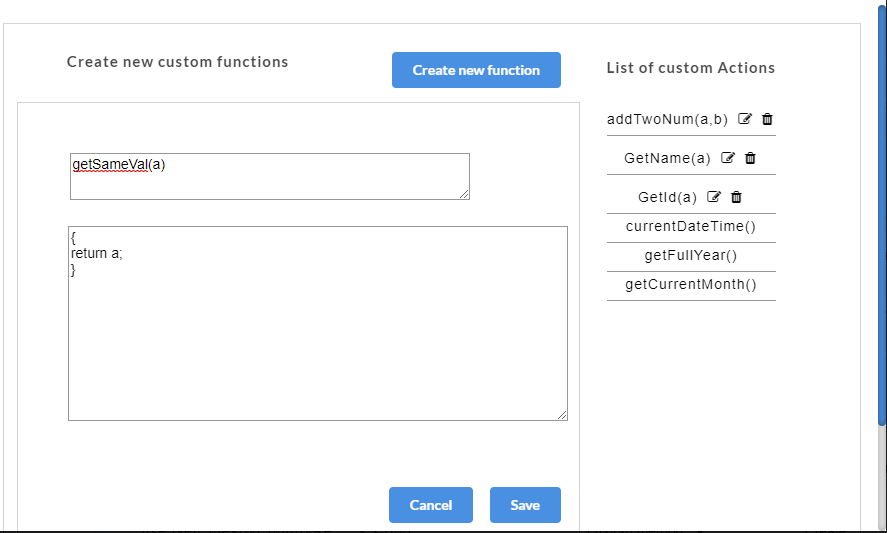
Fig. 4.124 Custom Function Value
- Click Save. A “Custom functions created successfully” message is displayed. Click OK to exit. The custom function will be saved and displayed under the List of Custom Actions.
Once the custom functions are created and values have been assigned to them, they need to be mapped to the request parameters. On the Custom Action page, corresponding to the newly created custom function, “Parameters are not mapped. Click on Map.” message is displayed.
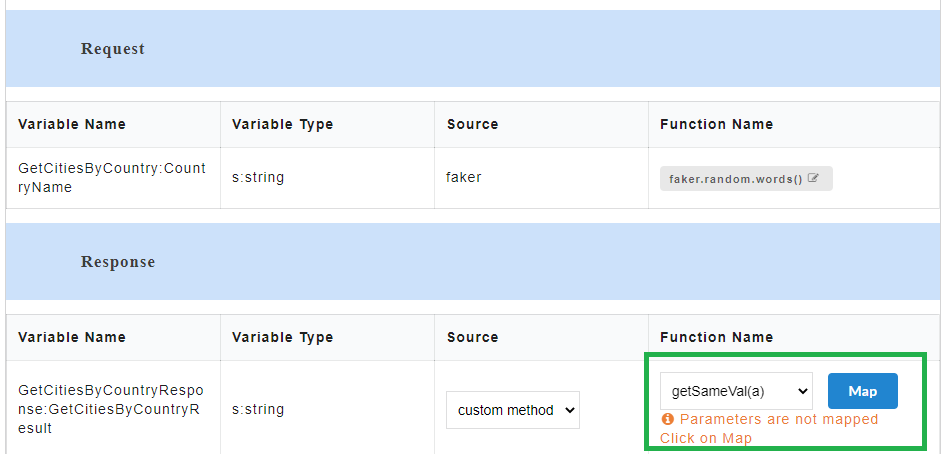
Fig. 4.125 Custom Function Mapping
- On the Custom Action page, for the newly created custom function, click Map to map the custom function arguments to the request parameters. A Map Parameters Custom Action modal opens.
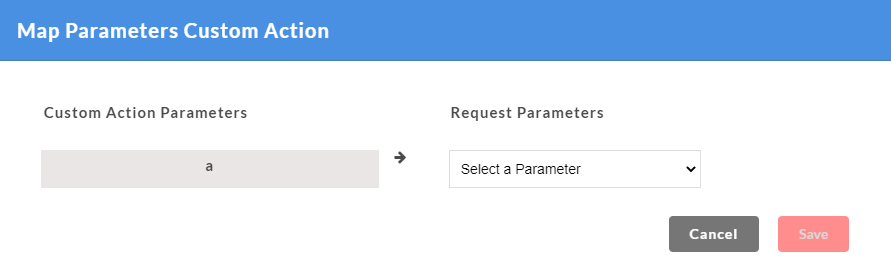
Fig. 4.126 Map Parameters Custom Action
- The Custom parameters that are to be mapped are displayed on the left. From Select a Parameter drop-down, select the required parameter to be mapped for each of the custom function arguments from the drop-down. Only the mandatory request parameters that are present within a request can be mapped to custom function arguments.
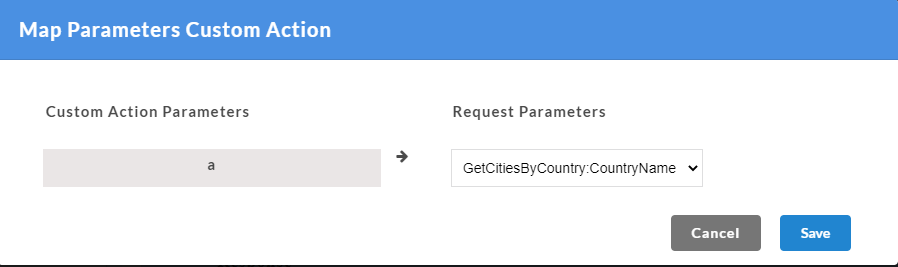
Fig. 4.127 Map Parameters Custom Action
- Click Save. A “Custom functions created successfully” message is displayed. Click OK to exit. On the Custom Action page, you can hover over the newly created custom function to view their mapped parameters. Parameters are mapped message will also be displayed under the custom function.
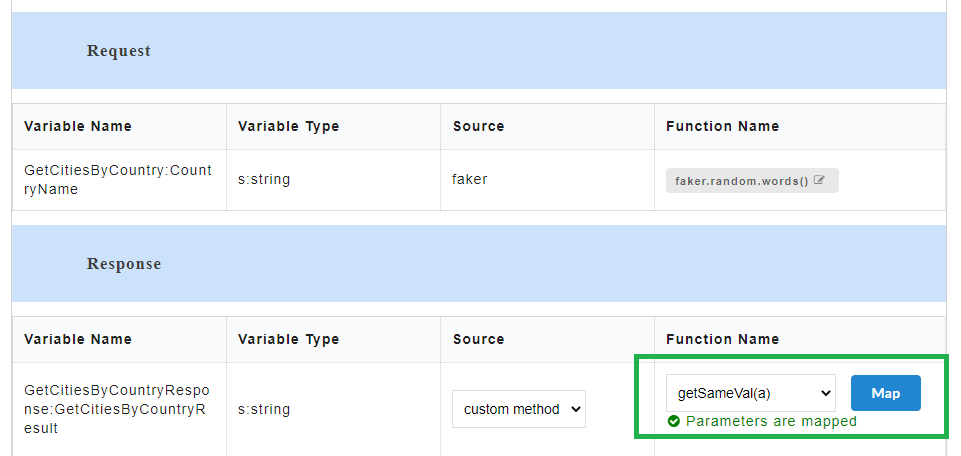
Fig. 4.128 Custom Function Mapped
- Generate the WSDL mock data for WSDL files. The custom function will be visible in the response body.
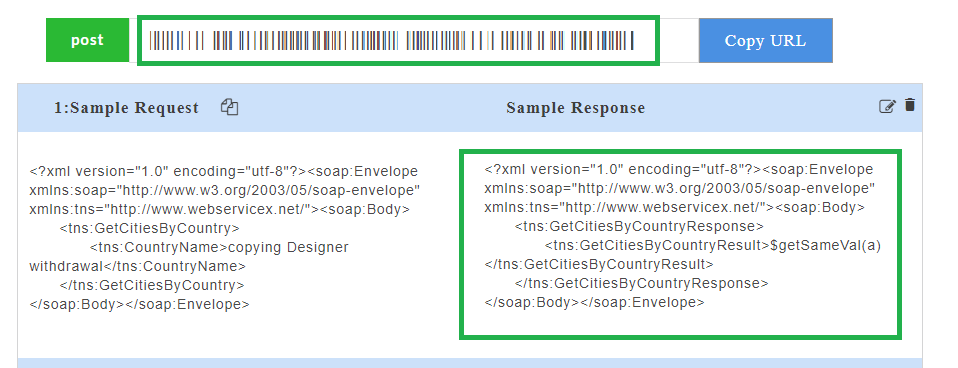
Fig. 4.129 Request Parameter Mapped
The endpoint URL can be used on a third party client to get the response. When the API is being consumed, the value of the custom function will be generated in the response.
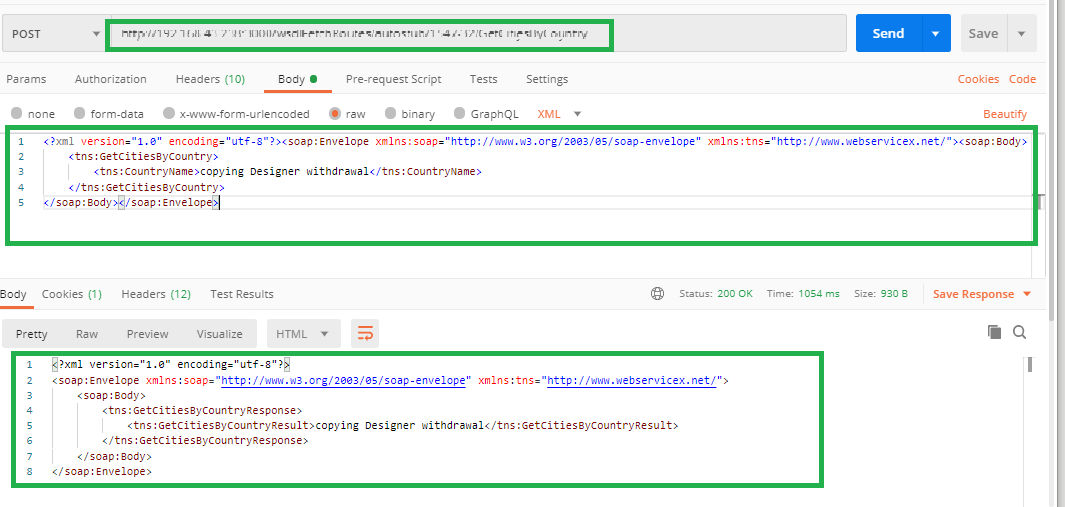
Fig. 4.130 Request Parameter Mapped WSDL
4.6.3.3. Editing/Deleting a Custom Function
You can edit or delete a custom function using the edit or delete icon in the Create new custom functions dialog box.
To open the Create new custom functions dialog box, select Create from the Select a Parameter drop-down. You can also access the Create new custom functions dialog box by clicking the Custom button at top-left corner of the AutoStub home page.
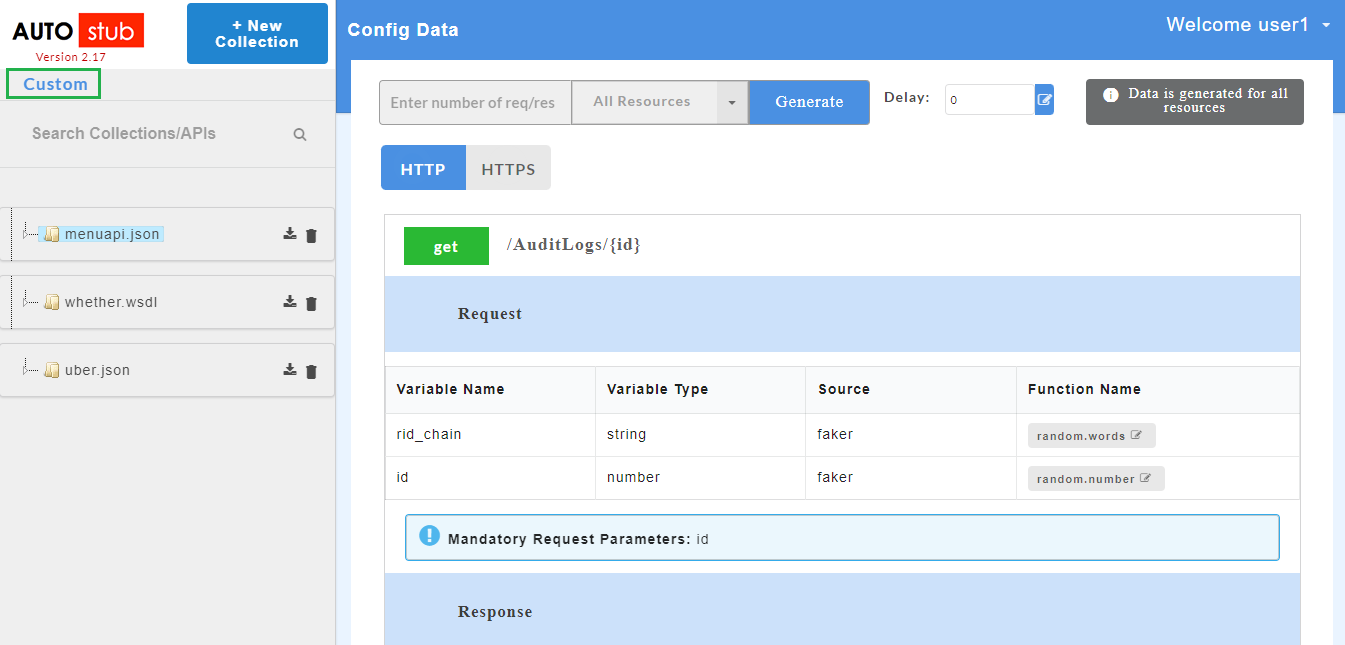
Fig. 4.131 Custom Button on Home Page
On the Create new custom functions dialog box, you can edit or delete a custom function using the edit or delete icon.
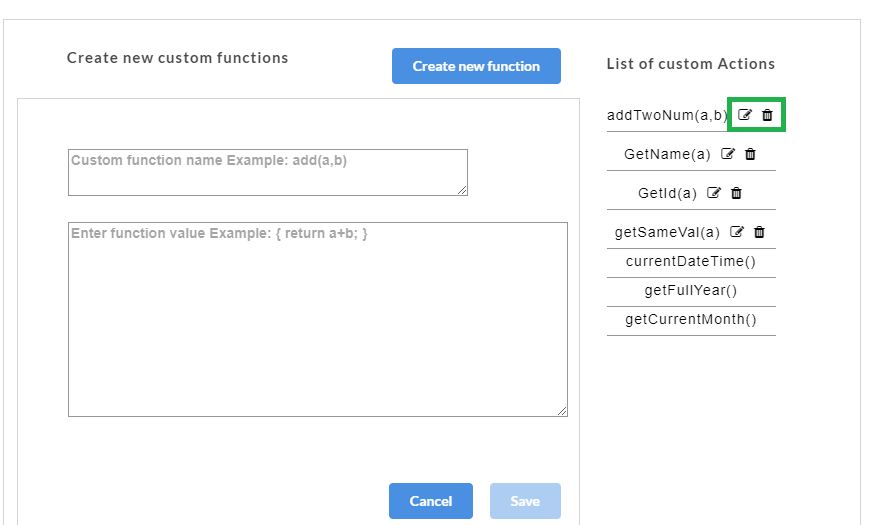
Fig. 4.132 Custom Function Edit/Delete
Editing a Custom Function
- To edit a custom function, click the edit icon corresponding to the custom function you want to edit. The custom function opens for editing.
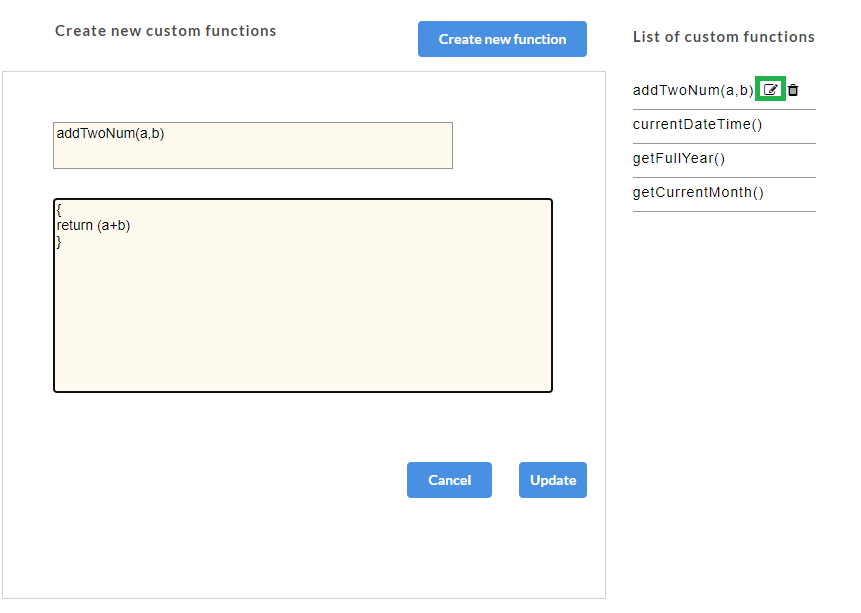
Fig. 4.133 Custom Function Edit
- If the custom function is assigned to a parameter, a warning message appears as shown below.
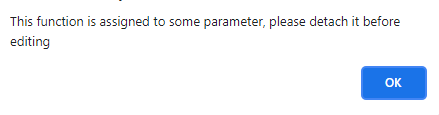
Fig. 4.134 Custom Function Edit
- Click OK to exit. You must remove the custom function from the parameter associated to it before deleting the function. Once the custom function is detached, click icon corresponding to the custom function.
- After making the required modifications, click Update to save the changes. Custom function will be updated successfully.
Note
You cannot edit the default functions.
Deleting a Custom Function
Custom functions that are not assigned to a parameter can be deleted. If a custom function is assigned to one or more parameters of a service, that function needs to be detached from those parameters in order to delete it.
- To delete a custom function, click the delete icon corresponding to the custom function you want to delete.

Fig. 4.135 Custom Function Edit
If the custom function is assigned to a parameter, a warning message appears as shown below.

Fig. 4.136 Custom Function Delete
- Click OK to exit. You must remove the custom function from the parameter associated to it before deleting the function. Once the custom function is detached, click icon corresponding to the custom function. A warning message appears as shown below.

Fig. 4.137 Custom Function Delete
- Click OK to delete the function or Cancel to exit.
Note
You cannot delete the default functions.
4.7. Consuming the APIs
4.7.1. Working with Strict Mode
For validation purposes, Strict Mode feature has been introduced. Strict mode validates each and every detail of the request. It throws an exception if the request is invalid.
4.7.1.1. Swagger
- Upload a swagger/zip file that contains .json file(s) and its dependencies.
- Generate the Swagger mock data.
- At the top of the Sample Data page, click the Strict mode toggle button to turn it to green and turn ON the strict mode. Inversely, click the Strict mode toggle button to turn it to red and turn OFF the strict mode.
Note
By default the strict mode will be switched ON. Upon disabling it, random responses will appear for the request.

Fig. 4.138 Swagger Strict Mode
To consume the API from a third party client in strict mode, follow the below steps:
- Click the copy icon
 to copy the request URL from the application.
 - Open a third party client.
- Paste the request URL at the required place in the third party client.
- Set the type of method (GET/PUT/POST/DELETE/PATCH).
- Set the key-value pairs for the HTTP headers.
- Click the copy icon to copy the request body from the application.
- Paste the request body at the required place in the third party client.
- Generate the response.
Note
To get a response via strict mode, it is mandatory to pass the request body in the third party client.
- Click the copy icon
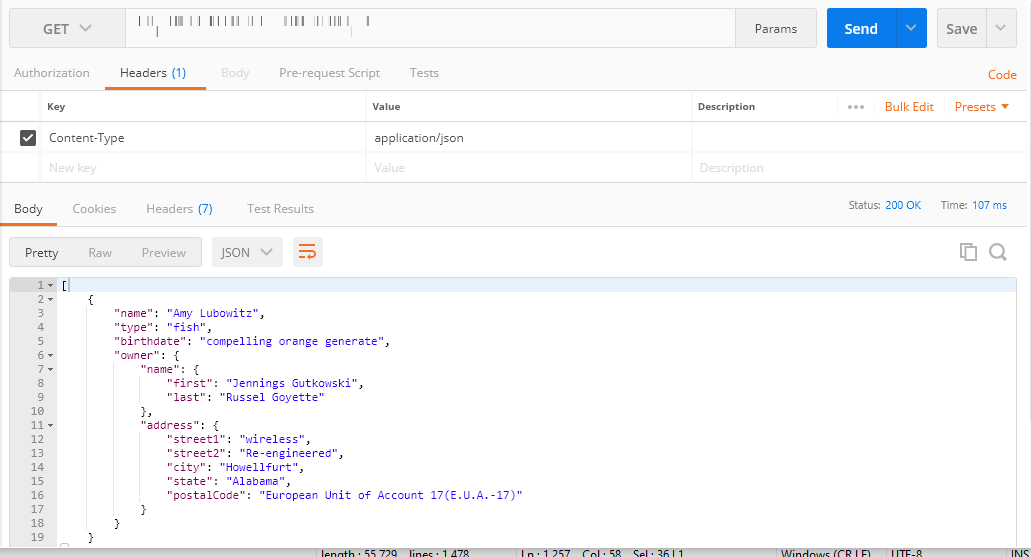
Fig. 4.139 Third Party Client Response for Swagger Example
Note
To get a swagger response, you must enter the “required” parameters in the request body even when strict mode is disabled. However, the value of the “required” parameter is not validated. ”Optional” parameters need not be entered when strict mode is disabled as they are not validated when strict mode is switched off.
4.7.1.2. WSDL
- Upload a wsdl/zip file that contains
.wsdl fileand its dependencies. - Generate the WSDL mock data.
- At the top of the Sample Data page, click the Strict mode toggle button to turn it to green and turn ON the strict mode. Inversely, click the Strict mode toggle button to turn it to red and turn OFF the strict mode.
Note
By default the strict mode will be switched ON. Upon disabling it, random responses will appear for the request.
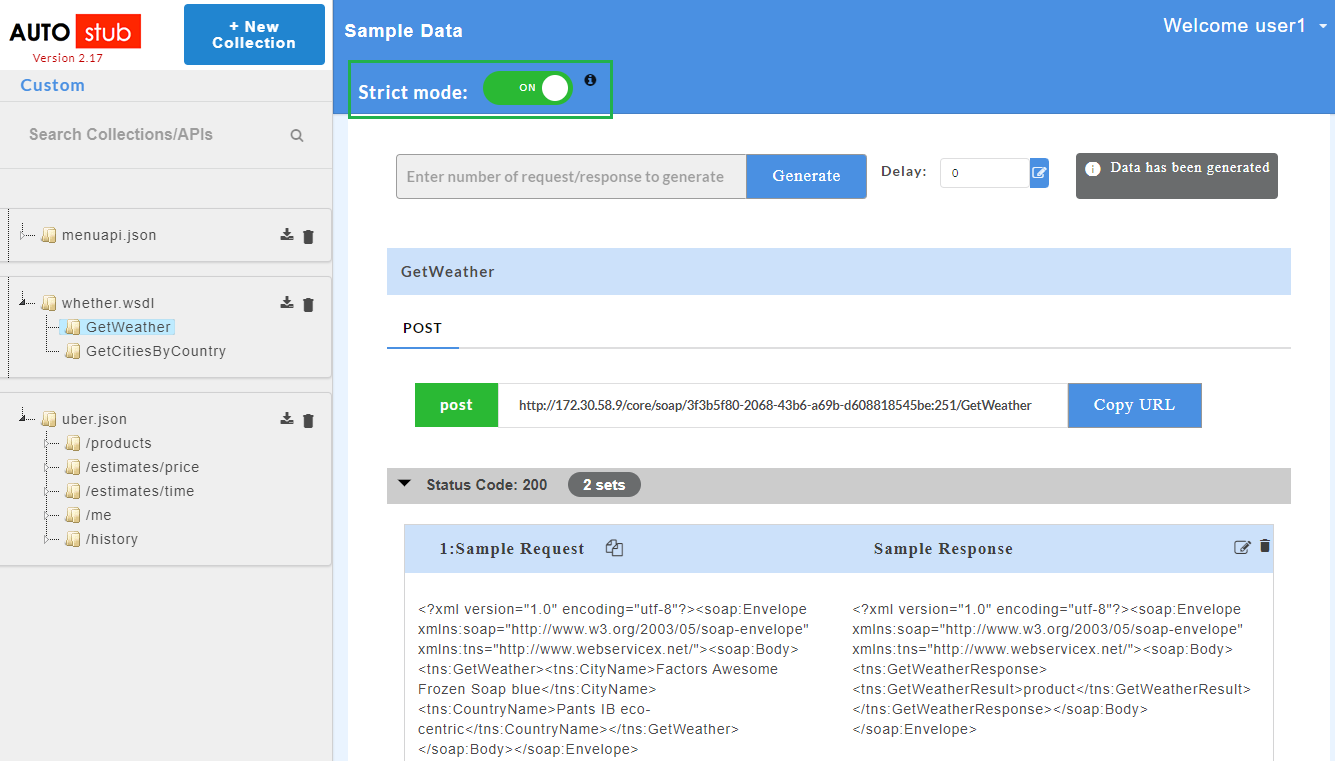
Fig. 4.140 WSDL Strict Mode
To consume the API from a third party client in strict mode, follow the below steps:
- Click the copy icon to copy the request URL from the application.
- Open a third party client.
- Paste the request URL at the required place in the third party client.
- Set the type of method (GET/PUT/POST/DELETE/PATCH).
- Set the key-value pairs for the HTTP headers.
- Click the copy icon to copy the request body from the application.
- Paste the request body at the required place in the third party client.
- Generate the response.
Note
To get a response via strict mode, it is mandatory to pass the request body in the third party client.
- Click the copy icon
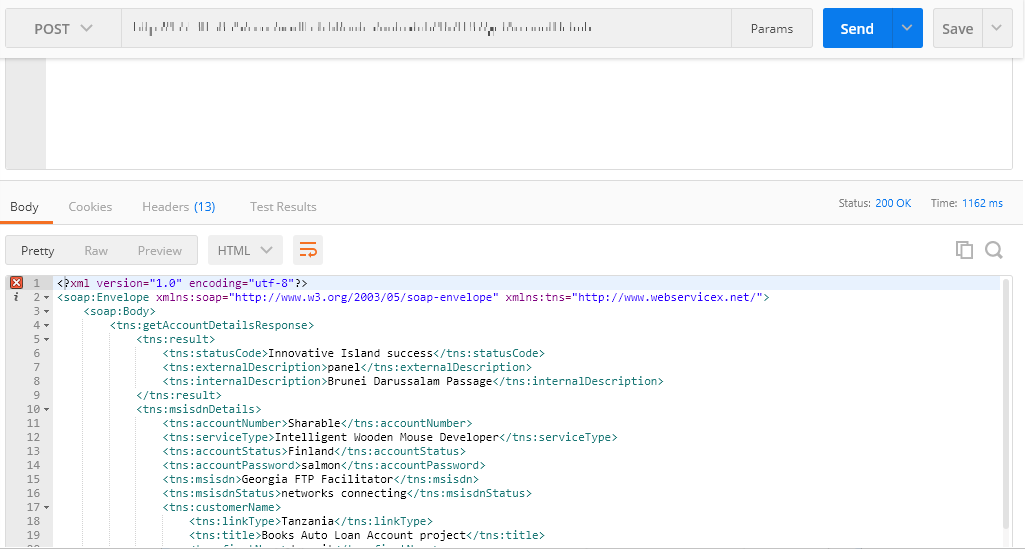
Fig. 4.141 Third Party Client Response for WSDL Example
Note
For WSDL files, request body parameter values are not validated if strict mode is switched off.
4.7.2. Viewing Transaction Logs for an API
Transaction logs is a record of all the transaction parameters encountered while consuming an API, such as url, methods, request, response data etc. The transaction data will be available in the user’s system’s home directory. The transaction logs will be stored in separate files based on the log level configuration. For example, application logs and transaction logs will be stored in separate files.
- Upload a swagger/zip file or wsdl/zip file.
- Click on a service.
- Generate the Swagger / WSDL mock data. After mock data is generated, the transaction logs will be available. The transaction log which is stored in the file in user’s home directory will give the transaction information in detail.
Example of a transaction log is given below.
2020-07-28T13:22:21.671 : [TRANSACTIONDATA] : 039a2df0-3b88-49b5-890a-3be5ebae512a : 1668:testSwag/handlers/1668-229/postWith.json/industry/levels.js:postWith.json:/industry/levels:{"method":"post","statusCode":"200","resourceData":{"url":"http://192.168.43.249:3001/1668-229/v2/industry/levels","requestBody":{"Member":{"id":"53700","category":{"id":"34698","name":"River Renner"},"name":"doggie","photoUrls":"http://lorempixel.com/640/480","tags":{"id":"6205","name":"August Wolff"},"status":"delivered"}},"responseHeaders":{"x-response-code":"AERTUY67675KJL"},"responseBody":{"Pet":{"x-response-code":"AERTUY67675KJL","id":"53700","petId":"43994","quantity":"62626","shipDate":"2020-10-13T06:35:18.192Z","status":"delivered","complete":"false"}}}}
The following details can be retrieved from the above transaction log:
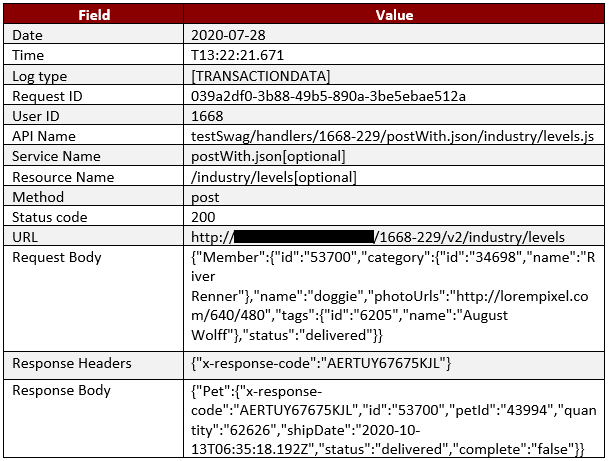
Fig. 4.142 Transaction Logs
4.7.3. Viewing Headers
There are two types of headers supported by the AutoStub application for Swagger specification for both Swagger and WSDL files.
- Custom Headers
- HTTP Headers
4.7.3.1. Custom Headers
Custom Header support is provided in AutoStub to consume the APIs based on Swagger 2.0/3.0 specifications. Custom Headers are used for providing additional information about an API (ex: security). Users can include header parameters in the request which will be passed to the server to get the appropriate response. The data will be generated for header parameters and displayed in the response body. If the user does not pass a custom header along with the request body, they will not be able to consume the API, that is, the response body is not sent.
4.7.3.1.1. Swagger
- Upload a swagger/zip file.
- Click on a swagger service. Parsed data that contain the header parameters is displayed.
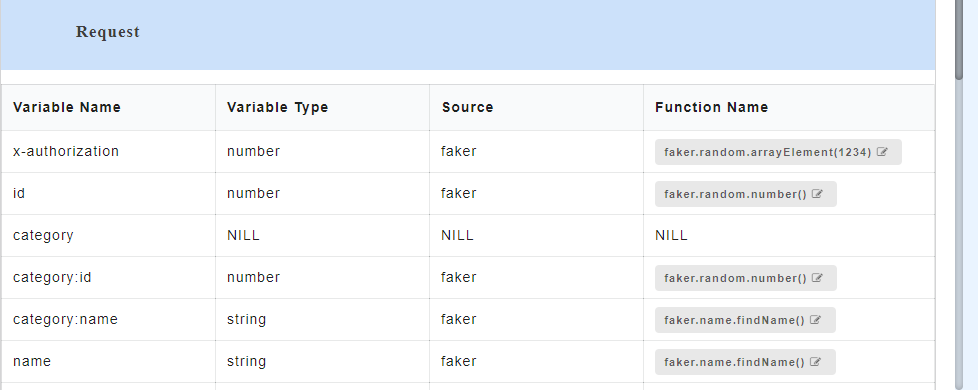
Fig. 4.143 Parsed data with Header Parameters for Swagger
- Generate the Swagger mock data.
- On the service panel, click a swagger service name and then click the type of method for which you want to view the sample request and response. The mock data with custom headers are displayed for a particular API.
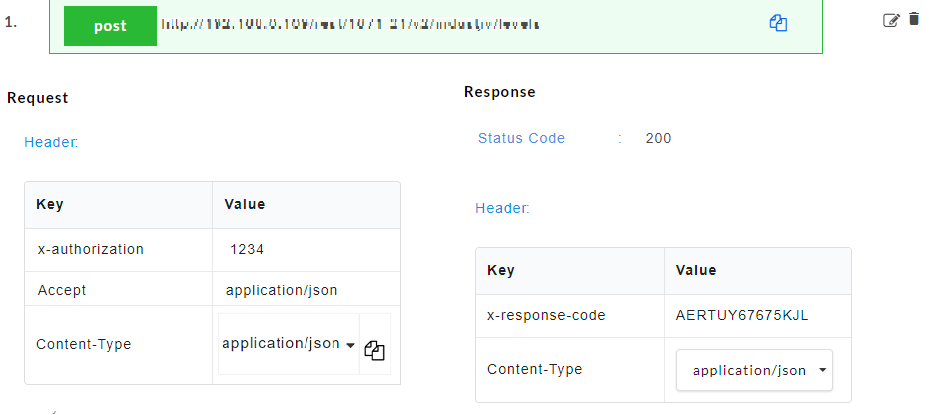
Fig. 4.144 Custom Headers for Swagger
4.7.3.1.2. WSDL
- Upload a wsdl/zip file.
- Click on a wsdl service. Parsed data for wsdl is displayed.
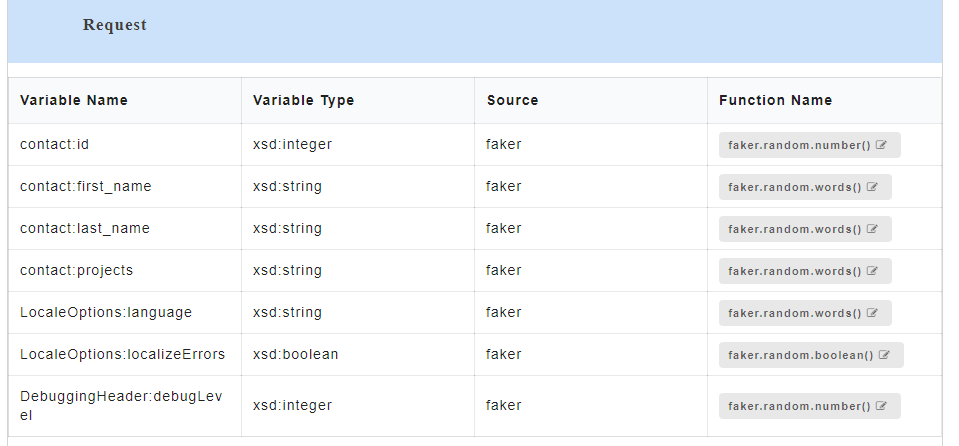
Fig. 4.145 Parsed data for WSDL
- Generate the WSDL mock data.
- On the service panel, click a wsdl service name and then click the resource for which you want to view the sample request and response. The mock data with custom headers are displayed for a particular API.
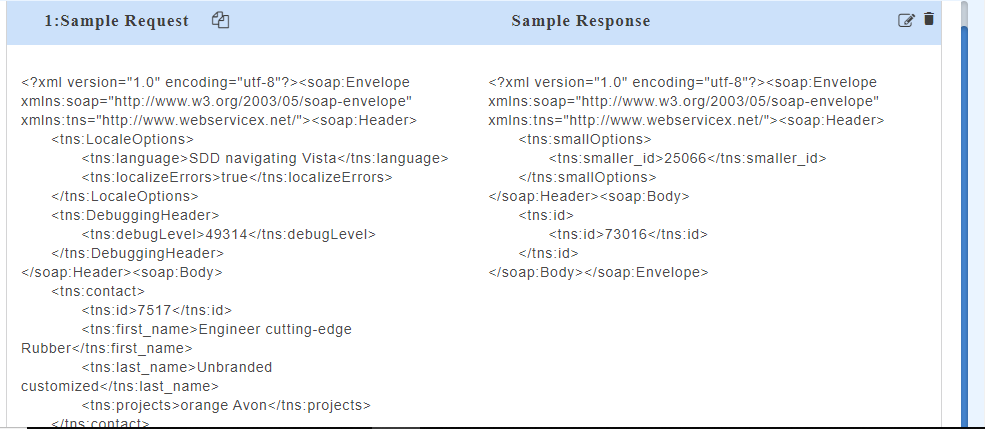
Fig. 4.146 Custom Headers for WSDL
4.7.3.2. HTTP Headers
A swagger file with 2.0/3.0 specifications has two parameters called Consumes and Produces. Consumes specifies the request body content type ( application/json for JSON and application/xml for XML) while Produces specifies the response body content type ( application/json for JSON and application/xml for XML) that is configured for a particular API. Based on the Content-Type data will be displayed in the UI. If in the initial position Content-Type is JSON then JSON will be displayed in UI. If in the initial position Content-Type is XML then XML will be displayed in UI.
HTTP Headers are of two types: Content-Type and Accept.
Accept Headers lets the server know what content types (JSON/XML/Text) will be accepted in the response. Content Type headers lets the server know what content types (JSON/XML/Text) will be returned in the response.
While consuming the API in a third party client, if the Accept Header in the request header is specified as application/json, Content Type is specified as application/json and a JSON request body is passed, then we will get the response in JSON format. If the Accept Header in the request header is specified as application/xml, Content Type is specified as application/xml and an XML request body is passed, then we will get the response in XML format. Content Type for Text format can either be text/plain or text/html. If the Accept Header in the request header is specified as text/plain, Content Type is specified as text/plain and a plain text request body is passed, then we will get the response in plain text format.
Note
HTTP headers are currently not implemented for WSDL.
4.7.3.2.1. Swagger
- Upload a swagger/zip file.
- Click on a swagger service. Parsed data that contains the header parameters is displayed.
Fig. 4.147 Parsed data with header parameters for Swagger
- Generate the Swagger mock data.
- On the left navigation panel, click a swagger service name and then click the type of method for which you want to view the sample request and response. The Accept Header and Content Type Header parameters are displayed for a particular API.
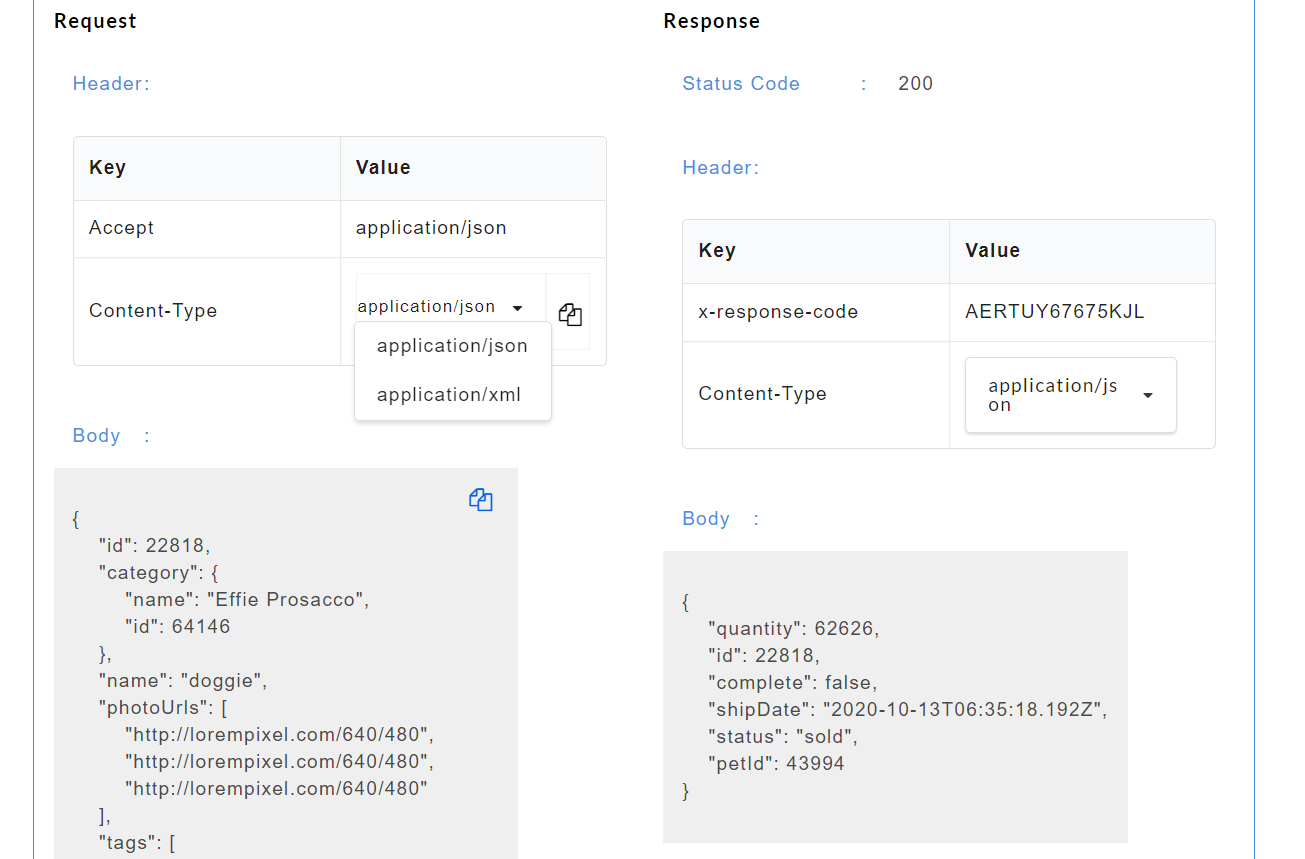
Fig. 4.148 Header Parameters for Swagger (JSON/XML)
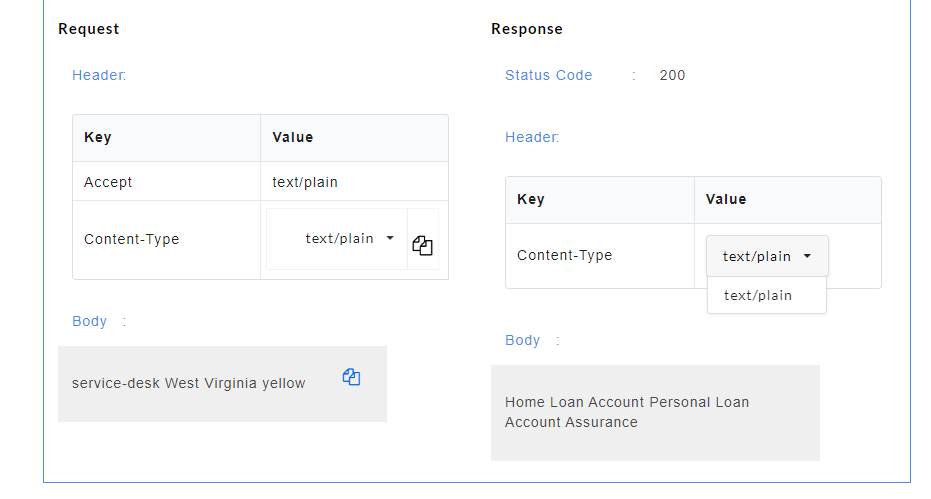
Fig. 4.149 Header Parameters for Swagger (Text)
- Click the copy icon
 to copy the Content-Type in the request header.